Power from attic through soffit onto brick column

tomachete

n3wb
Joined
Nov 11, 2019
Messages
7
Reaction score
3
Location
South Carolina
Hello all. I'm new here and I have scoured the forums trying to find a pic for reference. I am wanting to run power to a surface mount junction box on a brick column that will come from the attic and run through soffit. It's NM cable and will be exposed once it leaves the soffit for maybe 2 inches or so which I understand is not correct. My question is what is the best or right way to do this? I really appreciate any advice. I have run power to junction boxes in the past, but never to a surface mount box where cable would be exposed. My humble thanks to all and anyone.
 

Attachments

DavidR1

Getting the hang of it
Joined
Aug 14, 2019
Messages
75
Reaction score
63
Location
US
When it comes to electrical, it's all about the "AHJ", or Authority Having Jurisdiction. Do you know what code applies in your area? It's best to get the answer right from the source so you don't have to redo anything if the inspector doesn't like what you've done.

I've seen electrical boxes installed in the soffit for snow melt before (recommended GFCI), but it's not likely that's common in SC. Could you make that work or does it absolutely need to be on the brick column?

Typically, whenever wiring needs to be protected, it's run in conduit, and if memory serves, there's much debate about NM in conduit, particularly in "damp locations" like under the eaves. Jumping through hoops transitioning from NM to THWN, messing with J-boxes, LBs, and conduit for two inches doesn't seem worth it if you can live with the outlet in the soffit and that's allowed where you are.
 

tomachete

n3wb
Joined
Nov 11, 2019
Messages
7
Reaction score
3
Location
South Carolina
When it comes to electrical, it's all about the "AHJ", or Authority Having Jurisdiction. Do you know what code applies in your area? It's best to get the answer right from the source so you don't have to redo anything if the inspector doesn't like what you've done.

I've seen electrical boxes installed in the soffit for snow melt before (recommended GFCI), but it's not likely that's common in SC. Could you make that work or does it absolutely need to be on the brick column?

Typically, whenever wiring needs to be protected, it's run in conduit, and if memory serves, there's much debate about NM in conduit, particularly in "damp locations" like under the eaves. Jumping through hoops transitioning from NM to THWN, messing with J-boxes, LBs, and conduit for two inches doesn't seem worth it if you can live with the outlet in the soffit and that's allowed where you are.
Thank you for that response. I prefer to install on the brick as it would allow for a vertical installation as opposed to under the soffit.
 

DavidR1

Getting the hang of it
Joined
Aug 14, 2019
Messages
75
Reaction score
63
Location
US
My opinion is that the right way to accomplish your goal is to take your existing run of NM through the attic into an accessible junction box there where you transition to THWN which then runs in conduit through the soffit into your surface mounted junction box.

Again though, the real question is what your inspector (if electrical work must be inspected in your area) requires. I've had inspectors barely glance at the things they signed off on, and others nit-pick minor things where "generally accepted practice" didn't match "how they'd always required it."

At the end of the day, it's worth remembering that myself and anyone else here is "just some person on the internet" and our opinion is worth the price paid to obtain it. :) Full disclosure; I'm not a licensed electrician, nor a lawyer, nor an insurance adjuster. If you want to be 100% sure you've done it right, you need to ask your AHJ what they require.
 

TonyR

IPCT Contributor
Joined
Jul 15, 2014
Messages
16,715
Reaction score
38,909
Location
Alabama
Could I get away with something like this? And if so of course that leads back to nm and running it "in a wet location".
I was envisioning sealtight flex conduit and fittings even before your last picture....looks good to me mechanically and as brought up by @DavidR1, I would make the transition from NM to THW or THWN in a box in a dry, accessible location...a new box, if necessary.
 

tomachete

n3wb
Joined
Nov 11, 2019
Messages
7
Reaction score
3
Location
South Carolina
Thanks so much to you both for giving me a sense of direction. I will do the junction box to flex conduit (nm to thwn). I hope it ends up looking good lol. I'm thinking to mount the box in the attic so it won't be seen. One big concern is how much space I will have trying to get to that part of the ceiling safely. I know the box must be accessible per code so there's that too. I've attached a pic of that section of the roof. Any tips, ideas, or thoughts for navigating it or even what makes the most sense in terms of where to put the box etc would be greatly appreciated! I built a catwalk to get me this far down (the install location is over a connected carport) but I've never ventured far from the center (where the pic was taken from). Many, many thanks again!
 

Attachments

DavidR1

Getting the hang of it
Joined
Aug 14, 2019
Messages
75
Reaction score
63
Location
US
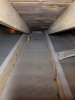
I wish more of the spaces I’ve worked in looked like that. :D Nice to have a reference point (where the light leaks in) to get oriented right away and no insulation or junk in the way of where you expect stuff to go.

Mounting the box for the transition in the attic where it won’t be seen is ideal, yes. That way it’s still accessible as required, it keeps your NM indoors, and is not an eyesore.

If I’m going to be working in an attic space with no decking for any length of time, I tend to toss in a few strips of plywood, sized just small enough to fit through the attic opening. It makes things safer and a little more comfortable. Sounds like you’ve more or less already done that to make your catwalk. You can decide if you want to secure something up there for future use (you know, for next time you’re up there to install ”just one more camera”), or just do something temporary to make life easy while you install the box and conduit.

Inside the attic, you can locate the box where it’s convenient to work in/on - there’s nothing that says it needs to go right out near the eaves for the transition. If you place it away from the eaves, more towards the center where you’ve already ventured, you’ll have more headroom (watch those roofing nails) while making your connections and such. Of course, the further from the eaves you go, the more conduit and wire you’ll need but the cost won’t change much for such small distances.

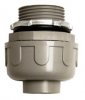
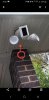
You should be able to drill a small pilot hole from outside, right where the conduit will naturally want to sit when attached to the exterior surface mount box (like the picture you shared previously). Then use that small hole to feed a fish stick or coat hanger up and check precisely where it’s going to wind up in the interior space. You can wrap some brightly colored tape on whatever you use to make it easier to spot in the attic. Hopefully it winds up exactly where you expect it but if not, it’s best to find out with a small hole that’ll blend in with the ventilated soffit.

If it looks good on the inside (i.e., you’re not going to drill out part of a joist or rafter tail with your larger bit sized to fit your conduit or some other show-stopping-problem), then you can drill the hole to the final size you need. After that, it’s just a matter of feeding the conduit in through the hole from outside (to avoid having to work laying down in the narrow space in the attic where the roof meets the wall). It should be fairly easy to guide it where you want it to go with flex.
 

DavidR1

Getting the hang of it
Joined
Aug 14, 2019
Messages
75
Reaction score
63
Location
US
Yes, you could use that. I think the minimum bend radius is between 3-4" on that stuff.

Note that the fittings for liquid tight connections are fairly large - you can mock up what you're trying to do in the store to get an idea of how it'll all go together and what it'll look like when finished.
 

DavidR1

Getting the hang of it
Joined
Aug 14, 2019
Messages
75
Reaction score
63
Location
US
I neglected to respond to the part about the box for the transition, sorry. Since you're planning on putting the transition in the protected space inside the attic and are only making a simple connection inside (i.e., there are no switches, outlets, hanging ceiling fans and such to consider) you don't need anything special. The big thing since you don't need it waterproof inside the attic is just box volume/fill.

I don't know the specifics of where your feed is coming from, but if it's a pre-existing run, you could potentially run your conduit right to that location and change out what's there to an appropriately sized box for the purpose. It goes without saying that you should make sure the circuit you're adding to won't be overloaded by what you add to it.

Before you start touching any wiring, check and double-check that the circuit where you're doing the work is actually the one that's off before doing anything - non-contact voltage detectors are cheap. In my opinion, it's a good idea at a minimum to put some sort of sign on the panel while you work, particularly since you'll be completely out of sight, and let anyone at home or with access know what you're doing before you start. There are even inexpensive lockout devices you can put on the breaker while you work.

Sorry if much of this sounds like a nagging internet safety-nanny. Everyone's experience level is different and who knows who'll come along and read any given post. The safety-related comments, many of which are just common sense, are my compromise when commenting online vs simply saying, "hire an electrician!" or not saying anything at all. ;)
 

tomachete

n3wb
Joined
Nov 11, 2019
Messages
7
Reaction score
3
Location
South Carolina
Thank you again for all the sound advice and recommendations. Been slammed at work so I haven't had time to do much of anything lol. But I will post pics when I get it done (or before if I run into problems). I feel alot better going into this now.
 
Top