Front door cam, fishing and mounting, vinyl siding

Dave88LX

Getting the hang of it
Joined
Jul 13, 2016
Messages
141
Reaction score
63
Location
York, PA
Before I start making holes, I want to make sure my plan is solid.

This cam is going to be posted to the left of the front door, between the door casing and the shutter. The Cat6 cable will be running down into the basement. I will need a hole drilled through the 2x6 sill plate and into the basement to get to my NVR.

I've posted a picture of the basement where the cable will be coming through. I *think* I should just be able to drill straight up through the flooring a couple inches away from the end joist there, and that should bring me up through the sill plate and into the wall cavity. Then fish from the hole in the siding to the hole in the floor.

Does anyone see any faults with this plan?

20180825_144246.jpg


20180825_144228.jpg


DSCN1765.JPG


20180825_144926.jpg
 
Last edited:

Dave88LX

Getting the hang of it
Joined
Jul 13, 2016
Messages
141
Reaction score
63
Location
York, PA
My thought is to mount this mounting plate to the vinyl siding, attaching it to the sheathing using the 3 red locations, which are opposite the locations the PFA137 box will mount (6, 2, 10 o'clock locations). I was thinking of using counter-sunk screws so they would sit flush.

Agree? Better suggestions?

20180825_151614.jpg
 

tangent

IPCT Contributor
Joined
May 12, 2016
Messages
4,421
Reaction score
3,655
My $0.02, start with an easier location. This isn't that hard of a location, but you'll learn things as you go and the front door may not be the best place to make mistakes.
 

Dave88LX

Getting the hang of it
Joined
Jul 13, 2016
Messages
141
Reaction score
63
Location
York, PA
This is probably the easiest. The rest require me running the other POE switch to the garage and then branching out of that.
 

guykuo

Getting comfortable
Joined
Jul 7, 2018
Messages
577
Reaction score
1,432
Location
Sammamish, WA
You could do as you plan, but I usually open a single gang sized hole and drill downward rather than blindly from below into insulation. The hole gets closed with a low voltage box & blank plate when done. That let's me guide the wire, drilling, and whatever "fish" device cleanly to the outer side of insulation. My goal is to not disturb the insulation. A blank plate on the wall is fairly discrete. Also, the slit you put into the vapor barrier to do the work is easily sealed with red sheathing tape.

Were it an uninsulated, interior wall, drilling and fishing from below is totally reasonable (provided you know there isn't anything else in that wall).

As for the mounting plate, I think your screw locations are ok, but I'd go with four screws and be certain they are long enough to anchor into the wall OSB layer (beyond the siding). The top, sides and most of the bottom edges of the plate should be caulked prior to final attachment. You can use either duct seal or standard silicone. I prefer a roll of duct seal because it remains pliable essentially forever and allows the plate to be removed more easily later. I say "most" of the bottom because I leave small, weep hole in the bottom edge to let any trapped moisture exit.

The actual penetration through the wall, you'll plug with duct seal once your wiring is complete.
 
Last edited:

Dave88LX

Getting the hang of it
Joined
Jul 13, 2016
Messages
141
Reaction score
63
Location
York, PA
You could do as you plan, but I usually open a single gang sized hole and drill downward rather than blindly from below into insulation. The hole gets closed with a low voltage box & blank plate when done. That let's me guide the wire, drilling, and whatever "fish" device cleanly to the outer side of insulation. My goal is to not disturb the insulation. A blank plate on the wall is fairly discrete. Also, the slit you put into the vapor barrier to do the work is easily sealed with red sheathing tape.

Were it an uninsulated, interior wall, drilling and fishing from below is totally reasonable (provided you know there isn't anything else in that wall).

As for the mounting plate, I think your screw locations are ok, but I'd go with four screws and be certain they are long enough to anchor into the wall OSB layer (beyond the siding). The top, sides and most of the bottom edges of the plate should be caulked prior to final attachment. You can use either duct seal or standard silicone. I prefer a roll of duct seal because it remains pliable essentially forever and allows the plate to be removed more easily later. I say "most" of the bottom because I leave small, weep hole in the bottom edge to let any trapped moisture exit.

The actual penetration through the wall, you'll plug with duct seal once your wiring is complete.
I'm glad you mentioned this method. I'd seen some posts during my research that showed cutting an access hole and then fishing through the top and bottom, and using a low-voltage old-work box w/ faceplate. I can handle the drywall repair, but this would be so much less work.

I sat there for a good 10 minutes trying to determine what length screw I was going to need for the plates. I ended up choosing 2-1/2" #10 SS screws. I am pretty sure that I just have OSB sheathing, a house wrap, and vinyl siding...but wanted to err on the side of caution in case there was foam or something. I don't think it'l hurt anything.

I do have a stick of duct seal ready to go also.

So the mounting of the PFA137 box to the mounting plate requires no sealant correct, since it's already foam-backed? Or should I put some around the hole before mounting it to the plate?

PFA137 box comes with a rubberized form-fitted gasket seal, so I don't think I'd need sealant there.
 

guykuo

Getting comfortable
Joined
Jul 7, 2018
Messages
577
Reaction score
1,432
Location
Sammamish, WA
The access hole also lets you absolutely verify there isnt' any wiring or plumbing in the wall you are drilling into. THAT is priceless if you discover a surprise.

Correct. The rear foam backing of the PFA137 seals it adequately. You can optionally put a bead of caulk around the central hole, but probably not needed. Just completely seal the center hole with duct seal after wiring is all hooked up. That is the last barrier to keep moisture and bugs from entering your wall. Other than that complete seal, think of the rest as things to guide water around what you are attaching to the wall, rather than as a water proof container. Strategy is to make water go around rather than in. Assume caulking failure and think what will happen with moisture that gets in. It must have a way back out. Your siding is built that way. So should your camera installation. That's why good junction boxes have weep holes at their bottom. Those get oriented downward. If the box lacks weep holes, I drill two tiny ones at the lowest location in the box.

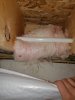
Because you have good access from the basement, drilling from below is easier. When you open the interior wall, you will find the vapor barrier right next to the dry wall. Beyond that is the insulation and cavity in which you wish to work. Slit the vapor barrier and insulation with a sharp knife and you can move both out of the way and reach down to your drilled hole.

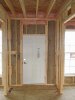
You already know where things are based on your construction photos, but when unsure, you can drill a diagonally cut piano wire or thin drill bit through the floor next to the baseboard to act as a guide. Find the tip in the basement and you accurately know where you are. A tiny piano wire hole is easy to patch compared to drilling a big hole in the wrong place. I also like to scan the wall with an AM radio to help detect hidden wiring.

Sometimes one is forced to drill downward. This can happen with a 2nd story wall going into a joist space. For drilling down, here are a few tips...

A length of 1 inch PVC pipe can protect insulation from your spinning drill bit. Cut it to match the distance from foot plate to bottom of your access hole. It gets passed through the vapor barrier and placed vertically down through the insulation. Your drill bit goes down through the PVC pipe and remains free of the insulation. No twisty cotton candy effect if you protect the drill bit.

Drilling downward in a wall goes a LOT easier if you get a 90 degree offset drill adapter. A flex bit extension can also work, but is much harder to control accurately. Actually, I love my Bosch right angle drill, but an offset adapter will suffice. Wear gloves and watch out for the bit grabbing and wanting to spin the offset adapter. That can pretty quickly hurt any fingers you have stilling into the hole.

Get drill bits with hex shafts, multiple different length drill extensions (2 inch, 3 inch, and a pair of 5 inch) so you can keep lengthening your drill string but remain in the vertical confines of a rework box sized opening. The short extensions let you drill downward a couple inches and then swap / add extensions. It's super frustrating if you lack the short extensions because you end up stuck between too long vs too short a drill string. With the 2 and 3 inch extensions, you can usually find a combo that lets you engage the offset adapter AND have clearance to drill downward.
 
Last edited:

Dave88LX

Getting the hang of it
Joined
Jul 13, 2016
Messages
141
Reaction score
63
Location
York, PA
@guykuo Thanks so much for all the details and tricks, those are great! Fortunately at least in my particular situation, I was able to take pics inside the walls before they were buttoned up. It's been really helpful with things.

Hopefully today I'll be able to punch through the wall and floor now, I feel a lot more confident.
 

Eagle55

n3wb
Joined
Oct 23, 2016
Messages
7
Reaction score
2
Probably a little late to help but, I have run similar wire runs successfully by using a variety on these techniques. Since you are putting a junction box on the outside I would probably try first with a one inch hole from outside into the wall.... a 3/4” or 5/8” hole from the basement into the wall cavity at a slight outward angle and then use a multi section glass rod to run up along the wall, hopefully between the insulation and sheathing board. I am usually able to find the glass rod on either side of the outside hole with a fish wire. The inside single gang hole and cover or patch is a good backup plan but I rarely had time to do any patching unless absolutely necessary and customers rarely would accept a cover plate by the front door. All of these are good techniques and recommendations just depending on your patience and skill level (and a bit of luck). Like to see how it turns out when you finish.
 

Dave88LX

Getting the hang of it
Joined
Jul 13, 2016
Messages
141
Reaction score
63
Location
York, PA
Well, I am a lazy POS that's gotten wrapped up in a 100 other things and still have not done this yet. Jeez.
Clearing space out of the basement to access this part of the wall; hoping to get this cable ran before I put the storage shelving back in that spot in the basement.
 

dudemaar

Known around here
Joined
Aug 18, 2018
Messages
1,190
Reaction score
2,535
Location
Canada
Does the camera pultrude out past the door casing? if not you may get some IR reflection off the white door casing.
 

Dave88LX

Getting the hang of it
Joined
Jul 13, 2016
Messages
141
Reaction score
63
Location
York, PA
Yep it protrudes out plenty, no issues with the door casing. Good question!
 

dudemaar

Known around here
Joined
Aug 18, 2018
Messages
1,190
Reaction score
2,535
Location
Canada
If you can drill a hole up through bottom plate of that wall from basement, then you can tape the wire to the tip of your flex rod and shove it up in there, you should be able to hook the wire from outside hole with coat hanger.you Might be fighting with some insulation. A second person and walkie talkies would help .
 
Top