Got my IPC-HDW5231R-ZE and ordered a PFA137 with it. Got it mounted and camera is awesome. When I ordered the PFA137 I didn't realize the connector would not be totally enclosed. The camera is mounted to the soffit and reasonably protected from the elements unless there is a blowing rain. I currently have the connector in the junction box. I applied dielectric grease and locked the supplied connector. Is this sufficient or should I put the connector inside the soffit or consider the PFA130-E. What are other owners doing?

Dahua 5231 owners - PFA130-E or PFA137
- Thread starter Olddawg
- Start date
J Sigmo
Known around here
- Joined
- Feb 5, 2018
- Messages
- 997
- Reaction score
- 1,335
I face the same problem. In another thread, I "butted-in" and was given the advice to get a different box to mount my cameras.
It is the PFA 122.
As with you, my concern was that the actual penetration into the house is left open around the cable. I have a slightly different camera, but I believe the mount is identical to yours.
This box has a grommet with a split in it that fits around the cable to make a seal there. Then the back of the box has a hole to fit up against the hole in the soffit. There is a foam gasket at the back of the box that will seal up against the soffit. Of course you could caulk that area, too instead of using that foam gasket.
This box is large enough that the screws that hold its cover in place are exposed even with the camera mounted to that cover plate. Everything has gaskets to seal it up.
We have high winds here, and I didn't want air to be able to blow into the holes for the Ethernet cables, and I didn't want paper wasps to be able to enter and build nests. This box makes things tight and easy, giving a good watertight space to hold the extra cable and the connection between the Ethernet cable and its socket on the camera end while allowing for easy future access.
The camera I currently have in place make a seal against the soffit, but I have large enough holes drilled to allow the connectors to shove up into the soffits. This box will cover those large holes and seal against the soffit. Then the inside of the box will contain the end of the Ethernet cable as well as the camera's connectors, so that will all be kept weather tight.
The secret to this box is the special split grommet that makes the seal around the camera's cable and then into the hole in the "face" plate of the box. The face plate seals to the box with a special silicone seal. So the when everything is installed correctly, the space inside of the box (where the cable connectors are) is sealed.
These cameras' mount (the eyeball setup) is kind of odd, and won't let us set them to some angles of aim because the cable coming out of the back of the "ball" will hit one of the little "feet" that hold the camera ball. I hope that doesn't prevent me from getting the aim set where I want it.
It will be easiest to get the camera and its mounting ring and the "eye socket" mounted to the box's face plate before mounting the face plate of the box up to the box itself. That way, I won't need to do all of this while standing on a ladder. So that means estimating how the whole ball and socket needs to be set before installing the camera mount to the box's face plate.
I'm hoping that after that, the adjustments will be small enough that I can do them with everything in place, AND that the cable exiting the back of the ball doesn't end up needing to be exactly where one of the "feet" ends up. If it does, then I'll just have to take the camera and box face plate down and rotate the base of the camera with respect to the box face plate and try again.")
It is the PFA 122.
As with you, my concern was that the actual penetration into the house is left open around the cable. I have a slightly different camera, but I believe the mount is identical to yours.
This box has a grommet with a split in it that fits around the cable to make a seal there. Then the back of the box has a hole to fit up against the hole in the soffit. There is a foam gasket at the back of the box that will seal up against the soffit. Of course you could caulk that area, too instead of using that foam gasket.
This box is large enough that the screws that hold its cover in place are exposed even with the camera mounted to that cover plate. Everything has gaskets to seal it up.
We have high winds here, and I didn't want air to be able to blow into the holes for the Ethernet cables, and I didn't want paper wasps to be able to enter and build nests. This box makes things tight and easy, giving a good watertight space to hold the extra cable and the connection between the Ethernet cable and its socket on the camera end while allowing for easy future access.
The camera I currently have in place make a seal against the soffit, but I have large enough holes drilled to allow the connectors to shove up into the soffits. This box will cover those large holes and seal against the soffit. Then the inside of the box will contain the end of the Ethernet cable as well as the camera's connectors, so that will all be kept weather tight.
The secret to this box is the special split grommet that makes the seal around the camera's cable and then into the hole in the "face" plate of the box. The face plate seals to the box with a special silicone seal. So the when everything is installed correctly, the space inside of the box (where the cable connectors are) is sealed.
These cameras' mount (the eyeball setup) is kind of odd, and won't let us set them to some angles of aim because the cable coming out of the back of the "ball" will hit one of the little "feet" that hold the camera ball. I hope that doesn't prevent me from getting the aim set where I want it.
It will be easiest to get the camera and its mounting ring and the "eye socket" mounted to the box's face plate before mounting the face plate of the box up to the box itself. That way, I won't need to do all of this while standing on a ladder. So that means estimating how the whole ball and socket needs to be set before installing the camera mount to the box's face plate.
I'm hoping that after that, the adjustments will be small enough that I can do them with everything in place, AND that the cable exiting the back of the ball doesn't end up needing to be exactly where one of the "feet" ends up. If it does, then I'll just have to take the camera and box face plate down and rotate the base of the camera with respect to the box face plate and try again.
Last edited:
I like the looks of that box. It doesn't show as an accessory on the Dahua Accessory Selection publication, but I looked at the mounting holes and they are on the same 84 mm mounting holes. How hard is it to remove the grommet? Can you remove it once the cover is installed on the junction box.
J Sigmo
Known around here
- Joined
- Feb 5, 2018
- Messages
- 997
- Reaction score
- 1,335
I ended up buying mine from B&H because I couldn't find them on Andy's site, and with free shipping (buying three of them to get over the free shipping threshold) they had the best final price.
The grommet will only go in one way. It has a thick rim on one side and a chamfer on the other side to let it fit into the hole easily. Mine came with the grommets inserted from the inside. Using them that direction, they won't come out from the outside. And there is probably good reason to insert them in that orientation.
They slip in quite easily from the inside that way. Not a struggle at all. But you need to decide how much slack you want on the camera side before installing the plug (grommet may be a bad word for them) because it gets a good grip on the cable.
The way I have done it while playing with it all is to mount the camera's mounting ring to the box face cover first. then feed the cable through the mounting base and hole in the box cover.
Then, you can install the camera and its cover, but with the set screw loose so you can rotate the camera ball.
Then get the camera fairly well into the desired aim position, and only then put the grommet around the cable, position it for the amount of slack you want on the camera side of the cover, and then push it into place.
But once you get the cover screwed into place on the box, you cannot adjust the slack on the camera side. To make any adjustments to the slack, or access the connections, you will have to take the cover (along with the camera and its mount) off of the box so you can get to the inside of the cover plate and the inside of the box, too.
When I mount the back side (the main part) of the box, I will first screw it to the soffit, centered over the hole I was already using for my old camera's Ethernet connection. Then I will pull the ethernet cable down through that hole and into the box. Then I can plug the new camera's connector onto the ethernet cable, and then finally screw the box cover with the camera onto the box itself.
I will probably put one up tonight. I'll take some pictures and post them here.
J Sigmo
Known around here
- Joined
- Feb 5, 2018
- Messages
- 997
- Reaction score
- 1,335
I am going to add a lot of photos to this post. I hope that doesn't violate some rule for the forum.
I installed one of the new cameras tonight. But I took a lot of shots to show the PFA-122 box and how it mates up with a Dahua IPC-HDW2231RP-ZS camera in my office, rather than out on my house because I hoped they would better illustrate what the OP, and perhaps someone else curious about this mounting box might want to know.
While there are some photos and mechanical drawings of this box on line, as I looked at them before I ordered the boxes, I was still left with some unanswered questions.
Maybe this post will help people answer those same questions.
Here goes:
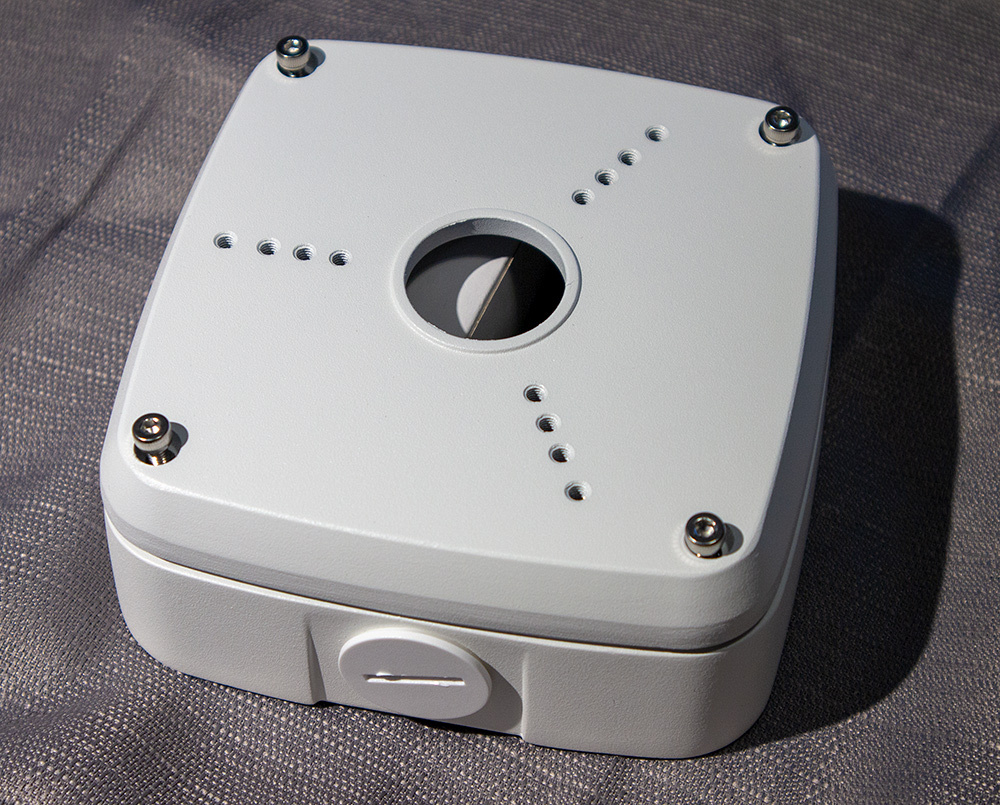
This is the box, with the cover laying in place, but not screwed down tight. Note the single conduit opening with its screw-in plug. This plug has a silicone o-ring to seal it. The threads for the plug are standard US 3/4" conduit (NPT) threads.

This is what's included. Box, cover, sealing "grommet" to fit around the camera's cable, hardware, and an Allen wrench.
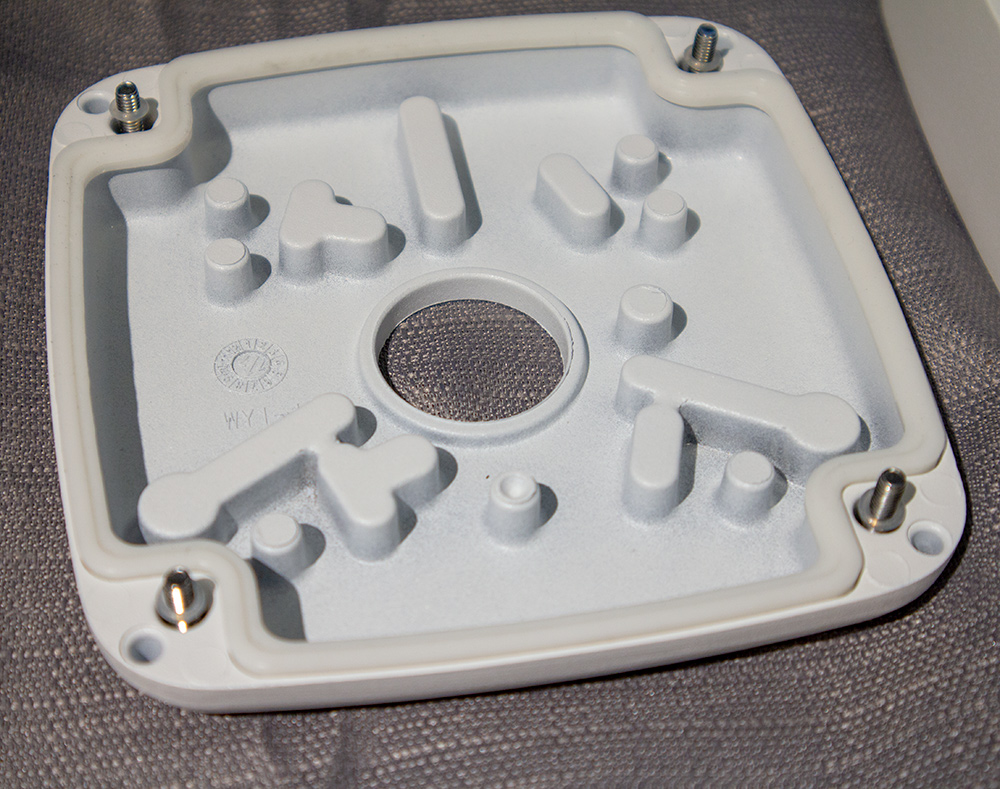
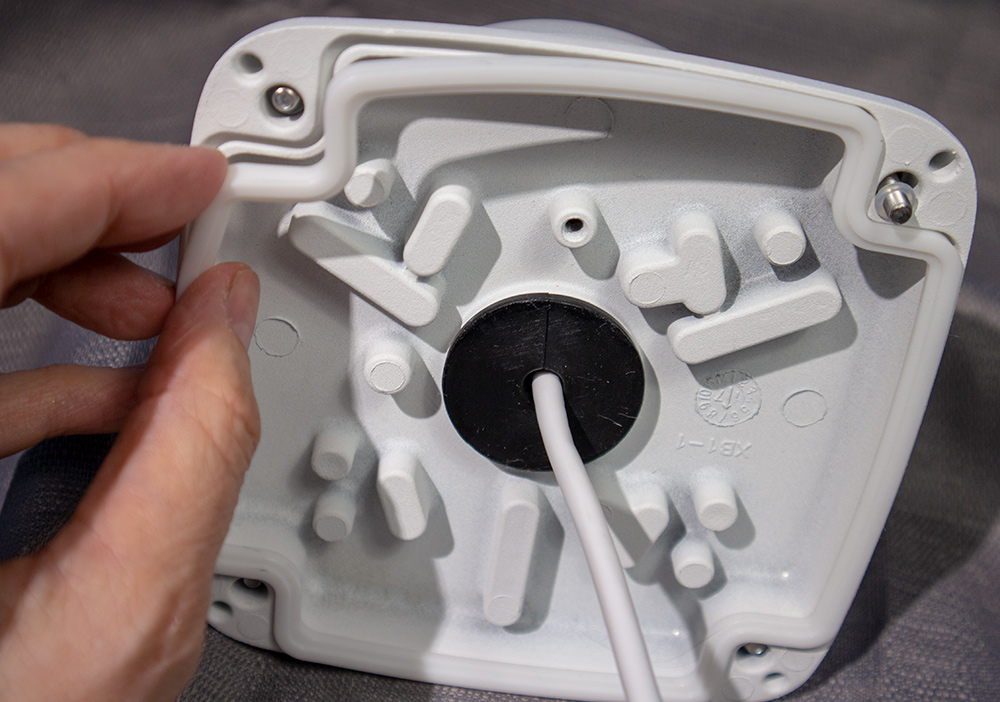
This is an inside view of the box cover plate. The hole in the center is for the "grommet" to seal around the camera cable. The hole is large enough to allow the connectors on the end of the camera's cable to easily fit through.
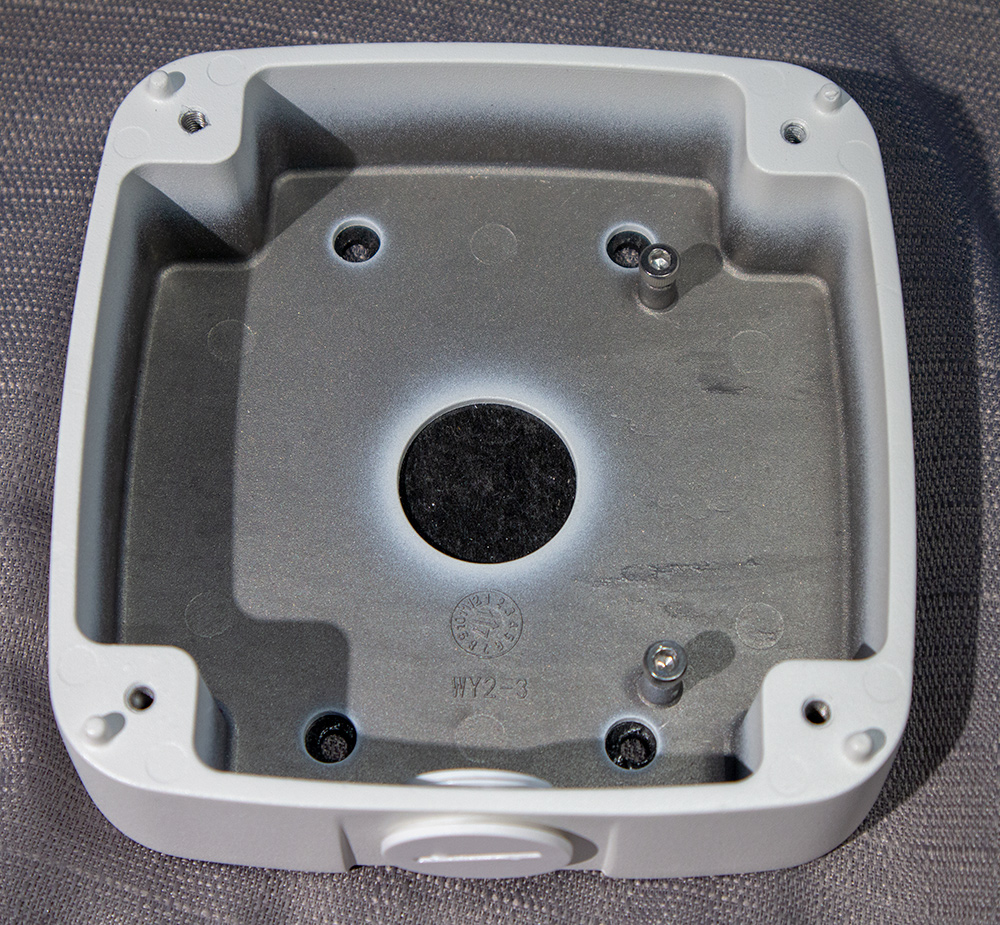
This is the "box" side of the box. The large hole in the center is covered by a layer of foam that will make a seal, but not be terribly rugged. Obviously, the box is meant to be mounted against a flat surface to which the foam will make a seal.
The four smaller holes are for mounting the box. They're quite large, and the mounting screws that are supplied are also large. You can see two screws installed into protruding threaded bosses. I presume these are for grounding the box. The screws can't penetrate far enough to seat against the tops of the bosses, so you'll need a few washers or the like if you are going to properly pinch against a typical ring lug under one of the screws.

This shows the back of the box with its thin foam seal. The large opening in the center of the box has not been cut out. So if you were going to use the conduit entrance, you'd just leave the box sealed by the foam sheet on the back.
You can also see the cover with its mounting holes, threaded to accept mounting screws to hold the camera's base or "pedestal" in place. Those threaded holes do NOT penetrate the cover. So a seal is maintained. The screws just need to be short enough to not bottom out in the threaded holes. The supplied screws work just fine.
In some of the photos above, you can see how the casting for the cover plate accommodates these threaded holes while keeping the cover sealed.
You can also see the grommet or "plug" to seal around the camera's cable.

This is a close-up of a place that was supposed to be drilled and tapped, but was apparently missed on one of the three boxes I received. This is in the cover. The next photo shows one that was properly drilled and tapped.

On this cover, you can see the threaded boss properly done. This is for another ground screw to go. Often, codes require both the box and its cover to be independently grounded. This boss, if drilled and tapped, will allow that. Two of the three boxes I received had this boss properly drilled and tapped.

This is one of the grommets or plugs. They obviously mold these, then simply split them with a knife or something to give you a way to install the grommet around the camera's cable to make a seal into the box cover. Never mind the cat hair! To get a good seal, I did rinse this grommet off and dry it before installing it!

This is a look at the hardware supplied as well as the Allen wrench. The screws and anchors are large. I highly recommend drilling a good pilot hole if you'll be mounting these screws directly into wood! They give you four screws to mount the camera's pedestal to the cover. Only three are needed. But the spare could be handy for grounding or if you lose one.
All of the hardware appears to be some variety of stainless steel. And that's good because you should always use stainless steel hardware when it will be in contact with aluminum to prevent galvanic corrosion.

I cut the foam seal out where the large hole is in the back of the box. This will go over the hole up into the soffit in my installation. And the Ethernet cable will come through the soffit and then this hole. So I don't want the foam seal right here. I cut it out with a disposable scalpel, but any hobby knife or a small pocket knife blade would work great.

Here's the box after cutting the foam seal out of the back hole. I also later cut the foam out the holes for the screws because I wanted to use a sharpie to mark where I needed to drill the pilot holes up into the soffit for mounting the box. If you didn't need to poke a pen up through the holes, you really wouldn't need to cut the foam away. There are smaller punched holes for the mounting screws.

The hole in the back of the box is about 1 and 3/16" diameter.

That's about 30mm.

Here we see the mounting "pedestal" for the Dahua IPC-HDW2231RP-ZS camera screwed into place on the box cover. The thing I like about these boxes is that the cover screws are not covered up by the camera's pedestal. So I can take the cover off of the box without removing the camera. Theoretically, this means I could work on the connections without tampering with the "aim" of the camera.

Here, I've threaded the cable from the camera itself through the opening in the box cover.
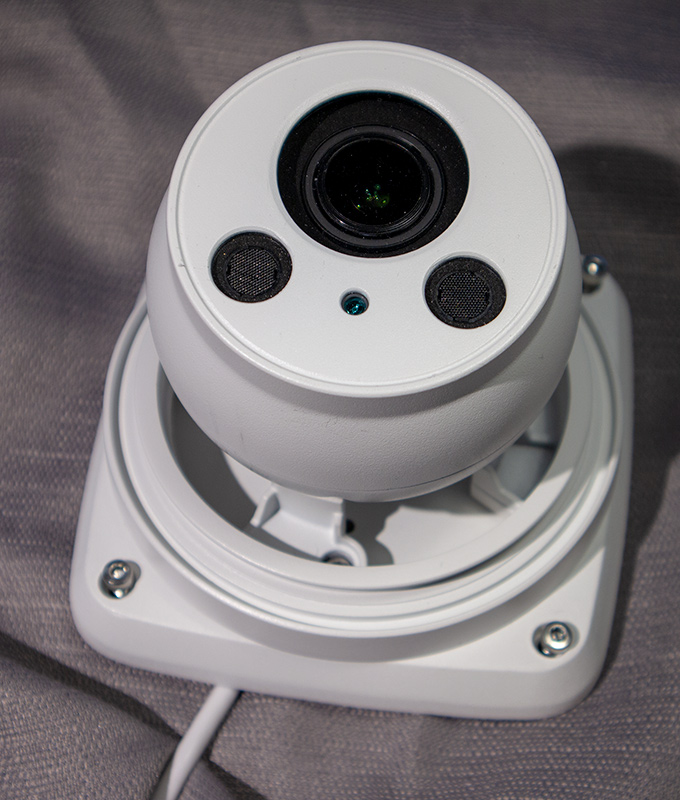
Setting the camera "ball" down onto the pedestal.

Cover in place, securing the camera "ball" against the pedestal. I've tightened the set-screw enough to keep things from falling apart, but not too snug, so I can still rotate the ball using a bit of force. Most of you are probably familiar with all of this, but this was my first camera of this style.

The camera mounted on the box cover with the cable emerging from the bottom.

Here, you can see the cable coming out through the hole in the cover.

Showing how the slit in the grommet lets you open it to slip it over the camera cable.

This is probably tedious and overkill, but here's how you insert the grommet, with the cable in it, into the hole in the box cover. I stuck it in from the inside. This is how the grommets were placed when I received the boxes.
The grommet squeezes down on the cable fairly tight. The small hole in the grommet is tapered, so it will make a good seal at the small end of the taper. It seems like it should seal pretty well.

Jamming the grommet firmly into place. The good seal to the cable is on the other side, where the tapered hole in the grommet is smaller and squeezes the cable quite tightly.

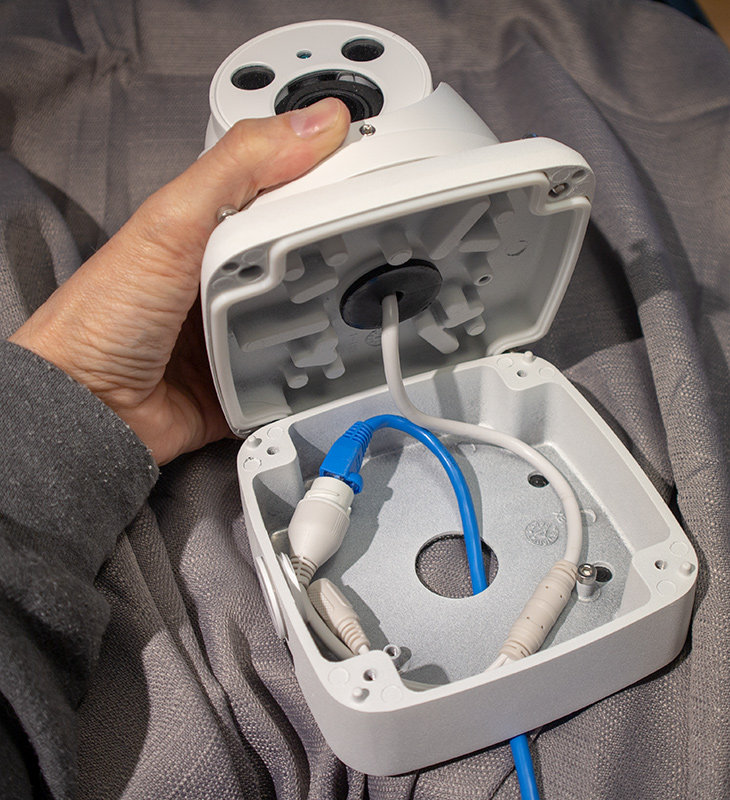
Overview of the underside of the cover with the camera cable. Note that the silicone rubber seal that goes between the box and the cover is not in place. As recommended to me in another thread, it's good to keep that seal off of things until you're ready to mount the cover to the box. Just don't forget to put it in place before you connect the Ethernet (or other wires).
Fitting the silicone rubber seal back into place on the back of the cover plate. This falls off easily, and you want it to be clean and dry when you actually mate the box and cover. If it falls and gets dirty or gets cat hair all over it you can rinse it off with tap water, which shorts out the static that holds the crud to it, and lets it clean off easily. But dry it well before finally using it, of course.

Making the Ethernet connection to the camera. The cameras actually come with a special sealing gadget that holds the connectors together and makes a seal around the entire connection. I'm not showing that here because I forgot about it when I was shooting these photos, and this is a "pre-made" Ethernet cable so I couldn't have installed it without cutting off the end of the cable. If you're making up your own Ethernet cables, however, the seal/strain-relief gadget is a good idea.
You just have to remember to put the thing on the cable end BEFORE you crimp on the connector, of course! (Like I'd ever forget to do THAT)!!! Oops!
OK, admit it guys, you have a few of those seal/strain-relief units laying around your place, too!
Ready to put the cover into place. Make sure you're not pinching any wires, of course, and mind that pesky silicone rubber seal. It does like to fall off! This is actually easier when the box is already mounted up under a soffit since gravity will hold the seal in place as you assemble the cover to the box.

Assembled, but not tightened. The seal between the box and cover is very compliant. I doubt you need to tighten the screws too hard to make a good seal. But I like to have things snug because we get a lot of high wind here, and it blasts things relentlessly.

The view you normally will never see, with the Ethernet cable emerging from the hole in the back of the box. Since you'll mount the box to the soffit or wall before attaching the cover with the camera, this is just a "studio" shot to show things.

Box mounted to underside of the soffit on my house.
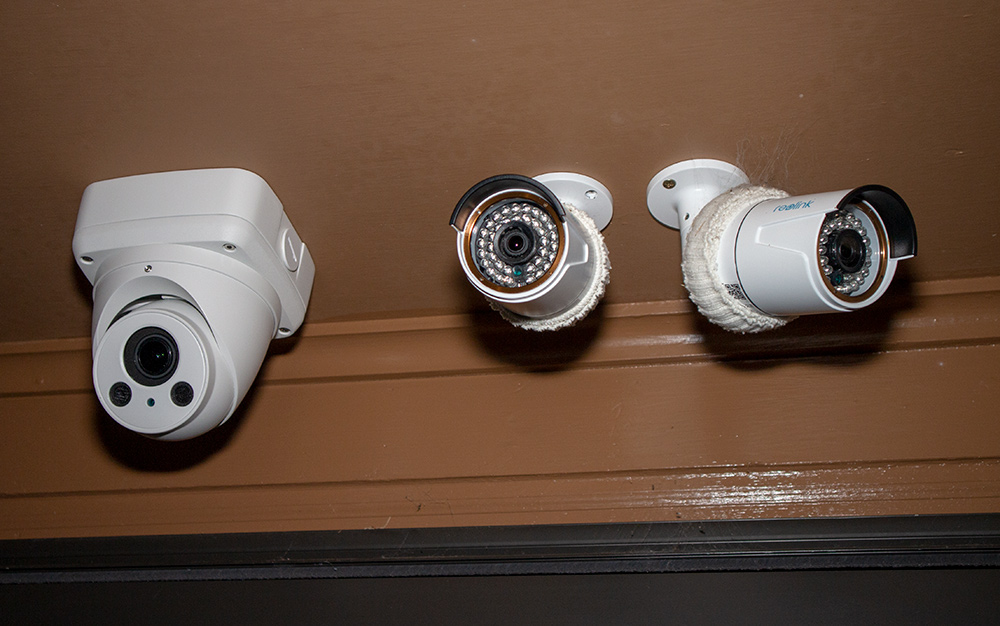
New camera mounted on box next to some others. The middle camera will likely be retired with the new camera taking its place. But I've left them both in place so I can do some comparisons for a while.
Don't look too close. You'll see that the two others are the dreaded Reolinks, and bullets, and, of course, have spider webs on them! The chunks of sweat socks around them act as "dead cats" to muffle the sound of wind on their microphones. It helps, but it's not perfect. But at least the spiders seem to appreciate the fabric there!
The soffit is fairly low here, but the front door does clear the new camera when it opens. Even with the camera this low, I'd prefer to have an even lower, more eye-level camera for seeing the faces of people who are right at the door.
Anyhow, the PFA-122 box is rather handy for mounting these cameras.
I installed one of the new cameras tonight. But I took a lot of shots to show the PFA-122 box and how it mates up with a Dahua IPC-HDW2231RP-ZS camera in my office, rather than out on my house because I hoped they would better illustrate what the OP, and perhaps someone else curious about this mounting box might want to know.
While there are some photos and mechanical drawings of this box on line, as I looked at them before I ordered the boxes, I was still left with some unanswered questions.
Maybe this post will help people answer those same questions.
Here goes:
This is the box, with the cover laying in place, but not screwed down tight. Note the single conduit opening with its screw-in plug. This plug has a silicone o-ring to seal it. The threads for the plug are standard US 3/4" conduit (NPT) threads.
This is what's included. Box, cover, sealing "grommet" to fit around the camera's cable, hardware, and an Allen wrench.
This is an inside view of the box cover plate. The hole in the center is for the "grommet" to seal around the camera cable. The hole is large enough to allow the connectors on the end of the camera's cable to easily fit through.
This is the "box" side of the box. The large hole in the center is covered by a layer of foam that will make a seal, but not be terribly rugged. Obviously, the box is meant to be mounted against a flat surface to which the foam will make a seal.
The four smaller holes are for mounting the box. They're quite large, and the mounting screws that are supplied are also large. You can see two screws installed into protruding threaded bosses. I presume these are for grounding the box. The screws can't penetrate far enough to seat against the tops of the bosses, so you'll need a few washers or the like if you are going to properly pinch against a typical ring lug under one of the screws.
This shows the back of the box with its thin foam seal. The large opening in the center of the box has not been cut out. So if you were going to use the conduit entrance, you'd just leave the box sealed by the foam sheet on the back.
You can also see the cover with its mounting holes, threaded to accept mounting screws to hold the camera's base or "pedestal" in place. Those threaded holes do NOT penetrate the cover. So a seal is maintained. The screws just need to be short enough to not bottom out in the threaded holes. The supplied screws work just fine.
In some of the photos above, you can see how the casting for the cover plate accommodates these threaded holes while keeping the cover sealed.
You can also see the grommet or "plug" to seal around the camera's cable.
This is a close-up of a place that was supposed to be drilled and tapped, but was apparently missed on one of the three boxes I received. This is in the cover. The next photo shows one that was properly drilled and tapped.
On this cover, you can see the threaded boss properly done. This is for another ground screw to go. Often, codes require both the box and its cover to be independently grounded. This boss, if drilled and tapped, will allow that. Two of the three boxes I received had this boss properly drilled and tapped.
This is one of the grommets or plugs. They obviously mold these, then simply split them with a knife or something to give you a way to install the grommet around the camera's cable to make a seal into the box cover. Never mind the cat hair! To get a good seal, I did rinse this grommet off and dry it before installing it!
This is a look at the hardware supplied as well as the Allen wrench. The screws and anchors are large. I highly recommend drilling a good pilot hole if you'll be mounting these screws directly into wood! They give you four screws to mount the camera's pedestal to the cover. Only three are needed. But the spare could be handy for grounding or if you lose one.
All of the hardware appears to be some variety of stainless steel. And that's good because you should always use stainless steel hardware when it will be in contact with aluminum to prevent galvanic corrosion.
I cut the foam seal out where the large hole is in the back of the box. This will go over the hole up into the soffit in my installation. And the Ethernet cable will come through the soffit and then this hole. So I don't want the foam seal right here. I cut it out with a disposable scalpel, but any hobby knife or a small pocket knife blade would work great.
Here's the box after cutting the foam seal out of the back hole. I also later cut the foam out the holes for the screws because I wanted to use a sharpie to mark where I needed to drill the pilot holes up into the soffit for mounting the box. If you didn't need to poke a pen up through the holes, you really wouldn't need to cut the foam away. There are smaller punched holes for the mounting screws.
The hole in the back of the box is about 1 and 3/16" diameter.
That's about 30mm.
Here we see the mounting "pedestal" for the Dahua IPC-HDW2231RP-ZS camera screwed into place on the box cover. The thing I like about these boxes is that the cover screws are not covered up by the camera's pedestal. So I can take the cover off of the box without removing the camera. Theoretically, this means I could work on the connections without tampering with the "aim" of the camera.
Here, I've threaded the cable from the camera itself through the opening in the box cover.
Setting the camera "ball" down onto the pedestal.
Cover in place, securing the camera "ball" against the pedestal. I've tightened the set-screw enough to keep things from falling apart, but not too snug, so I can still rotate the ball using a bit of force. Most of you are probably familiar with all of this, but this was my first camera of this style.
The camera mounted on the box cover with the cable emerging from the bottom.
Here, you can see the cable coming out through the hole in the cover.
Showing how the slit in the grommet lets you open it to slip it over the camera cable.
This is probably tedious and overkill, but here's how you insert the grommet, with the cable in it, into the hole in the box cover. I stuck it in from the inside. This is how the grommets were placed when I received the boxes.
The grommet squeezes down on the cable fairly tight. The small hole in the grommet is tapered, so it will make a good seal at the small end of the taper. It seems like it should seal pretty well.
Jamming the grommet firmly into place. The good seal to the cable is on the other side, where the tapered hole in the grommet is smaller and squeezes the cable quite tightly.
Overview of the underside of the cover with the camera cable. Note that the silicone rubber seal that goes between the box and the cover is not in place. As recommended to me in another thread, it's good to keep that seal off of things until you're ready to mount the cover to the box. Just don't forget to put it in place before you connect the Ethernet (or other wires).
Fitting the silicone rubber seal back into place on the back of the cover plate. This falls off easily, and you want it to be clean and dry when you actually mate the box and cover. If it falls and gets dirty or gets cat hair all over it
you can rinse it off with tap water, which shorts out the static that holds the crud to it, and lets it clean off easily. But dry it well before finally using it, of course.
Making the Ethernet connection to the camera. The cameras actually come with a special sealing gadget that holds the connectors together and makes a seal around the entire connection. I'm not showing that here because I forgot about it when I was shooting these photos, and this is a "pre-made" Ethernet cable so I couldn't have installed it without cutting off the end of the cable. If you're making up your own Ethernet cables, however, the seal/strain-relief gadget is a good idea.
You just have to remember to put the thing on the cable end BEFORE you crimp on the connector, of course! (Like I'd ever forget to do THAT)!!! Oops!
OK, admit it guys, you have a few of those seal/strain-relief units laying around your place, too!
Ready to put the cover into place. Make sure you're not pinching any wires, of course, and mind that pesky silicone rubber seal. It does like to fall off! This is actually easier when the box is already mounted up under a soffit since gravity will hold the seal in place as you assemble the cover to the box.
Assembled, but not tightened. The seal between the box and cover is very compliant. I doubt you need to tighten the screws too hard to make a good seal. But I like to have things snug because we get a lot of high wind here, and it blasts things relentlessly.
The view you normally will never see, with the Ethernet cable emerging from the hole in the back of the box. Since you'll mount the box to the soffit or wall before attaching the cover with the camera, this is just a "studio" shot to show things.
Box mounted to underside of the soffit on my house.
New camera mounted on box next to some others. The middle camera will likely be retired with the new camera taking its place. But I've left them both in place so I can do some comparisons for a while.
Don't look too close. You'll see that the two others are the dreaded Reolinks, and bullets, and, of course, have spider webs on them! The chunks of sweat socks around them act as "dead cats" to muffle the sound of wind on their microphones. It helps, but it's not perfect. But at least the spiders seem to appreciate the fabric there!
The soffit is fairly low here, but the front door does clear the new camera when it opens. Even with the camera this low, I'd prefer to have an even lower, more eye-level camera for seeing the faces of people who are right at the door.
Anyhow, the PFA-122 box is rather handy for mounting these cameras.
bababouy
Known around here
@looney2ns In your opinion is the PFA 137 enough protection if connector is properly protected with dielectric grease and silicone tape. I will definitely get the 122 with next camera, but don't want to replace the new 137 I just bought.For me, it's $30 shipped for one.
Or buy 3 and it's $26 with free ship.
J Sigmo
Known around here
- Joined
- Feb 5, 2018
- Messages
- 997
- Reaction score
- 1,335
@Olddawg: I bought three of these boxes to get the free shipping from B&H, and just as @looney2ns said, they were $26.00 each.
The seal/Strain-relief gadget that comes with the cameras I got will seal the cable connection well if you use it. That means that you need to be putting the end on your Etherenet cable, and cannot use a pre-made cable. The free end of the seal gadget must be slipped back onto the unterminated cable before you crimp the connector onto the cable end.
As you tighten the shell onto the camera's connector, it will squeeze down onto the cable jacket to make the seal complete.
I'd still use the grease, and try to protect things as well as possible, though. It sounds like you did all of that and are using it.
Another concern would be the hole up into the soffit, around the cable. I would want that sealed so I don't get air infiltration or pesky paper wasps building nests inside of my attic space. Some duct seal might be the ticket there.
The bases of the bullet cameras seal fairly well up against the soffit, and the little cutout to allow running the cable out the side can be caulked easily. So the bullets were easy to mount and seal without any extra box or hardware.
Last edited:
looney2ns
IPCT Contributor
Yes@looney2ns In your opinion is the PFA 137 enough protection if connector is properly protected with dielectric grease and silicone tape. I will definitely get the 122 with next camera, but don't want to replace the new 137 I just bought.
JayS_IPCams
Young grasshopper
This is a great "review" ... anyone know of a good product that can be used to seal the side hole if used to run the cable into the box? I've found cable glands, but they are too small for CAT6, and you also have to use them before termination of the cable. Is there something like that rubber plug for the camera cable that can be ordered and used on the side entry hole?
J Sigmo
Known around here
- Joined
- Feb 5, 2018
- Messages
- 997
- Reaction score
- 1,335
I haven't seen any CGBs (conduit gland bushings), or what was often call a "rubber asshole" that can be used after the connector is in place. But if you are crimping your own connectors on, then you can feed the cable through it all before crimping, and with the correct size CGB, or "cord grip seal", the rubber insert will grip and seal to the CAT 5 or 6 cable.
Usually, the problem is finding ones made for this small diameter cable. But you can order them in various sizes, and they specify the cord diameter range they're designed to accommodate. They work very well.
Try a large electrical supply house rather than a home center to find a larger variety.
You may need an adapter (threaded bushing) to go up from 1/2" conduit thread to the 3/4" size hole in the side of this box because a lot of the CGBs are 1/2" size. They make 3/4" size CGBs, but they are harder to find made to fit small diameter cable.
JayS_IPCams
Young grasshopper
Yes i do crimp my own... and have done it the way you have suggested... a couple issues with it for those that haven't tried.I haven't seen any CGBs (conduit gland bushings), or what was often call a "rubber asshole" that can be used after the connector is in place. But if you are crimping your own connectors on, then you can feed the cable through it all before crimping, and with the correct size CGB, or "cord grip seal", the rubber insert will grip and seal to the CAT 5 or 6 cable.
Usually, the problem is finding ones made for this small diameter cable. But you can order them in various sizes, and they specify the cord diameter range they're designed to accommodate. They work very well.
Try a large electrical supply house rather than a home center to find a larger variety.
You may need an adapter (threaded bushing) to go up from 1/2" conduit thread to the 3/4" size hole in the side of this box because a lot of the CGBs are 1/2" size. They make 3/4" size CGBs, but they are harder to find made to fit small diameter cable.
1. If mounting in a high location, crimping and putting an end of an ethernet cable passed through an already mounted box is a PIA to say the least (i'm sure if you do it for a living, then likely not as big of an issue).
2. You can get the CGBs smaller from all sorts of places (ebay is where i found some good yet cheap). Problem is the adapters so it fits the pre made wholes... you end up with this long ugly connector which may not work in all locations/spaces (near walls, etc).
2.b they do work great if you are putting into a box where you need to make the holes.
On the good news side, i did find bushings that are specifically for Terminated Cat5/6 cables (no boot) that work great!
search ebay for "RJ-45ft FeedThrough cable gland Field Install"... can be hard to find at a reasonable price however
mat200
IPCT Contributor
- Joined
- Jan 17, 2017
- Messages
- 13,931
- Reaction score
- 23,235
FYI - additional sources for junction boxes ( Dahua OEM )
1) Amcrest - example AMCPFA130-E = PFA130-E
available on Amazon and Amcrest's website
often a bit cheaper on Amazon. If you get it on Amcrest's website look for a discount code - if you need a lot try chatting with their customer service reps
https://www.amazon.com/Amcrest-Water-Proof-AMC1081BC36-AMC1080BC36-IP8M-2496EB/dp/B07CB468HC
2) Lorex
S1JF2G= Dahua OEM PFA121
S1JF3G = Dahua OEM PFA122
Lorex typically has a 10-15% off discount code, so look for that.
Outdoor Junction Box for 3 Screw Base Cameras (Gray)
3) Montavue - example Montavue MAM121 = Dahua OEM PFA121 ( note, currently they have a 15% off code for the New Years - NY15 )
Montavue MAM121 5.3 x 5.3 x 2.2″ Junction Box for select cameras | Montavue
Noticed they currently have the Dahua PFA135, 136, 137, PBW204 ( MAM204W ) and a few others in stock
Category: Junction Boxes | Montavue
and
Category: Mounting brackets | Montavue
Last edited:
As an Amazon Associate IPCamTalk earns from qualifying purchases.
I had a heck of a time mounting this junction box (PFA130) with my 5231's.
The problem is not necessary that it's complicated, it's just difficult to juggle the camera and wire dangling while screwing in the mount and it cannot be put together beforehand as all screws in the base layer are covered by the second layer. I also found it difficult to stuff the connector and wire through that small hole and into the junction box and had to partially disassemble it (slide the mount bottom cover off to the side, stuff the connector through the hole then slide the cover back over the wires). There's a lot of wire/connector to fit in that tiny space and through that tiny hole at an angle. I'll have to get back in there and reorganize everything when I've got more time.
To be fair, I was in a bit of a hurry- but there's got to be an easier way.
Did anyone else have a difficult time putting one of these on a horizontal (soffit) wall and mounting the camera? Any suggestions?
That's exactly how I felt. Glad I'm not alone.I installed one on a vertical wall and 3 hands would have been nice.
Didn help either it was about 10⁸F and windy. I had a really hard time getting the cables in the box without them cracking due to the cold/stiffness. At least I think no cracks. Going to check when I can feel my fingers again come about May.
Are you sure you aren't me?Didn help either it was about 10⁸F and windy. I had a really hard time getting the cables in the box without them cracking due to the cold/stiffness. At least I think no cracks. Going to check when I can feel my fingers again come about May.
I'm afraid to open the mount because of possible cracks from freezing temps this morning.