Howto: Open HFW series bullet camera when having condensation problem

MakeItRain

Pulling my weight
Joined
Aug 7, 2017
Messages
401
Reaction score
218
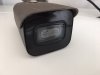
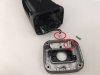
This is how you open up a HFW series bullet camera when you have condensation.

(I bought two of these HFW-1831E from Andy and placed them side-by-side next to each other to capture a full 180 degree FOV. It rained for 3 days and one of them suddenly developed condensation and the problem would not get better. The other one for some reason is still okay. Most likely I think this camera is exposed to direct sunlight when the rain clears and this causes temperature variation.)

IMG_1471.JPG

1. Pry open the piano-black face plate gently. It is glued on. Do not pull upwards but use a tiny flat head and insert deep into the base and then lift up slowly. The piano black face plate is plastic and may crack.

IMG_1473.JPG

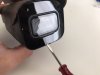
2. Remove 4 screws as shown.

IMG_1475.JPG

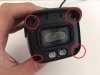
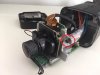
3. The cover should now fall off. Disconnect the white connector.

IMG_1476.JPG

4. Remove two screws on opposite side of each other. Then you can gently pull and slide out the entire camera circuitry from the housing. But do not pull hard, the circuitry is still wired to the pigtail at the back. You can now clean, dust off, and replace desiccant.

IMG_1480.JPG
 
Last edited:

MakeItRain

Pulling my weight
Joined
Aug 7, 2017
Messages
401
Reaction score
218
I am trying to edit my post to make the thumbnails bigger but unfortunately, I get a message:
Forbidden
You don't have permission to access /posts/328141/edit-inline on this server.
 

MakeItRain

Pulling my weight
Joined
Aug 7, 2017
Messages
401
Reaction score
218
I've been reading up on condensation a little and it sounds like to me that the proper way to mitigate this problem is to fill the camera with warm - zero humidity air. Warm air can hold more water molecules than cold so it is less likely to condense. This is why in cold/rainy weather, I get this condensation problem.

So in order to bring down the humidity to near zero and reassemble this camera with warm (non-moist air), I think the best place to do it is to get in my car, close the car, start the engine, turn on AC and heat to MAX. Then wait 10 minutes, and then reassemble my camera w/ desiccant while inside my car.

Does anyone agree/disagree? Thoughts?????
 

mat200

IPCT Contributor
Joined
Jan 17, 2017
Messages
13,944
Reaction score
23,250
I've been reading up on condensation a little and it sounds like to me that the proper way to mitigate this problem is to fill the camera with warm - zero humidity air. Warm air can hold more water molecules than cold so it is less likely to condense. This is why in cold/rainy weather, I get this condensation problem.

So in order to bring down the humidity to near zero and reassemble this camera with warm (non-moist air), I think the best place to do it is to get in my car, close the car, start the engine, turn on AC and heat to MAX. Then wait 10 minutes, and then reassemble my camera w/ desiccant while inside my car.

Does anyone agree/disagree? Thoughts?????
Hi @MakeItRain

I would suggest using a hair dryer to blow dry air into the camera in your dining room while you assemble it, as I like to use a good table space when doing such work.
 

TonyR

IPCT Contributor
Joined
Jul 15, 2014
Messages
16,754
Reaction score
39,009
Location
Alabama
I've been reading up on condensation a little and it sounds like to me that the proper way to mitigate this problem is to fill the camera with warm - zero humidity air. Warm air can hold more water molecules than cold so it is less likely to condense. This is why in cold/rainy weather, I get this condensation problem.

So in order to bring down the humidity to near zero and reassemble this camera with warm (non-moist air), I think the best place to do it is to get in my car, close the car, start the engine, turn on AC and heat to MAX. Then wait 10 minutes, and then reassemble my camera w/ desiccant while inside my car.

Does anyone agree/disagree? Thoughts?????
I agree. Please read my 7/20/18 post about what I dubbed "differential thermal cycling" as it pertains to condensation inside cameras => here.
 

MakeItRain

Pulling my weight
Joined
Aug 7, 2017
Messages
401
Reaction score
218
I'm getting that Forbidden error all over this forum now too.... whats going on
 

Mike

Staff member
Joined
Mar 9, 2014
Messages
2,982
Reaction score
2,725
Location
New York
It's all related to the same issue, looks like a permission got mixed up somewhere. On it.
 

Mike

Staff member
Joined
Mar 9, 2014
Messages
2,982
Reaction score
2,725
Location
New York
Seems to be only this thread?? Anyone see these errors anywhere else?
 

nbstl68

Getting comfortable
Joined
Dec 15, 2015
Messages
1,399
Reaction score
322
What is the IP rating for this camera? I would not have expected these to have condensation issues at all. That means there is air/water infiltration possible again at any time.
 

MakeItRain

Pulling my weight
Joined
Aug 7, 2017
Messages
401
Reaction score
218
Supposed to be IP67 according to spec sheet. I just got this cam about a month ago from Andy. One is fine, this is the other one. Both are right next to each other. So.. don't know what gives.
 

c hris527

Known around here
Joined
Oct 12, 2015
Messages
1,795
Reaction score
2,094
Location
NY
What is the IP rating for this camera? I would not have expected these to have condensation issues at all. That means there is air/water infiltration possible again at any time.
I tend to agree with you on this, I bet by now I have over 100 outdoor cams running and the only time I EVER got something like this is when the heated gutter failed and Ice rolled and wacked the cam right off the mount, I put it back up but it developed this issue, I bet we will be seeing more of this with this newer design.
 

TonyR

IPCT Contributor
Joined
Jul 15, 2014
Messages
16,754
Reaction score
39,009
Location
Alabama
What is the IP rating for this camera? I would not have expected these to have condensation issues at all. That means there is air/water infiltration possible again at any time.
IP 67 in specs here.

The 6: Dust tight: No ingress of dust; complete protection against contact (dust tight). A vacuum must be applied. Test duration of up to 8 hours based on air flow

The 7: Immersion, up to 1 m depth: Ingress of water in harmful quantity shall not be possible when the enclosure is immersed in water under defined conditions of pressure and time (up to 1 m of submersion).
 

MakeItRain

Pulling my weight
Joined
Aug 7, 2017
Messages
401
Reaction score
218
Do you guys think the factory assemble these in zero humidity vacuum? Also, nothing leads me to believe these things are hermetically sealed. The design is as simple as a valve cover bolted to a cylinder head with a rubber gasket in between. The tiny thin rubber gasket is the only seal in the front housing. As far as I can see from the back of the housing, the cables are sealed by some kind of wax plastic thing so that looks pretty air tight.

I'm contemplating about buying some GE silicone sealant from HD and then using that to seal this camera instead of using the provided rubber gasket.

1.jpg
Made of 100% silicone, the GE 2.8 oz. Silicone Sealant provides a watertight seal around doorways and windows and is ideal for marine applications above the water line. The sealant can adhere to plastic, glass and many other materials and dries to the touch within 15 minutes.
  • UV-resistant, translucent silicone
  • Adheres to plastic, glass and metal
  • Permanently flexible
  • Dries to the touch in 15 minutes and hardens in 12 hours
  • Heat resistant up to 400° F (205° C)
 
Last edited:
Top