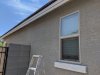
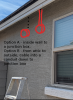
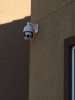
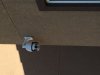
@ArmoredDragon - Thanks for the outside picture. Good start to figuring out what you're trying to do. No problem on the inside picture. It was just an optional view if available.
If this was my house, I would not be cutting into drywall unless necessary with no other options. Just a lot more work involved. I will do almost all home remodeling tasks but not texturing drywall. I leave that to a skilled person. Same for stucco work. I've done it and it just doesn't look the same. The most I'll take on is a small patch. The pros know how to make it look good and it's money well spent to have them do the work.
Do you already have other cameras and this is an add-on or part of a new system?
Did you already buy the camera(s)?
Have you tested this location with a camera or is this just an estimate of a mounting location?
Any chance you can take a pic showing a wider view of this location and show what area you want to capture with the camera? Maybe this isn't the optimal spot to mount a camera.
Also show where you have security lighting since that can affect your camera view. I don't see any on the pic you provided.
It's good you're taking the time to think about this before jumping in and you're asking good questions.

") Edit: Oh yeah I talked them down another $10k below that as well. Pretty good deal, but it was in its complete state so I had no say in what wiring was added.
Edit: Oh yeah I talked them down another $10k below that as well. Pretty good deal, but it was in its complete state so I had no say in what wiring was added.