Mounting turret cam on stucco wall

holland53

n3wb
Joined
Dec 17, 2018
Messages
19
Reaction score
19
Location
East
I found a discussion of mounting a camera on a stucco wall, but I thought I'd start a fresh thread to drill down on some details.

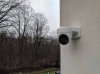
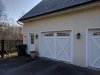
I'm my case, I'm starting with a single camera mounted outside the garage, between the "person door" and the corner of the house. I'll attach an image for illustration.

I've ordered a Dahua IPC-HDW5231R-ZE, along with a PFB203W wall mount bracket.

There is an unfinished "bonus room" above the garage. When the house was being built, I took a weekend to run CAT5e to every room, including this one, all home run back to a patch panel in the basement. As with the other rooms, it's terminated here with an RJ45 jack on a wall plate screwed to a single gang box on a stud wall.

The garage wall is stucco on exterior and painted sheet rock in the interior, with blown insulation in the wall cavity.

My general plan is to run CAT5e from the camera location back to this wall jack, terminated on both ends with plugs.

Questions:

  1. Fishing the wall: To get through the insulation, I'm thinking either metal fish tape, or nylon rods. The rods might be easier to work through the insulation, but I'm concerned about the size of hole I'd need in the wall to get a turning radius to poke it through to attach the CAT5 for pulling back up. Thoughts?
  2. Mounting method: I selected the wall bracket, simply because that's what I saw in the wiki in a diagram for a wall mount application. But I've seen images here on the board with cameras mounted sideways on round boxes. This might give a slightly lower profile look. I realize this is a more subjective issue, but I welcome any comments/opinions on one vs. the other.
  3. RJ45 plug terminations: As I alluded to earlier, I'm familiar/comfortable with RJ45 jack installation, but I have zero experience terminating with plugs. This is really more a comment than a question, but I'm finding it to be a rather fiddly and frustrating operation, and I'm guessing that the only way to do it better is with repetition. For the jacks, I use the JackRapid tool, which punches and trims all 8 conductors on a jack simultaneously. It'd be cool if there was a similar widget for plugs. But any tips/shortcuts are welcome :)
Pre-Install Spot.jpg
 

TonyR

IPCT Contributor
Joined
Jul 15, 2014
Messages
16,670
Reaction score
38,782
Location
Alabama
This is really more a comment than a question, but I'm finding it to be a rather fiddly and frustrating operation, and I'm guessing that the only way to do it better is with repetition.
You are correct there, friend. :highfive:

Question:
Since construction codes vary, and since that's an exterior wall where you intend to install the camera, are there firebreaks (horizontal pieces of 2x4) installed between the vertical studs?
 

holland53

n3wb
Joined
Dec 17, 2018
Messages
19
Reaction score
19
Location
East
You are correct there, friend. :highfive:

Question:
Since construction codes vary, and since that's an exterior wall where you intend to install the camera, are there firebreaks (horizontal pieces of 2x4) installed between the vertical studs?
Ooh...that *is* a good question. There's a top plate that I'll have to get through, but not sure about stud space below...lemme check construction photos.
<elapsed time to check construction photos>
Ok, looking at a bunch of pre-wallboard photos, no horizontal blocking between studs, at least between floors.
 

holland53

n3wb
Joined
Dec 17, 2018
Messages
19
Reaction score
19
Location
East
Having given it some further thought, I think that instead of fishing the cable, I'll run a stick of EMT down the inside wall from the room above, then poke through the wall at the mount point. "I'll" is used loosely here...I'm getting a hand from some colleagues who do that work routinely, as opposed to a mouse jockey such as me :)

Now mulling whether to mount the cleat that comes with the PFB203W directly to the stucco, or put a plate of some sort between the mount and the wall.

And one key RJ45 plug termination tip I got from surveying YouTube: After stripping the jacket and separating the pairs, work a flathead screwdriver into each pair in turn, right where they come out of the jacket. Then run the shaft of the screwdriver up through the pair, which simultaneously unwinds them and straightens them out. Much easier to work with thereafter.
 

holland53

n3wb
Joined
Dec 17, 2018
Messages
19
Reaction score
19
Location
East
You will want to get that light out of the FOV, it will affect exposure at night.
Noted...but we don't often use those lights (there's 3 in a row). And if I got them out of FOV, the "man door" to the garage would not be in frame.

There is, however, a motion-activated flood, just above the camera. I plan to test that out tonight and see if it causes any issues - pausing to switch out of IR illumination and such.
 

Adamsdaddy

Young grasshopper
Joined
Feb 1, 2018
Messages
37
Reaction score
21
Looks great! To keep rain/water from getting between the mount and the stucco did you caulk it or ?
 

holland53

n3wb
Joined
Dec 17, 2018
Messages
19
Reaction score
19
Location
East
Thanks!

I put a bit of caulk where the cable comes through the wall, but left the mount itself un-sealed. The connection of the house CAT5e and the camera pigtail is pretty well protected, and the camera itself is IP67, so a I'm not too concerned about a bit of moisture getting into the mount from behind.
 
Joined
Apr 26, 2016
Messages
1,090
Reaction score
852
Location
Colorado
I know when I mounted an exterior light the manual recommended some weather resistant exterior grade caulk around the base, just to keep moisture and condensation from creeping into the back of the unit.
 

holland53

n3wb
Joined
Dec 17, 2018
Messages
19
Reaction score
19
Location
East
I know when I mounted an exterior light the manual recommended some weather resistant exterior grade caulk around the base, just to keep moisture and condensation from creeping into the back of the unit.
Indeed, I certainly wouldn't go against the mfg recommendation for a light fixture. But most light fixtures aren't rated for being dropped into 1m of water for 1/2 hour. And like I said, Dahua seems to provide adequate connection accessories for sealing off the CAT5e interface, at least for the case where it stays out of direct contact with the weather.

But I'll make this promise: If any part gets damaged from water incursion, I'll return here and eat my words :)
 

J Sigmo

Known around here
Joined
Feb 5, 2018
Messages
997
Reaction score
1,335
You will want to get that light out of the FOV, it will affect exposure at night.
Noted...but we don't often use those lights (there's 3 in a row). And if I got them out of FOV, the "man door" to the garage would not be in frame.

There is, however, a motion-activated flood, just above the camera. I plan to test that out tonight and see if it causes any issues - pausing to switch out of IR illumination and such.
As long as you don't turn the light that's in the field of view on, you'll be OK. But I have one camera at my place that, in order to see what I want it to see, also sees a porch light that we do leave on at all times. I ended up building a shade that mounts to the soffit, and shaped just so, such that it blocks the direct light from the porch lamp from reaching the face of the camera in question. It makes a HUGE difference in the performance of the setup. That was practical in my location, but might be more unsightly or difficult to implement in your situation.

Even when a camera isn't aimed such that the offending light is directly visible in the frame, that bright light falling on the face of the camera can be a nuisance as it lights up dust, bugs, spiderwebs, scratches, etc., on the face or cover of a camera. I don't like having any direct light falling on the faces of cameras if I can help it. This is why one often uses a lens shade on a photographic camera. Lens flare, dust, etc., can cause trouble even if the light source isn't visible directly in the frame.

Also, having an area (such as a wall) that is brightly illuminated in the field of view will throw off the automatic exposure for that camera, making everything else show up far too dark as the auto exposure attempts to achieve an overall "medium" exposure over the whole frame. I wish these cameras had the ability to adjust their exposure based on a selected area, rather than being always in what would be called "averaging mode" in a photo camera.

Give me a spot or "partial" metering setup where I can define the size and shape of the area to be metered, and I'd love that feature!!
 

holland53

n3wb
Joined
Dec 17, 2018
Messages
19
Reaction score
19
Location
East
As to the automatic flood, it actually isn't an issue, we've found. It's a seamless transition from IR to visible light. Huzzah!
 

Serodgers

Getting the hang of it
Joined
Dec 17, 2018
Messages
74
Reaction score
51
Location
PC FL
As an Amazon Associate IPCamTalk earns from qualifying purchases.

pozzello

Known around here
Joined
Oct 7, 2015
Messages
2,270
Reaction score
1,117
[QUOTE="
Give me a spot or "partial" metering setup where I can define the size and shape of the area to be metered, and I'd love that feature!![/QUOTE]

isn't that what BLC is for? at least in theory... tho most of the implementations lack the granularity your asking for (usually just top/bottom/left or right kinda thing)
 

J Sigmo

Known around here
Joined
Feb 5, 2018
Messages
997
Reaction score
1,335
isn't that what BLC is for? at least in theory... tho most of the implementations lack the granularity your asking for (usually just top/bottom/left or right kinda thing)
Yeah, I've played with that on a couple of Dahuas and couldn't get it to really do what I wanted. But you're right about that seeming to at least be an attempt at this.

I'm assuming BLC stands for Backlight Compensation.

Simply being able to define the area that will be used for metering would be more useful and positive for me. As it is, I couldn't get it to meter on the area of interest and ignore the areas that were throwing off the exposure.
 
Last edited:

basalt

n3wb
Joined
Jan 8, 2019
Messages
7
Reaction score
17
Location
United States
For connectors: https://www.amazon.com/Platinum-Tools-100010C-Connectors-Clamshell/dp/B000FI9VU2/ref=sr_1_10?ie=UTF8&qid=1547593115&sr=8-10&keywords=pass+through+rj45

Crimp and cut with: https://www.amazon.com/Platinum-Tools-100008-EZ-RJ45-Combo/dp/B002PI475O/
or
https://www.amazon.com/Pass-Thru-Reliable-Klein-Tools-VDV226-110/dp/B076MGPQZQ/

Super easy. You don't have to worry about keeping the twists tight, cutting the wires to just the right length or lining them up perfectly. Just strip a bunch of wire. untwist and flatten, cut at an angle and insert. easier to tell if they got out of order, and you can pull it all the way so the jacket is inside and nearly none of the twists are un-wound. Then just crimp and cut at once.
 
As an Amazon Associate IPCamTalk earns from qualifying purchases.
Top