Noob Question on the wiring of ip camera plastic shield(?)

apothecary

n3wb
Joined
Mar 23, 2016
Messages
6
Reaction score
0
Hi all.

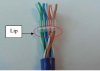
For the life of me, I cannot figure out how to run an ethernet cable through this shield to help protect it from the elements on my LaView IP cameras. The hole is tiny! Do I have to cut the ethernet cable and reattach? Seems incredibly strange to me.

Thanks! I've been picking my brain about this for so long but can't figure it out.

Pictures of what i'm talking about.


zero-degrees

Known around here
Joined
Aug 15, 2015
Messages
1,350
Reaction score
847
That weather fitting is to be applied BEFORE a connector is terminated on the end of the cable.

If you are using exsiting terminated cables you will either have to cut the end off and reterminate or not use that weather fitting.
 

tigerwillow1

Known around here
Joined
Jul 18, 2016
Messages
3,844
Reaction score
8,507
Location
USA, Oregon
I ran the cable and attached the connector before I got the camera and ran into the same situation. Just a lesson learned the hard way, and I got more practice attaching RJ45s.
 
Joined
Nov 11, 2015
Messages
28
Reaction score
1
Location
Remote part of Western USA
As an Amazon Associate IPCamTalk earns from qualifying purchases.

Keyboard

Getting comfortable
Joined
Oct 25, 2016
Messages
279
Reaction score
534
Location
Owings Mills, MD
Yes, a real head scratcher until you realize that the Ethernet cable must be fed through the shield before terminating with the RJ45. Also, make sure that you put the rubber grommet on before terminating. The rubber washer goes on the female terminated end of the camera.

  1. Slide cable through capscrew;
  2. Slide grommet onto cable;
  3. Slide cable through the long cover;
  4. Terminate the cable with an RJ45 connector;
  5. put rubber washer on the female terminated camera connector;
  6. Connect the cable to the camera connector;
  7. Twist lock the long cover onto camera connector;
  8. Screw the capscrew onto the long cover;
  9. Done.
CAM00563[1].jpg CAM00564[1].jpg CAM00565[1].jpg

EDIT: The crimp job sucks, but the point of the pictures is to show the order of installing the parts.
 
Last edited:

tangent

IPCT Contributor
Joined
May 12, 2016
Messages
4,421
Reaction score
3,655
Your crimps need some practice. You left the wires about 1/4" too long after you put them in order. A crimp that looks like this is guaranteed to fail eventually :(
The plastic part of the modular plug that grips the cable needs to grip the outer jacket not the inner wires!

*Photo could have been take before you crimped or you may have just stuck it on to illustrate the assembly of all the pieces.
 
Last edited:

tigerwillow1

Known around here
Joined
Jul 18, 2016
Messages
3,844
Reaction score
8,507
Location
USA, Oregon

Platinum Tools 100010C EZ-RJ45 Cat 6+ Connectors, Clamshell, 50-Pieces

Weather Report
Sold by: Amazon.com LLC
$31.58


This type of connector makes it easier to put RJ45's on round cable.
You can pull the cable through and verify it before crimping the connector.
There is an associated crimping tool, but any regular crimper should work too.
Good luck!
I've been using an RJ45 that's similar in concept and costs a bunch less. 100 pieces from Monoprice is $7.98, but you'll probably end up with shipping cost on top of that. It's called "Cat6 Plug Solid W/Insert". To assemble you strip a few inches of jacket off the cat6 cable, then push the wires through a small plastic insert, similar to how it's done with the Platinum Tools connector. Then you snip the wires at the end of the insert, push it into the RJ45, and crimp. Hard to say which one is easier without using both of them. With the Platinum Tools system, it would be easier to grip the RJ45 when feeding the wires, compared to gripping the teeny plastic insert. On the other hand, it might be easier to feed the wires into the insert because the teeny holes are right at the edge instead of ~1/4 inch inside the connector shell. The product page is at Cat6 Plug Solid W/Insert 50U 100pcs/Bag - Monoprice.com, and the directions are here http://www.monoprice.com/manual/How to - crimp RJ45 w inserts.pdf . Here's a picture of the wires in the insert, which gets pushed closer to the cat6 jacket before crimping.

insertPic.jpg
 
As an Amazon Associate IPCamTalk earns from qualifying purchases.

Keyboard

Getting comfortable
Joined
Oct 25, 2016
Messages
279
Reaction score
534
Location
Owings Mills, MD
Your crimps need some practice. You left the wires about 1/4" too long after you put them in order. A crimp that looks like this is guaranteed to fail eventually :(
The plastic part of the modular plug that grips the cable needs to grip the outer jacket not the inner wires!

*Photo could be been take before you crimped or you may have just stuck it on to illustrate the assembly of all the pieces.
Somehow, I knew someone would comment on the crimp job!!!

It was a quick sample from scrap cable that I made for the pictures. Otherwise, my crimps are done right. But, thanks for your input.

In any event, the point of the pictures was to show the order of installing the parts.
 

tangent

IPCT Contributor
Joined
May 12, 2016
Messages
4,421
Reaction score
3,655
no worries. If somebody's looking at the pics to understand how to do this, I just thought I should say something.
 
Joined
Mar 22, 2017
Messages
14
Reaction score
2
Do these need to be installed on the cable if you are tucking the whole thing back up in the soffit? I would assume its only needed if the whole thing is exposed outside correct?
 

nayr

IPCT Contributor
Joined
Jul 16, 2014
Messages
9,329
Reaction score
5,325
Location
Denver, CO
if its outside, it should be installed and wrapped in some self sealing silicon tape.. or do you never clean the cobwebs and dirt off your siding w/a garden hose? I just did that today, all my cameras still work :D

#1 killer of DIY Camera installs is water damage on ethernet connection..
 
Top