Suggestions for how to mount Dahua Jbox on soffit?

badutahboy

n3wb
Joined
Mar 3, 2018
Messages
10
Reaction score
0
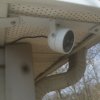
Hi all, I just finished running wires for 2 IPC-HDW5231RP-Z's, and I'm ready to mount the cameras. They'll be going on either side of my garage in the aluminum soffits.

I'm trying to figure out the best way to mount my Jbox's though. I've looked at various modifications of a ceiling fan spanner, but they don't work ideally at all. My other idea is to toenail a piece of 2x6 in between the two rafters and mount the box to it.

I'm just wondering if there are better suggestions? Also, is it better to mount the Jbox inside the soffit and the camera outside, or to mount it in such a way that both jbox and camera are exterior to the soffit? I'm assuming that's a purely aesthetic decision, but figured I'd ask anyway.

Any help? Thanks in advance.
 

mat200

IPCT Contributor
Joined
Jan 17, 2017
Messages
13,895
Reaction score
23,186
Hi @badutahboy

I mounted my junction boxes on the stucco wall - and in one area placed a 2x6 section behind the stucco to support the junction box ( had a small section of drywall opened up, and at least at the point I was placing the junction box there was no wood backing - just "chicken wire and tar paper" behind the stucco )

I like the idea of toe nailing a 2x6 section between the rafters, and the junction box on the surface of the soffit or if you need the cameras lower to bring a section of conduit down to a junction box and mount it on your wall.
 

awsum140

Known around here
Joined
Nov 14, 2017
Messages
1,254
Reaction score
1,128
Location
Southern NJ
Assuming vinyl soffit, measure the width of the soffit, between the INSIDE of both the inner and outer lips/flanges. Get some 1-1/2" or 2" aluminum flat stock, Lowes or Home Despot, and cut it about a 1/4" shorter than you measured. Mount a weatherproof box, like the one specified for the R-Z series, slip in in under the flanges and you can adjust and move the camera very easily to suit the view you want. The flat stock can be secured with a few dabs of silicon calk or even a sheet metal screw to keep it solid once you've got the exact location finalized. I make a clamp for one end with a short, scrap piece of the same stock I use for the main bar, drill and thread, and you end up with a "no holes needed" mounting system. The biggest trick is getting a section of soffit out for the wiring, but even that can be done fairly easily.
 

badutahboy

n3wb
Joined
Mar 3, 2018
Messages
10
Reaction score
0
Hi @badutahboy

I mounted my junction boxes on the stucco wall - and in one area placed a 2x6 section behind the stucco to support the junction box ( had a small section of drywall opened up, and at least at the point I was placing the junction box there was no wood backing - just "chicken wire and tar paper" behind the stucco )

I like the idea of toe nailing a 2x6 section between the rafters, and the junction box on the surface of the soffit or if you need the cameras lower to bring a section of conduit down to a junction box and mount it on your wall.
Thanks for validating that my thought process was on the right path. As usual, you're right on top of jumping in to offer good advice. Thank you!

Assuming vinyl soffit, measure the width of the soffit, between the INSIDE of both the inner and outer lips/flanges. Get some 1-1/2" or 2" aluminum flat stock, Lowes or Home Despot, and cut it about a 1/4" shorter than you measured. Mount a weatherproof box, like the one specified for the R-Z series, slip in in under the flanges and you can adjust and move the camera very easily to suit the view you want. The flat stock can be secured with a few dabs of silicon calk or even a sheet metal screw to keep it solid once you've got the exact location finalized. I make a clamp for one end with a short, scrap piece of the same stock I use for the main bar, drill and thread, and you end up with a "no holes needed" mounting system. The biggest trick is getting a section of soffit out for the wiring, but even that can be done fairly easily.
This is a seriously intriguing idea, particularly because I might take these cams with me if I move. My soffit is aluminum, but I'm pretty sure it'd work similarly. I think I'm envisioning what you're saying correctly, but any chance you could post a pic just to verify that I'm understanding?

No holes (or one 1/4" hole to poke a wire through) sounds much better than cutting a big hole out of soffit.
 

Mr_D

Getting comfortable
Joined
Nov 17, 2017
Messages
596
Reaction score
527
Location
Southern California
Hi @badutahboy

I mounted my junction boxes on the stucco wall - and in one area placed a 2x6 section behind the stucco to support the junction box ( had a small section of drywall opened up, and at least at the point I was placing the junction box there was no wood backing - just "chicken wire and tar paper" behind the stucco )
Why not just use masonry anchors in the stucco? Or do you have the newer kind of stucco that's not really that solid?
 

awsum140

Known around here
Joined
Nov 14, 2017
Messages
1,254
Reaction score
1,128
Location
Southern NJ
I'll be working outside later today and will try to get a cell phone shot for you. In my case, the mount is for an auxiliary IR illuminator and it's on an extension of the soffit that matches the gable end soffit so I used two clamps, but the basics are all the same.
 

giomania

IPCT Contributor
Joined
Jun 1, 2017
Messages
780
Reaction score
538
I managed to hit part of a rafter by using a 3” drywall screw, but if you are placing the camera in the middle of the rafters...no bueno.

There was a video posted about that flat bar stock idea, and I think I added it here:

IPCamTalk Cliff Notes 2018-03.docx


Sent from my iPhone using Tapatalk Pro
 

awsum140

Known around here
Joined
Nov 14, 2017
Messages
1,254
Reaction score
1,128
Location
Southern NJ
That's close, Gio, but no cigar. The method I describe is similar to the old work box that mounts between rafters but is external to the "ceiling" material and uses the channels that the soffit mounts in. The bar stock provides a pretty solid mounting surface, more solid than either aluminum or vinyl soffit. There is another post in a thread here, can't remember where, with photos. I "improved" on it with the clamps on the ends of the cross bar. I will get some photos later today and try to find that other post and link it here, too.
 

TechBill

Known around here
Joined
Nov 1, 2014
Messages
1,772
Reaction score
1,182
On mine, I removed the soffit and add a small sheet of 3/4 inch plywood since I have a 7/8 inch gap between the rafter and soffits. After I screw down the plywood to the rafter then I put the soffit back on and drilled the hole for cable where I wanted the camera to be at and screw the camera directly to the plywood. There is a photo in my build post where I have not install all the soffit back in yet but you can see plywood exposed behind the soffit that the camera is mounted to. All I have is a 3/4 inch hole and 3 screws holes in my soffit which all is sealed off. No weather or bugs will be getting into it.

TechBill's surveillance build

At first, I was going to use a ceiling fan bracket if the plywood screwed directly on rafter weren't going to work out for me. My plan was going to take a 3/4 plywood 6" x 6 "square and screw it on the fan junction box so the camera have something to mount to and then install it between the roof rafter. It's strong enough to hold a ceiling fan so it will hold a piece of plywood and camera easily and it completely adjustable even if you install it slightly angled between the rafter. I would drill a 3/4 inch hole in the plywood then pop one of the hole on the junction box to feed the cable in.

Here a link to the adjustable ceiling fan box I am talking about -

Shop RACO 1-Gang Silver Steel Interior New Work/Old Work Ceiling Fan Ceiling Electrical Box at Lowes.com
 

awsum140

Known around here
Joined
Nov 14, 2017
Messages
1,254
Reaction score
1,128
Location
Southern NJ
OK, I took a picture but please, please, don't put it in the Wiki! I should have done a few things. Properly primed the aluminum before painting to prevent peeling (and I have the right primer). Increased the spacer thickness under the clamp. Shortened the clamp length a bit as well. Power washed the whole house. But at least you get the idea.

If mounting a camera the cable can be routed in a groove of the soffit under the bracket to make it even neater. This is an "experiment" to see if I can improve detection at extreme range of an existing overview camera that's about 125 feet from the Tendelux IR illuminator in the photo. It's only a 4 watt illuminator but I can easily see the difference. I was adjusting the pan angle trying to improve it further so I got the photo.


soffit-mount.jpg

I have no idea what that dark spot is on the corner molding, either. It's not visible to the eye, or at least I can't see it. Found out that dark spot was crap on the lens of the phone.
 
Last edited:

badutahboy

n3wb
Joined
Mar 3, 2018
Messages
10
Reaction score
0
OK, I took a picture but please, please, don't put it in the Wiki! I should have done a few things. Properly primed the aluminum before painting to prevent peeling (and I have the right primer). Increased the space size under the clamp. Shortened the clamp length a bit as well. Power washed the whole house. But at least you get the idea.
Thanks a ton for the pic. I'm glad I asked, because I was envisioning running the flat bar the opposite direction, and somehow pinching it between two pieces of the actual soffit material. I was trying to wrap my head around how it attaches. Now that I see it, I think this idea is brilliant for one ofmy two cameras. The other one might call for something a little more secure, as it's closer to ground height (probably 8 feet high, rather than about 12 for the other one). I suppose I could do both using this method and either use a security torx screw on the clamp or put a drop of solder into the head of a phillips.
 

badutahboy

n3wb
Joined
Mar 3, 2018
Messages
10
Reaction score
0
On mine, I removed the soffit and add a small sheet of 3/4 inch plywood since I have a 7/8 inch gap between the rafter and soffits. After I screw down the plywood to the rafter then I put the soffit back on and drilled the hole for cable where I wanted the camera to be at and screw the camera directly to the plywood. There is a photo in my build post where I have not install all the soffit back in yet but you can see plywood exposed behind the soffit that the camera is mounted to. All I have is a 3/4 inch hole and 3 screws holes in my soffit which all is sealed off. No weather or bugs will be getting into it.
This could work for me as well. Might have to build it up a bit because I think my gap is more like 1.5", but I'll take a look at it today. Thanks for the suggestion!
 

awsum140

Known around here
Joined
Nov 14, 2017
Messages
1,254
Reaction score
1,128
Location
Southern NJ
If you're that worried about security, use tamper proof torx. If nothing else, it'll slow them way down. At eight feet it's still high enough to be a pain in the ass to unscrew anything without a ladder or standing on someones shoulders. It would be easier just to wack it with a baseball bat to defeat it and no mounting method will withstand that. I used stainless phillips and anyone is welcome to try and unscrew them.
 

giomania

IPCT Contributor
Joined
Jun 1, 2017
Messages
780
Reaction score
538
OK, I took a picture but please, please, don't put it in the Wiki! I should have done a few things. Properly primed the aluminum before painting to prevent peeling (and I have the right primer). Increased the space size under the clamp. Shortened the clamp length a bit as well. Power washed the whole house. But at least you get the idea.

If mounting a camera the cable can be routed in a groove of the soffit under the bracket to make it even neater. This is an "experiment" to see if I can improve detection at extreme range of an existing overview camera that's about 125 feet from the Tendelux IR illuminator in the photo. It's only a 4 watt illuminator but I can easily see the difference. I was adjusting the pan angle trying to improve it further so I got the photo.


View attachment 28508

I have no idea what that dark spot is on the corner molding, either. It's no visible to the eye, or at least I can't see it.
Do you think the inserted aluminum bar stock opens up enough of a gap to allow bugs into the soffit?

In the video I saw, the dude just inserted the bar stock at an angle, and then straightened it out to be perpendicular, therefore wedging it in. I think his aluminum bar stock was thinner than yours.

I have to find that video.


Sent from my iPhone using Tapatalk Pro
 

awsum140

Known around here
Joined
Nov 14, 2017
Messages
1,254
Reaction score
1,128
Location
Southern NJ
I don't really think bugs would find it any easier, there's always gaps around soffit anyway. I went with 1/8" thick stock so there is enough material to get solid threads cut into it. I will say it's pretty solid with both ends clamped, but this particular case is a little different because it's actually out past the end of the house, itself.

That's how it has to go in, angle it, tuck one end in, then pivot it to tuck the other end in. It can then be easily slid to the optimal spot. I'm not sure I'm going to use clamps again, but probably will. If you wanted even more support, just use two pieces, side by side.

I looked for that video, too, and can't find it again. Maybe I'll look some more after dinner while I have my coffee.
 

giomania

IPCT Contributor
Joined
Jun 1, 2017
Messages
780
Reaction score
538
Obviously the gentleman did not know about the IPVM v3 calculator tool, otherwise he would’ve known exactly where to place the cameras to begin with!


Sent from my iPhone using Tapatalk Pro
 

awsum140

Known around here
Joined
Nov 14, 2017
Messages
1,254
Reaction score
1,128
Location
Southern NJ
My trick is to use my 35mm camera, even a better idea, at least to me. Real world view from the exact location. Besides, it gets me outside :lol:
 
Top