I made a simple program to take repeated screenshots of an embedded web browser control and save it to a PNG file. This is a rough workaround I made tonight after work so it has not been rigorously tested and it could probably use more polishing. I appreciate any feedback.
For
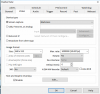
Blue Iris it uses the image overlay option with the screenshot stretched across the camera window. The settings below seem to work but if you find something else works better please let me know.
The project repository can be found here:
GitHub - bbarenz/web2img: Simple program to take screen shots of an embedded webbrower control and save the image to the disk
If you just want the executable download it here:
https://github.com/bbarenz/web2img/blob/master/web2img/bin/Debug/web2img.exe
Setup web2img:
Run web2img and select a website URL and file location to save the image file. The program utilizes windows web browser control in Visual Studio which mirrors all Internet Explorer settings on your machine. If something isn't working correctly here update your Internet Explorer settings and try again. Once the webpage loads you can resize the form and adjust the location of the image you wish to display on your Blue Iris overlay. The size of the image file will be the same as the size of the web browser so you may need to do some back and forth with Blue Iris to make sure it is displayed correctly.
Adjust the image update interval in miliseconds to how often you want the image file to be updated.
Adjust the web browser update interval in minutes to how often you want the web browser to refresh. If you don't want it to refresh at all uncheck the Enable box.
Both the image and web browser can be updated manually by clicking the "Snap" option in the menu strip.
Click Minimize or File>Hide to hide the application. You can find it in the system tray, click the context menu strip and click "Show"
Setup Blue Iris:
- Add a new camera.
- On the Video tab set the Device Type to "Screen Capture" > Blackness.
- On the bottom of the Video tab Enable Text and Graphic Overlays and click Edit
- Click Add Image and load the image file from web2img at the location you specified previously
- Adjust the size of the image to fit the window, this may take some back and forth to get setup
- On the Watchdog tab uncheck "Detect loss of signal"
- Click OK and it should work
- You will need to refresh your browsers to view the new camera properly
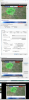
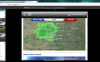
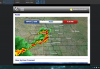
Screenshots:


")