
Many people have covered this topic, but usually for a specific doorbell camera (RING/NEST/EZVIZ/EUFY/Reolink etc) or for a specific intercom system.
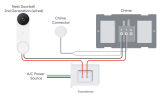
Regarding the doorbell cam, it probably needs to come with a mechanical chime adaptor known as "The power module" or "The Chime Adaptor"
Regarding intercom systems, as long as it has a two way speaker, a SPST push button, and a 30VAC doorbell transformer (or larger!) you are probably good to go!
Before I go any further, I would like to acknowledge our collective indebtedness to the master scientists over at NUTONE NORTH SIDE SERIVCE who have a YouTube playlist on this topic that could easily serve as a doctoral thesis on the subject. They are also the original inventors behind the now world famous Doorbell Cam Door Station Relay Adaptor kit (DCDSRA) get version 2.1, accept no substitutes! When it comes to Intercomology, there is only one place you need to go. Note: If you live in San Ramon CA, a little bad news I am afraid...NORTHSIDE recently moved to Hixson Tn.
In my case, the original intercom installer used one two pair cable for the doorbell push button and a second two pair cable for the door station speaker. Therefore I had two spare pair running back from the Nutone door station to the Nutone Master Station. Also for power, the intercom installer ran two pair from the master station to the transformer in the main breaker panel and had already doubled up the pairs to carry more current.
Install Steps:
1) If necessary, upgrade the POWER CAPACITY of your master station transformer to 30VA or even 40 VA (typically a 16Vrms or 24Vrms transformer, the exact voltage does not matter except for the choice of your adaptor relay voltage later.)
2) You will need a power pair from the Intercom master station to the Intercom Door station. Perhaps you will get lucky like me and have a spare pair or two already present. In my case I had two spare pair so I doubled them up to maximize current handling capacity
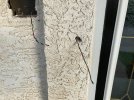
3) Figure out how you will get a cable from your intercom door station to your doorbell cam (see tunnel photo, I used a very long wood/masonry drill bit designed for running wires through walls in houses.)
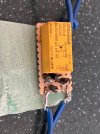
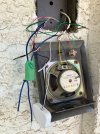
4) Buy (or make) the relay adaptor board (see photo, I made one, rather crude but I covered it with electric tape and some bungee cords lol). Note, in the end I had to add a 50V 470uF electrolytic capacitor at the DC side of the full wave bridge because the 24V DC relay I selected was chattering.
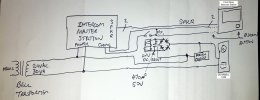
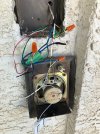
5) Transformer Power Off, then wire up the Relay adaptor board and the Power Module in the Intercom Door Station box, but leave the door chime button on the intercom door station faceplate connected for now. (See photos Schematic, Chime button, Relay Board etc)
6) Wire in your door camera, transformer power on, and then test that the camera doorbell button and the Door station Chime Button both activate the intercom chime. (Be sure to select the "Mechanical Chime" option when you install your Doorbell cam in the install App.)
7) If desired (recommended) disconnect the intercom door station chime button, and replace the button with an electrical box knockout plug.
Bingo, Bango, Bongo!
Thanks to Chris from North Side for his immense insight and brilliant design! Next time I am in Hixson, the beer is on me my friend!
Regarding the doorbell cam, it probably needs to come with a mechanical chime adaptor known as "The power module" or "The Chime Adaptor"
Regarding intercom systems, as long as it has a two way speaker, a SPST push button, and a 30VAC doorbell transformer (or larger!) you are probably good to go!
Before I go any further, I would like to acknowledge our collective indebtedness to the master scientists over at NUTONE NORTH SIDE SERIVCE who have a YouTube playlist on this topic that could easily serve as a doctoral thesis on the subject. They are also the original inventors behind the now world famous Doorbell Cam Door Station Relay Adaptor kit (DCDSRA) get version 2.1, accept no substitutes! When it comes to Intercomology, there is only one place you need to go. Note: If you live in San Ramon CA, a little bad news I am afraid...NORTHSIDE recently moved to Hixson Tn.
In my case, the original intercom installer used one two pair cable for the doorbell push button and a second two pair cable for the door station speaker. Therefore I had two spare pair running back from the Nutone door station to the Nutone Master Station. Also for power, the intercom installer ran two pair from the master station to the transformer in the main breaker panel and had already doubled up the pairs to carry more current.
Install Steps:
1) If necessary, upgrade the POWER CAPACITY of your master station transformer to 30VA or even 40 VA (typically a 16Vrms or 24Vrms transformer, the exact voltage does not matter except for the choice of your adaptor relay voltage later.)
2) You will need a power pair from the Intercom master station to the Intercom Door station. Perhaps you will get lucky like me and have a spare pair or two already present. In my case I had two spare pair so I doubled them up to maximize current handling capacity
3) Figure out how you will get a cable from your intercom door station to your doorbell cam (see tunnel photo, I used a very long wood/masonry drill bit designed for running wires through walls in houses.)
4) Buy (or make) the relay adaptor board (see photo, I made one, rather crude but I covered it with electric tape and some bungee cords lol). Note, in the end I had to add a 50V 470uF electrolytic capacitor at the DC side of the full wave bridge because the 24V DC relay I selected was chattering.
5) Transformer Power Off, then wire up the Relay adaptor board and the Power Module in the Intercom Door Station box, but leave the door chime button on the intercom door station faceplate connected for now. (See photos Schematic, Chime button, Relay Board etc)
6) Wire in your door camera, transformer power on, and then test that the camera doorbell button and the Door station Chime Button both activate the intercom chime. (Be sure to select the "Mechanical Chime" option when you install your Doorbell cam in the install App.)
7) If desired (recommended) disconnect the intercom door station chime button, and replace the button with an electrical box knockout plug.
Bingo, Bango, Bongo!
Thanks to Chris from North Side for his immense insight and brilliant design! Next time I am in Hixson, the beer is on me my friend!
Attachments
-
 Typical Dorbell Cam Power Module wirirng .png18 KB · Views: 0
 -
 Schematic Nutone North Side Supply Master Staion Adaptation .jpg353.2 KB · Views: 0
 -
 NUTONE NORTH SIDE SUPPLY RELAY ADAPTOR.JPG1.5 MB · Views: 0
 -
 TUNNELING FROM NUTONE DOOR STATION TO DORBELL CAM MOUNT POINT.JPG2.9 MB · Views: 0
 -
 RELAY OUTPUT DISCONNECTED. NUTONE CHIME OPERATED BY NUTONE BUTTON.JPG2.2 MB · Views: 0
 -
 DOOR STATION WIRING. NUTONE CHIME BUTTON REPLACED by RELAY CONTACT.JPG2.6 MB · Views: 0
 -
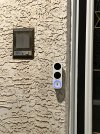 FINAL INSTALL. NUTONE CHIME BUTTON DISABLED.JPG1.7 MB · Views: 0