IPC-T2231T-ZS IR Artifacts

Joined
Mar 2, 2021
Messages
5
Reaction score
1
Location
USA
Hello everyone, I've been a a long time reader for some time on these forums, but this is my first post. I finally broke down and bought an IPC-T2231T-ZS and I was doing some testing with the camera in day and night settings. For the most part, the camera has met all of my expectations; I have noticed some nighttime artifacting (if thats even the right term) in one particular night shot. It almost seems as though the lens is dirty, but I made several cleaning attempts with no success. Further, if I move the camera to a different location, the artifacting goes away. Bring it back and its back as soon as it went away.

Has anyone else experienced this? Any thoughts on how something like this could be corrected?
 

Attachments

wittaj

IPCT Contributor
Joined
Apr 28, 2019
Messages
25,144
Reaction score
49,014
Location
USA
Yep total IR glare from those lights out in the distance which is evident by how it disappears when you move the camera. That blur ghost in the one pic is a little bug and too slow a shutter giving it that ghost trail.

You can minimize some of that with the right settings...

Take it off auto settings at night unless you like seeing Casper and blurring and hotspots. Auto settings in most situations for shutter will produce a great picture, but motion is complete crap with blurring and ghosting. Even in the day auto settings are usually not your friend.

In my opinion, shutter and gain are the two most important and then base the others off of it.

Go into shutter settings and change to manual and start with custom shutter as ms and change to 0-8.3ms and gain 0-50 (night) and 0-30 (day)for starters. Auto could have a shutter speed of 100ms or more and gain up at 100 which will contribute to significant ghosting and that blinding white you will get from the infrared.

Now what you will notice that happens immediately is your image gets A LOT darker. That faster the shutter, the more light that is needed. But it is a balance. The nice bright night image results in Casper during motion LOL. What do we want, a nice static image or a clean image when there is motion introduced to the scene?

So if it is too dark, then start adding ms to the time. Go to 10ms, 12ms, etc. until you find what you feel is acceptable as an image. Then have someone walk around and see if you can get a clean shot. Try not to go above 30ms as that tends to be the point where blur starts to occur.

You can also adjust brightness and contrast to improve the image.

You can also add some gain to brighten the image - but the higher the gain, the more ghosting you get. Some cameras can go to 70 or so before it is an issue and some can't go over 50.

But adjusting those two settings will have the biggest impact. The next one is noise reduction. Want to keep that as low as possible. Depending on the amount of light you have, you might be able to get down to 40 or so at night (again camera dependent) and 25-30 during the day, but take it as low as you can before it gets too noisy. Again this one is a balance as well. Too smooth and no noise can result in soft images and contribute to blur.

It may not completely remove those, but it can reduce it greatly. I have been able to knock mine out by adjusting settings.
 
Joined
Mar 2, 2021
Messages
5
Reaction score
1
Location
USA
Thanks for the input everyone. I'm in the works of putting together a mobile camera mount for the greater project; its basically a glorified stick with a battery and wifi. This should give me the mobility I need to try different angles and views around the property. I will make the recommended adjustments and report back when I get things operational, hopefully within the next couple days.
 
Joined
Mar 2, 2021
Messages
5
Reaction score
1
Location
USA
I got my mobile camera mount put together, moved to a different angle with more shot diversity, and made some adjustments. Through all of your recommendations, I learned some stuff and now realizing that getting proper coverage around my place is going to be a challenge.

Focal length was a big deal, as soon as I zoomed in the and was focused either on the light source or the local, unlit premises, the IR glare goes away. Unfortunately, there are most likely going to be shots that I can't avoid getting both into the frame. This took me to the next set of recommendations which was tuning the camera settings.

I placed the camera in a glare scenario and adjusted to the recommended night values:
Custom shutter 0-8.3ms
Gain 0-50 (night)
Glare is still there, but it is significantly better.

I adjusted values further to:
Shutter 0-2
Here, the IR glare is just barely visible, but the image is much too dark.

I reset the shutter and adjusted the gain:
Shutter at 0-8.3
Gain 0-30
Again, this makes IR glare just barely visible, but the image is much too dark.

I reset back to the recommended settings and made a couple tweaks:
Custom shutter 0-8.3ms
Gain 0-50 (night)
Brightness 65
Saturation 65
WDR 50
WB Outdoors
IR Backlight 10

I adjusted the focal length to mitigate some of the glare and I think it was mostly successful. There is still some haze from the glare in the lower left part of the image, but maybe this is the best that can be done given the situation?

Maybe I'm asking for my cake and wanting to eat it too. Is there a better camera to address this type of situation? I bought this unit to get a testing baseline before I ran my cables, so I'm not invested into anything in particular, yet.

Thanks All.
 

Attachments

wittaj

IPCT Contributor
Joined
Apr 28, 2019
Messages
25,144
Reaction score
49,014
Location
USA
What exactly are you trying to cover with this location? Is there enough light there to force it in color to avoid the IR glare? Can you lower the camera to get those lights out of the view? etc.

As you are finding out - one camera, regardless of how good, cannot perform as a be all, see all camera...and fortunately you are actually doing it right and testing first before running all the cables!

You need the right camera for the area you want to cover.

And you usually need more than one camera.

To cover an area at a distance from your camera install you need optical zoom to that area. Digital zooming in after the fact on the video only works in the movies and TV.

Here are my general distance recommendations, but switch out the 5442 camera to the equivalent 2MP on the 1/2.8" sensor works as well.
  • 5442 fixed lens 2.8mm - anything within 10 feet of camera OR as an overview camera
  • 5442 ZE - varifocal - distances up to 40-50 feet (personally I wouldn't go past the 30 foot range but I like things closer)
  • 5442 Z4E - anything up to 80-100 feet (personally I wouldn't go past 60 feet but I like things closer)
  • 5241-Z12E - anything from 80 feet to almost 200 feet (personally I wouldn't go past 150 feet because I like things closer)
  • 5241-Z12E - for a license plate cam that you would angle up the street to get plates up to about 175 feet away, or up to 220 with additional IR.
  • 49225 PTZ - great PTZ and in conjunction with an NVR or Blue Iris and the cameras above that you can use as spotter cams to point the PTZ to the correct location to compliment the fixed cams.
You need to get the correct camera for the area trying to be covered. A 2.8mm to IDENTIFY someone 40 feet away is the wrong camera regardless of how good the camera is. A 2.8mm camera to IDENTIFY someone within 10 feet is a good choice OR it is an overview camera to see something happened but not be able to identify who.

Main keys are you can't locate the camera too high (not on the 2nd story or above 7 feet high unless it is for overview and not Identification purposes) or chase MP and you need to get the correct camera for the area trying to be covered. A 2.8mm to IDENTIFY someone 40 feet away is the wrong camera regardless of how good the camera is. A 2.8mm camera to IDENTIFY someone within 10 feet is a good choice OR it is an overview camera to see something happened but not be able to identify who.
 
Joined
Mar 2, 2021
Messages
5
Reaction score
1
Location
USA
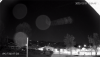
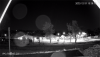
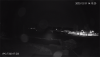
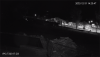
I'm not trying to cover anything in particular with the exact shots that I have shared. I noticed the IR glare while doing my first bit of toying with the camera at night. I am anticipating that I will have a couple scenarios where the light source in the distance will be unavoidable. Knowing to what degree glare can be mitigated, either by camera choice, settings, or otherwise is going to go a long way to finding an optimal placement plan. In the scope of my surveillance goals, I'm trying to cover the areas leading up to the ingress/egress points (ie. doors, windows, and accessory buildings). Ideally, it would be nice identify at 40ft, but 20-30ft should be acceptable in nearly, if not all all situations. The ability to observe at around the 100-125ft mark would be a secondary goal. I bought this camera with the varifocal to hopefully identify where a fixed lens camera would be feasible and what that fixed lens should be. The reality is, I'm guarding against tweakers on the other side of town, and by their nature, the mere presence cameras will be enough of a deterrent. That said, fortune favors those who are prepared, and I want to do this right. Hopefully that sufficiently covers my intent, moving back to the topic:

I can try forcing color but I'm doubting that we are going to have much luck, there just isn't that much light around, other than the blaring light causing the IR glare. No light-posts on the streets, no light sources on the property. Very rural.

Is it reasonable to expect that my most recent posting is about as good as its going to get, given the scenario posed?
From what I understand with my reading on the forums, more MP means more light or bigger sensors are needed to be effective at night. The 4MP cameras you have suggested cover the bases with bigger sensors, but wouldn't they be subject to the the same glare observed with the 2MP variant I am testing with?

I appreciate your input.
 

Mike A.

Known around here
Joined
May 6, 2017
Messages
3,837
Reaction score
6,412
Is it reasonable to expect that my most recent posting is about as good as its going to get, given the scenario posed?

...The 4MP cameras you have suggested cover the bases with bigger sensors, but wouldn't they be subject to the the same glare observed with the 2MP variant I am testing with?
It's more just the interaction of the particular scene and the way that the lens in that cam is constructed. You have a very dark scene overall with some very distinct points of light that seem to be reflected off of whatever element(s) in that particular lens. If you change the focal length, angle, and/or brighten the overall scene with a slower shutter speed, then that that may eliminate/lessen the effect. (e.g., They're gone in your second pic above). Color likely won't work well there without added white light.

It's possible that another camera model might not be affected in the same way given differences in design. You'd have to try it and see.

Any other cam that you have that you could try there? As was asked above, what are you trying to cover with that cam? Can you position it so that it covers the same area from another angle where the lights aren't directly in the picture? i.e. Same area but from say 45 degrees to one side or another.
 
Last edited:

wittaj

IPCT Contributor
Joined
Apr 28, 2019
Messages
25,144
Reaction score
49,014
Location
USA
That glare is going to happen regardless of which camera. Simple physics. Every camera has a lens and a protective cover.

You can mitigate it some with settings and/or moving the camera around. You can turn the camera to try to line the light glare up with the actual lights themselves, but you have so many that to line them all up will be tough.

You could put the camera on the fence facing back to your house.

Lot's of ways to get the coverage you need and avoid/mitigate the problem of the light glare or greatly reduce it, but that issue will still be there regardless of camera choice.
 
Top