Long outdoors network cable run – Part 2 ... Fiber Optic run working

Virga

Pulling my weight
Feb 13, 2023
196
141
USA
A. Overview of installing a long run of Fiber Optic cable

I completed a long run of Fiber Optic (FO) Cable, with much help from forum members at every step. It was suggested that I document my experience, so this thread in case it is useful for others.

Some time back I posted requesting input on how to implement a long outdoor network cable run, approximately 400 feet from my wiring center to the outdoor switch, in an existing buried 3/4" conduit. At the time I was thinking copper ethernet cable, because at the time that is what I knew.

With input and encouragement from forum members, the project took a different shape. Many suggested to use FO. At first I was reluctant to go down the suggested path, mostly because it was out of my comfort/knowledge zone and beyond my abilities.

Turns out FO is neither hard to do nor prohibitively expensive, though you may have to buy a cable stripper if you don't already have one
At many points I was stumped. But I overcame each hurdle one at a time, and now I can’t believe I was frozen at those points.

Doing things helps me understand things. I started buying tools/components/parts and trying them out. I was prepared to circle back and replace anything that turned out to have been the wrong choice. So far, so good.

This post is organized in five sections including this one as separate posts, to keep the actionable info at the top and be a convenient read. I will update these initial posts as necessary.

Concluding thought: Most here could likely run and terminate FO if they decided to do so.
Yeah, I know. I too felt “easy for you to say” when it was suggested to me in another thread and it turned out to be true.
 
Last edited:
B. Links, materials, tools, images

Threads/posts
:
#11
#49

Materials:
Weathertight box for low voltage equipment at far end, comes in various sizes
Weathertight box at house end, comes in various sizes
14-Gauge Half Slotted Metal Framing Strut Channel
2-1/2 in. Pipe Strap - Silver Galvanized - Strut Fitting
DIN rails at control panel
FO Cable - see link at post #49 above
Industrial/outdoor network switch at far end
Pull tape ½”

FO Tools and parts:
Jonard Tools JIC-375 Three Hole Fiber Optic Stripper
Klein Tools 11057 Wire Cutter/Stripper 20-30 awg solid wire - alternative stripper, at-hand tool used by @jnissen
Wire & Kevlar Cutting Shears
FO connectors and FO cleaver - kit
FO cable tester
Transceivers - Could use any; I used Ubiquiti in the hope it would play nicely with my UniFi network

Images
 

Attachments

  • Far_end_LV_enclosure_closed.jpg
    Far_end_LV_enclosure_closed.jpg
    511 KB · Views: 0
  • Far_end_LV_enclosure_open.jpg
    Far_end_LV_enclosure_open.jpg
    1.2 MB · Views: 0
  • house_end_pull_box.jpg
    house_end_pull_box.jpg
    1.6 MB · Views: 0
  • 01_FO.jpg
    01_FO.jpg
    604.6 KB · Views: 0
  • 02_FO_buffer_stripped.jpg
    02_FO_buffer_stripped.jpg
    538.8 KB · Views: 0
  • 03_FO_buffer_&_acrylate_strippings.jpg
    03_FO_buffer_&_acrylate_strippings.jpg
    664.1 KB · Views: 0
  • 04_FO_cleaving_setting_up.jpg
    04_FO_cleaving_setting_up.jpg
    284.8 KB · Views: 0
  • 05_FO_acrylate_stripped_cleaving.jpg
    05_FO_acrylate_stripped_cleaving.jpg
    560.9 KB · Views: 0
  • 06_FO_inserting_strand_in_terminal.jpg
    06_FO_inserting_strand_in_terminal.jpg
    146.7 KB · Views: 0
  • 07_FO_testing_strand_to_400_ft_away.jpg
    07_FO_testing_strand_to_400_ft_away.jpg
    196.1 KB · Views: 0
  • 08_FO_testing_terminal_to_terminal.jpg
    08_FO_testing_terminal_to_terminal.jpg
    228.5 KB · Views: 0
  • 09_FO_connector_in_transceiver.jpg
    09_FO_connector_in_transceiver.jpg
    376.6 KB · Views: 0
  • 10_FO_termination_all_tools_&_supplies_used.jpg
    10_FO_termination_all_tools_&_supplies_used.jpg
    748.5 KB · Views: 0
Last edited:
As an Amazon Associate IPCamTalk earns from qualifying purchases.
  • Like
Reactions: OldBobcat
C. Fiber Optic Cable basics, relevant to IPcam network
In 2025, Multimode OM3 FO is the relevant standard for residential FO wiring. OM1 and OM2 are older standards just like Cat 4 and Cat 5 copper ethernet wiring are older standards. For understanding the basics of FO cable, I found posts at retailer and manufacturer websites useful.

Single mode FO cable has skinnier strands/fibers, uses more expensive lasers, and is used by utilities for longer distances.

Fiber Optic cables are color coded and Multimode OM3 FO cable is aqua color. Typically multi-strand cable would be used for a home network. The FO strand/fiber is the inner-most core, on it is an acrylate coating, and then a buffer coating which brings it to 600-900 microns, then strength fibers which are Aramid/Kevlar, and finally the outer jacket the diameter of which depends on the number of strands. Typically, a pair of strands makes for a run, one for transmitting, one for receiving.

There are different FO connectors types/formats, and the one most of us are likely to encounter is the Lucent Connector (LC).

A pair of LC connectors goes into a transceiver which in turn goes into a slot in a suitable networking switch. The transceiver handles the transition from electrical signals to laser signals and vice versa.
Once FO cabling/cable is connected to switches at both ends, the network works the same as a copper cable based network, and no special actions need be taken.

You’ll need power where you are running FO to.

Cable bend radius is an important consideration in an FO run.

The above is an AFAIK summary, just to get started and is by no means a deep dive. Please post if anything above is incorrect, and I’ll update.
 
Last edited:
D. Execution details – deep dive
Existing conditions were that I have two ¾” conduits buried in the ground, around 330 feet long including verticals at each end, from the wall of the house to the far end. From the wall, approximately 70 feet through the crawl and up to the wiring center.
Line power live at far end in a separate 1” conduit.
I now better appreciate that for a long run, 1½” conduit is preferable, two runs if possible. The set up of trenching and restoring is a pain, and future-proofing with two 1 ½” runs is a good move if one can do it. Even 1” conduit would be much better than ¾”.
However, I had two ¾” runs in the ground, and making this work would be great.

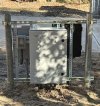
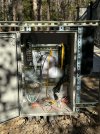
At the far end I ended up rebuilding the controls panel replacing existing 4x4 pressure treated posts and frame with 2 ½” galvanized steel posts in concrete, two horizontal C-channels, channel clamps, and DIN rails. All these are available at Home Depot, see links in next post. All this worked out fine.
I bought a large weathertight outdoor enclosure for all the low voltage equipment. I bought it directly from the manufacturer, and it is also available through Home Depot. This enclosure worked out well.
Use a hole saw or step drill bit to make holes in boxes for cables, clamp/secure the box else the hole maker can catch, which can produce unexpected/undesired results and tear up the hole.

At the house end of the cable in buried conduit, I cut out the 4x4x2 existing box, and replaced it with a larger generic weathertight box. The box worked out fine and gave me vertical clearance when it came time to pull the cable.
I had smurf conduit at hand and used it to for the horizontal run in the crawl space, from the wall penetration to the bottom of the vertical conduit going up to the writing center.

I had Klein pull string in the ¾” conduits and used it to pull ½” pulling tape as an intermediate step. By the way, the simplest way to pull string into a conduit is to tie a section of plastic sheet from a grocery store bag, and suck it with a shop vac. It works surprisingly well.
So far, everything is regardless of what kind of cable you are going to pull.

I used Klein foam lubricant in the conduit. It expands and is not messy. It does expand in all directions so be prepared to stuff a rag at the open end to keep it from flowing back out. I squirted into he conduit every 40-50 feet of cable. It comes with a long flexible tube. When I fed it into the conduit at either end, it would snag probable at the inside joint at 90-degree sweep elbows at either end. So I tried rotating it like a cork screw hoping that would get it past the snag points on the inside of the conduit. Unfortunately this ended up weakening and cracking the little plastic protrusion on the can on which the plastic tube goes, and the foam mostly oozed out of that crack. Ended up discarding the can. But if done thoughtfully it would help the pulling operation. Next time I would follow the suggestion in this thread by @MTL4 and blow the foam lubricant with compressed air.

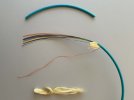
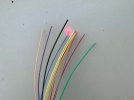
Now we get to the optical fiber part.
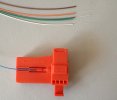
I used a 12-fiber plenum cable that a member posted a link to on ebay. I realize this is not burial grade and am hoping for the best. Will replace should that become necessary in the future, due to wet soil on my site.

Pulling any cable in a 330-foot ¾” conduit with 90-degree sweep elbows at either end is going to be hard. FO cable is light, so it was probably less hard than coax or copper ethernet would have been.

With FO, the question is how do you secure the pulling line to the FO, without destroying the FO cable in the pull?
Turns out to be surprisingly simple.
I braided the Kevlar fibers into a string, looped the pull tape and the Kevlar, and knotted them. It worked fine. Use cable lubricant, see links, and above para.
Definitely need two people for a cable pulling operation, one to feed the cable and one to pull. For that distance, the pull took some force. As you pull up, the tape bites into the plastic edge of the vertical conduit/fitting because while pulling you are likely be an angle. An "Insulating Plastic Conduit Bushing" would be useful to put at either end, but I had not anticipated this and just kept going.
Let’s say you got the cable through and have a nice working length at both ends.

The next step is termination. Much of the input I got was that one should use pre-terminated cable. In ¾” conduit that is not an option.
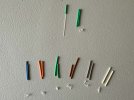
One lone voice in this forum encouraged me to do it myself based on that member’s recent successful experience, with very helpful links provided for tools and fittings. I got the tools, and added Kevlar scissors which probably I could have improvised around, but I like the right tools.
A note on termination. I believe there is a difference in splicing FO, and terminating FO. I agree that if one were splicing FO cable, training, the right expensive tools, and precision would be necessary. However, terminating FO with basic mechanical connectors is within the reach of moderately hands-on people.

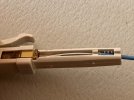
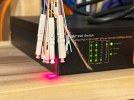
My first attempt at terminating FO was not great. The instructions that came with the tools and the parts are rather sketchy. I jammed the stripped and cleaned fiber into the connector and closed it. Accordingly, rather than a crisp laser dot through the cable you are supposed to get with the FO tester tool/flashlight, I got a hazy and scattered red glow. Then I remembered seeing a how-to video some time back where it was said to be sure to open the sliding window on the connector before inserting the fiber. So I made a second practice termination on a short section of cable and on this second attempt I got a nice round dot of laser beam with the tester. Links to tools and fittings in section above.

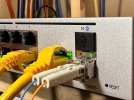
I set up a test bench replication of my long run. My third practice termination was with seven-foot strands that tested out fine, and I used them in place of the 400-foot run. This network assembly did not work. Then I thought that FO strands should cross-over so the transmit port at one end connects to the receive port at the pother, rather than the straight-through connection I had made based on my copper experience. Still did not work. Then I rebooted my router and switch. Within minutes everything was recognized on the network as hoped for, and that could only be possible if the FO connection was working. I realize now that inserting a transceiver in the switch is effectively adding a card.

When you buy pre terminated FO cables, they can only connect one way and probably take the crossover into account. However, when you are working with single strands, important to get the Tx and Rx connections right. There may not be markings on the transceivers, and a little common-sense comes in handy.

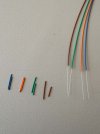
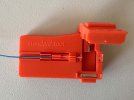
I found that when I used the stripping tool casually and naturally, I got good results. In my first attempt I was trying to be careful and methodical. The results were not great. The tool designers did a good job and there is really no need to second guess tool holding angle and in which orientation to strip. When I held the tool naturally, and in the obvious direction, everything went smoothly.

At first it seemed tricky to measure out the precise required lengths of bare fiber, fiber with the white acrylate coating, and bare fiber. I then realized that on the fiber cleaving tool, even though there were no markings to that effect, or mention in the instructions, there are visual clues that suggest where to place the full fiber, stripped fiber, and bared/cleaned fiber that serve as confirmation of required length for each section. In my final process, I used a ruler and made marks on the cable with a fine soft felt tip pen.

I looked at the fiber under an inexpensive electronic microscope I bought 20-plus years ago at Radio Shack. The strand from the cable cut with cable snips was like a glass stube smashed with a hammer, and the ends were jagged. The strand from the inexpensive FO cleaver had a much cleaner and uniform cut end.

* Some might say use pre-terminated fiber cables, they are cheap, and fiber tools are expensive.
If you can get FO cables inexpensively, and pull them in the conduit you have without damaging and/or contaminating the cables, by all means do so.
I could not figure out a way to pull pre-terminated cables in 3/4" conduit that I had in the ground.
Tools were not expensive and I will always have them.
After practicing on two ends each of three FO strands, I went for it.
I have done a total of 14 FO terminations, and hundreds of copper ethernet cable terminations.
The level of difficulty of FO at this point is about the same as terminating an RJ-45 clip.

I'm an average person, did it, and think most people here could terminate fiber.
Besides, its fun to do something new and better.
Most people are not here for Ring cameras.
 
Last edited:
  • Like
Reactions: TonyR
E. Open Questions:

1. I would appreciate input on how to hang power supply bricks for two switches and networking device hub in the low voltage weathertight enclosure.
See image above.
The enclosure provides standard DIN rails but there is no way to mount DIN rail hangers on power bricks, that I can think of.
 
Last edited:
Yes, good job and great write-up, @Virga :cool:
 
  • Like
Reactions: Virga
Unless I glanced over it, and it's too late for you now, instead of using a single 90* conduit bend, use two 45* pieces to make the 90*. It is much easier to pull this way, especially at distance.
 
  • Like
Reactions: TonyR and Virga
Thank you, all.
@Ri22o conduits have been in the ground since 2018, though there were modifications at the very end of the verticals.
In any case the pull is done, and someday I'd like to try a comparison of pulls between 1@ 90* sweep elbow vs 2@45*.
 

Attachments

  • Conduit _sweep_90_vs_2@45-.jpg
    Conduit _sweep_90_vs_2@45-.jpg
    236.2 KB · Views: 0
  • Like
Reactions: AP514
Thank you, all.
@Ri22o conduits have been in the ground since 2018, though there were modifications at the very end of the verticals.
In any case the pull is done, and someday I'd like to try a comparison of pulls between 1@ 90* sweep elbow vs 2@45*.
I didn't pull near 400', but for my 60-80' run it made a big difference compared to the other, shorter runs I did.
 
  • Like
Reactions: Virga
When I did my 110' pull of FO. I used a 18 gauge wire as the load and put the FO on it as a Rider to make sure very little stress was on the Fiber Cable. (it Rode on the back of the wire-all pulling was done to the wire not the FO)
 
@AP514 I had first pulled just a 1,250 lb pull tape through.
Then I considered how to attach the FO cable at intervals to the pull tape as I was pulling more tape, for reasons you stated.
Couldn't come up with a good solution and was concerned that in a 3/4" conduit a complicated process might backfire.
I braided the Kevlar fibers, looped that and the pull tape, and went for it.
How did you cause the FO cable to ride the load wire?
 
Last edited:
I just winged it with plenty of lube, a pusher and a puller. Wasn’t that bad. My fiber was the riser type so it had lots of rated pulling force. The only downside I had was the outer sheathing stretched yet the inner fibers did not. I just cut back several feet and all was good. That first light test was awesome to see it was intact.


Sent from my iPhone using Tapatalk
 
  • Like
Reactions: Virga
@AP514 I had first pulled just a 1,250 lb pull tape through.
Then I considered how to attach the FO cable at intervals to the pull tape as I was pulling more tape, for reasons you stated.
Couldn't come up with a good solution and was concerned that in a 3/4" conduit a complicated process might backfire.
I braided the Kevlar fibers, looped that and the pull tape, and went for it.
How did you cause the FO cable to ride the load wire?
Well, I first used some waxed string with a small bit of paper towel on the end--Used the Shop Vac to Vacuum the paper towel/string thru the 3/4 gray PVC. I then put the string on more Wires and about 4 inches back I secured the FO onto the wires. Pulled them Thru. So, all the pulling was on the wire. Ran 3 wires 16 gauge or 14 can not remember for a light switch
* just a Note you can have FO in with a 120V power Run. It is ok Per Code**
 
  • Like
Reactions: Virga
Wow! You went whole hog and decided to terminate your own fiber!

Doing that greatly complicates the use of fiber. The good news is that you can purchase premade fiber cables (and even have them custom made if you need a specific length). The cost for these premade fiber cables is pretty reasonable, especially since you don't have to buy a lot of specialized fiber termination tools. So for the average person doing the average install (which this clearly wasn't), it is probably easier and more economical to look at pre-terminated fiber cables.

That being said, you did a great job. Thank you for the write up too!
 
  • Like
Reactions: Virga
Mechanical fiber splices are becoming very common. I am aware of multiple isps that use them locally for terminating fiber to the home type runs.
 
  • Like
Reactions: Virga
Terminating fiber is not all that difficult with the ends they have now. I had to purchase the fiber connectors and it came with a stripping and cleaving tool.


I purchased a fiber tester as well. This is nothing more than a glorified lazer to light up the cable for testing. Took a few test terminations but once I had a hang of it on some test cable it was easy. The connectors can be reused so it was as simple as opening a small sliding window on the connector to close or open the connection.
 
As an Amazon Associate IPCamTalk earns from qualifying purchases.