Moisture Inside Hikvision Turrets (Cloudy Lens)

Ookie

Getting the hang of it
Nov 27, 2014
111
76
I have some lens clouding that has developed on a few of my Hikvision turret style cameras over the last 2-3 years. I thought they were just dirty, but after using some glass cleaner on a microfiber towel, it seems pretty clear that this is from moisture intrusion on the inner glass.

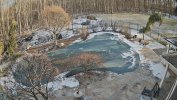
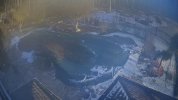
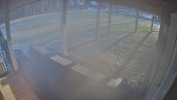
Image quality on those cams is severely compromised right now. The first two pictures are still snapshots from two Hikvision 4K turrets over my pool deck. Both are the same camera model. The images speak for themselves. The third picture is another severely affected camera.

I'm just wondering if it is possible to disassemble them for cleaning. If so, if anyone can point me toward instructions on how to do it, I would appreciate it.
 

Attachments

  • pool-clean.jpg
    pool-clean.jpg
    2.2 MB · Views: 0
  • pool-moisture.jpg
    pool-moisture.jpg
    467.4 KB · Views: 0
  • Office-Door.jpg
    Office-Door.jpg
    571.1 KB · Views: 0
Depending on area it's important to change out the gel packs that are in cameras. I know there are loads of people that will say they have same cameras for years never opened or changed the gel packs. I think that is great for them.

However I live in am area that I have to every 2 years for most of mine and do have a few every year. I have cameras still in use after 12+ years because I do.

So it's important to know that you will not only want to take apart to clean, but you will want to use fresh beads and in some cameras will require all boards to be removed. Others only remove from housing to gain access.

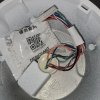
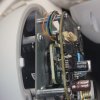
Normally on my turrets anyway once you get ball from mount, 3 screws on back. 2 half with power board in back and camera in front. There will be 1 packet in back and 1 maybe 2 in front half. 2 or 4 screws depending on size of camera and lens types. You will want to remove and mark wiring connectors if wire connectors are of same size. In some cases ribbon cables are rubber glued in take care to remove that so you can get holder open to pull ribbon. Again depending on make and quality you might have another layer before you get to front lens area. You will want to remove ir board if not connected to camera portion. Once that is out you can clean inside glass. Use quality glass cleaner. Put ir back in, remove gel packs from camera side replace same way they had them installed. Use a quality heat safe double sided tape. Or mini wire tie that is heat safe.

Something to note, my Dahua wedge cameras have gel packs under pcb on bottom plate so same for your turrets you will want to confirm there is/isn't one under your back side power board. My larger turrets do smaller ones didn't but will want to check. Remove 3 or 4 screws that hold it in. Most will have heat tape pad so might need little extra pull just replace and put board back in. Connect other connectors and connect 2 parts back together, put the 3 screws back in making sure gasket is in place and no gaps when you tighten up screws.
 
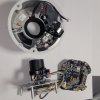
Also please note this is from one of my motorized vf lens turret, all boards are on front half. So to cleans lens inside this 4 screws, 6 wiring connectors one being camera ribbon cable and another micro sd/ reset button ribbon cable. Then 4 more screws that hold camera into front. This camera is from 2020.
 

Attachments

  • 20250107_172831.jpg
    20250107_172831.jpg
    1.3 MB · Views: 0
  • 20250107_171509.jpg
    20250107_171509.jpg
    1.4 MB · Views: 0
  • 20250107_171421.jpg
    20250107_171421.jpg
    843.3 KB · Views: 0

A couple of tips to remember before cracking open the camera housings:

  • Bring the cameras inside, let them warm up to ambient room temp before you attempt to crack them open. Moulded metal and aluminum are brittle when cold.

  • Once warmed up, crack the cases open, inspect the camera case seals and any cord grip seals. If the seals are bad (dry rotted), replace them. If the seals are very dry, you can take a smidgeon of silicon grease and lube the seals up. The silicon grease helps keep the rubber seal pliable and helps keep moisture out.

  • Make sure all case screws are present and the screw threads are in good shape. Ensure the screw threads are not galled. Ensure the tapped case holes are not galled. Pool areas have corrosive gasses in the air that attack metal and cause galling. (especially between dissimilar metals) Running a blind hole tap into the tapped holes will clean any galling up. If some of the camera case screws are missing, replace them. A tiny bit of NEVER SEIZE on the screw threads will prevent future thread galling.

  • Clean the lenses with denatured alcohol. Clean the window with denatured alcohol. Use a lint free microfiber cloth, only. DO NOT use paper towels or tissues. They will scratch your lenses. Do not use isopropyl alcohol. It leaves a film behind when it dries.

  • Let the camera sit for an hour or two opened up, to dry out the interior of the housing and electronics. Ensure that you are doing this in the driest room of the house. Don't do it in the kitchen, bathroom or basement. My whole house right now is 38% humidity. You don't want to fill the camera housing with 98% humidity air and then seal it up. Don't do it outside, unless you live in an arid region where low humidity (<20%) is the norm.

  • Just before you close up the camera housing, open the sealed package the new desiccant pak comes in. Immediately install the pak and quickly seal the camera back up.

  • Tighten the case screws to 4 lb in (.5nm). Over-tightening will just stretch the aluminum tapped threads, causing the screws to loosen up during heating cycles.

 
Last edited:
Thanks much to both of you guys for the prompt and detailed responses.

Do you have a link for the proper sized desiccant packs? I'm assuming that they are pretty small.
 
Different cameras use different sizes and so for me I use Dry & Dry 5G, 10G and 20G packs.. In some cases I can't use them as the camera has some crazy shape packs and in that case I will reuse the packs they have taking care not to damage the package and using the tape to seal it back up.. Loading the packs to about same sized as I remove them with the Dry & Dry beads, Keep in mind that normal RH for my home in summer and when I am working on these most times is at 43% and for the winter months I have it set at 36% and don't have any issues with packs being spoiled. I mean if I was doing this in my Humidor then things would be little different lol..
 
Thanks much. I suppose that you could back the factory packets in the over at low temp using the same instructions that Dry & Dry advises for reactivating their packets.
 
As stated above, use silicone grease only. No Vaseline or any other automotive style petroleum formulated gooo. Plumber's grease is fine. Magic Lube is what I use on O-rings. Made for the swimming pool industry on pump filter basket O-rings. Doesn't wash off in chlorinated water. Home plumbing repairs and so on.

1736379884280.jpeg
 
Not all packets are the same and while some can be reused by slow baking them not all can be reused this way.. Sometimes it is the package and other times it is the type of beads used. Normally they will state they are able to be re-activated. Plus it takes time that one might not want to have the camera pulled from duty while they wait for the beads to be usable again.. So for me it is just easier to change them out.. When I replace mine that I have replaced bevore I do store them in a different package and when I get enough for a tray I will bake them for 1hr. Some have said you can do it in the Microwave shorter time but I don't and personally wouldn't feel safe using that method..