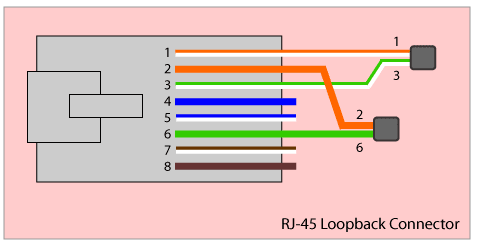
I'm having the same issue with a flir N243EW4 as well. What is the loop back cable?
Restoring the Factory Settings
The camera comes configured from the factory with a default IP address (192.168.250.116), the login passwords (user, expert, fliradmin), and all of the other configuration parameters (stored in a file called server.ini). In some cases, it may be necessary to restore the network settings of the camera to the original factory settings. If necessary, the camera IP address can be restored to this factory default address by temporarily connecting a loopback device to the Ethernet port during initial power up (this can be accomplished by using conventional power rather than PoE+). Approximately 30 seconds after power is turned on, the loopback device should be removed to allow the camera to finish booting up.
Note
The camera will not finish booting up while the loopback device is connected to the camera. The camera will display analog video, but the Nexus Server will not start until the loopback device is removed from the camera.
At each power-up, the system transmits a packet and then checks to determine if that same packet has been received. Detection of the received packet indicates the camera has a custom loopback connector installed on its Ethernet interface. The detection of the loopback packet cues the camera to restore Factory Defaults (including the IP settings, user passwords, and configuration file), and to revert to the same configuration and behavior as when the camera left the factory.
The custom loopback connector is described below.
| Pin # | Signal | Tied to pin # |
| 1 | Transmit + | 3 |
| 2 | Transmit - | 6 |
| 3 | Receive + | 1 |
| 4 | Unused | N/A |
| 5 | Unused | N/A |
| 6 | Receive - | 2 |
| 7 | Unused | N/A |
| 8 | Unused | N/A |
The RJ45 loopback termination ties pin 1 to pin 3, and pin 2 to pin 6. The other pins are not connected. This type of device is available commercially (the Smartronix Superlooper Ethernet Loopback Jack and Plug is one example), or it can be easily made with an RJ45 plug, a couple wires, and a
crimp tool.
After the camera boots up, confirm the startup information is displayed on the analog monitor after
approximately 90 seconds. For example:
S/N: 1234567
IP Addr: 192.168.250.116

