Server Rack - adding components - cable management - suggestions please

saltwater

Getting comfortable
Joined
Oct 6, 2019
Messages
485
Reaction score
630
Location
Melbourne, Australia
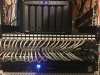
I've started building up my 18RU wall-mounted server rack. This is my first time working with server racks and now after installing the three patch panels and connecting the cables it dawned on me that some form of cable management is required behind the patch panels. The photos below show the current state, I'm not in a hurry to complete, as it's a house under construction, about two months before we move in. The extra components to be installed are a UDM Pro and 2 x 24 port switches. Other stuff will be the modem and ISP terminating device, coax management and computer for BI.

As can be seen in the photos, I have the three patch panels at the top of the unit, then I intend installing two switches followed by the UDM Pro. Below these, on a shelf will be the modem and ISP terminating device.

1. What can I use, or is there a component available, to somehow run the cables vertically up at the back of the unit and then across to the patch panels? Any recommendations here? Would you guys suggest another alternative? Initially I was thinking that it would be ok for the first underlying swtich unit to effectively push the cables back anyway, would this be acceptable?

2. Any suggestions on component placement?

3. In the second photo, you'll see how I've connected the cables. Is it wise to somehow tie them off on that guide bit at the back of the patch panel?


20200829_145247.jpg

This is as far as the unit can swivel out. I lost 200mm width in the room due to the stairs on opposite side; in the plans there was no cavity between walls. We had to create a cavity to allow for the cables to track along. It caught out both the builder and me.

20200829_145300.jpg
 
Joined
Aug 8, 2018
Messages
7,423
Reaction score
26,020
Location
Spring, Texas
Nice rack!

I did use cable ties to secure each cable to the back of the patch panels. I would advise this since you have a rack that will move and anytime you swing it out, it will twist the cables. I tied the bundle off to each patch panel.
DSC_4761.JPG

I staggered my equipment, placing the patch panels between the switches so that the patch cords would not cover other components, at least for the most part.
DSC_4930.JPG
 

Mike A.

Known around here
Joined
May 6, 2017
Messages
3,828
Reaction score
6,387
1. What can I use, or is there a component available, to somehow run the cables vertically up at the back of the unit and then across to the patch panels? Any recommendations here? Would you guys suggest another alternative? Initially I was thinking that it would be ok for the first underlying swtich unit to effectively push the cables back anyway, would this be acceptable?

2. Any suggestions on component placement?

3. In the second photo, you'll see how I've connected the cables. Is it wise to somehow tie them off on that guide bit at the back of the patch panel?

...

This is as far as the unit can swivel out.
Search for "vertical cable manager." Horizontal too if you want and there are some that flip to work either way. Lots of different ones in various forms and costs available. Search for "network cable management guide" and you'll find a bunch of various rack organization solutions. Useful but most of all of it is more for organization/looks and not really necessary. Some of it also tends to be expensive for what it is. Assuming that you don't have some big mass of cable that you need to support (which you don't look to), you can just let things hang and push back. Better to wrap it up and organize it somewhat at least so you don't have a mess of cables.

Velcro wraps in various sizes probably will do most of that for the vertical and otherwise work well to keep things together and cleaned up and are cheap. Easy access when you need to move/change/add. With most racks you can just run the cable along the inside of the rails and wrap the Velcro around for the vertical. That might be all you need. Don't zip tie things too much.

You don't need to tie off at the back there but can help keep things cleaner. You can if, for example, you want to wrap things to run along that and then out to the sides. Might separate groups of cables to go in opposite directions to keep from having too much together in one big wad of cables. i.e., one panel running one way, the next the other.

You probably won't ever swing it out anyway once you have much in it. Somewhat useful when doing what you're doing now but no big deal especially since you look to have good access from that one side.

That's a big rack for what you have going into it so you'll have plenty of extra space. Leave some between things at various points so you have an easier way to reach back in there if you need to. e.g., a couple of U between the panels and the switch, etc. (If you leave 1U/2U between two components then if you have to you can drop one down to get more access.) There are 1U/2U/etc. panel blanks/grids that you can use to cover the spaces or can just leave open. Also cable managers/separators for the front if you want. Given the extra room, I'd probably space your panels 1U apart vs as you have them now and maybe use those between just to keep the cabling separated and cleaner.
 
Last edited:

sebastiantombs

Known around here
Joined
Dec 28, 2019
Messages
11,511
Reaction score
27,693
Location
New Jersey
I used to do large install and we always dressed and bundled all cable using wire ties. Now, I use velcro straps both to bundle and hold them in place on walls, racks and whatever. All turns, if you're going for appearance, should be 90 degrees. Things were always cut to length in those commercial installs, but now I leave some slack, either tucked into the wall or bundled in the basement or attic as appropriate, just in case.
 

reflection

Getting comfortable
Joined
Jan 28, 2020
Messages
348
Reaction score
261
Location
Virginia
Like others have said, you might consider spreading out so that all your patch panels are not together. The switch doesn't have to be next to each other either.

I also made my own 6" patch cables from the switch to the patch panel to minimize the cable sprawl in front.

But there is a still a spaghetti mess of cables in the back. LOL! My rack is attached to two studs which have no drywall in an unfinished utility room.
 

Attachments

aesterling

Getting comfortable
Joined
Oct 9, 2017
Messages
352
Reaction score
346
I also made my own 6" patch cables from the switch to the patch panel to minimize the cable sprawl in front.
Wow, do you mean you put ends on that many 6” patch cables? You must be really fast because I would have lost my mind! Nice job. I bought a pack of 6” patch cables because I don’t have the patience.
 

reflection

Getting comfortable
Joined
Jan 28, 2020
Messages
348
Reaction score
261
Location
Virginia
Wow, do you mean you put ends on that many 6” patch cables? You must be really fast because I would have lost my mind! Nice job. I bought a pack of 6” patch cables because I don’t have the patience.
Yeah, I guess I'm used to it. I didn't even consider buying 6" cables. First RJ45 I crimped was back in 1994.
 

ARAMP1

Pulling my weight
Joined
Feb 13, 2018
Messages
243
Reaction score
171
Location
Memphis, TN
Here's my current setup. I put patch panels around each of my switches and use RJ45 female to female keystones. The only issue I've had with this is that it's sometimes difficult to get to the middle of the patch pannel between two switches.
I have one switch on the back of my rack along with power strips/battery, etc. I was thinking about moving all the switches to the back and doing away with patch panels all together.


ARAMP1

Pulling my weight
Joined
Feb 13, 2018
Messages
243
Reaction score
171
Location
Memphis, TN
After all the RAID/ZFS is accounted for, probably around 250TB. The good thing is that half of those caddys are empty, so I can expand easily.
 
Joined
May 1, 2019
Messages
2,215
Reaction score
3,504
Location
Reno, NV
If you have slack on some of those cables... "dress" them to the right (door hinge pivot side....in your case, is to the right) and terminate while door is fully open. This is your max reference point. If each cable has existing labeling, loosely dress to the right following the bundle path, come into the path panels from the right, measure where to cut to the specific numbered port. As mentioned above, use velcro instead of tie wraps. You'll be using that velcro through out the cabinet for various purposes as well. Get the skinny velcro that fits through the rack post square holes to make a pathway.
I have seen various configurations for racks. 24 port path panel - switch - 24 port patch panel - switch - etc. This config allows you to use 6" or 12" patch panels through out. Could label 1-24, 25-48, 49-96 or could be labeled A01-A24, B01-B24, C01-C24. Or could cconfig as patch panels stacked ontop of each other (like you have done) and use various lengths of patch cords to switch though you will have to figure out how to make the patch cords look all pretty in the end since difference lengths.
Unsure if it is physics or common sense or habit, but at my work (and personal preference) is to have the light stuff up high and the heavy stuff down low.
I can only see 1 screw (bottom right) holding along the back of the case, out of the total 4. That screw looks rather dinky or maybe camera angle makes it look dinky. Would be a concern. I'd go for butterflies or robust stud/lag bolts.
I left enough space from top of rack to drywall ceiling to make room for my Ubiquiti UDM. Was unsure of the AP effectiveness being inside the metal cabinet so I have it sitting on top of it.
You will want either an additional #2 19" electrical bar on the rack posts. As you open/close cabinet, less electrical connection wires dangling to that existing #1 from the rack door itself, the better. Or relocate existing electrical bar to the inside of rack.
Your shelf will hold your UDM, router. And future NAS, USB sticks, future home automation NUC, spare patch cords, etc.
1U from very bottom is where rack mounted battery backup, if purchased (if put on very bottom, the back bottom lip of door might interfere).
Purchase some of those 120mm cabinet fans as things will get warm in there even in a HVAC room.
Put Blue Iris server into rack mounted server case if that is a consideration.
I know most patch panels come with those back panel stress relief guides. Maybe more professional folks use them, I never had. My Cat6 cables come right to the backside of the termination, hugging the backside of the panels. I toss those guides as they simply get in the way for terminations and future troubleshooting. And no, does not affect the cabling as I have certified 100,000 Cat6e cables with a Fluke Network tester with this config.
IMG_20200802_083113.jpg

Example of how I bring cables to the patch panel (not my pic but general google pic):
Network-patch-panel-900x350.jpg

Bundle run could look something like this, though I prefer to follow the framing to velcro at attaching points instead of free floating but have done both:
1915-3-800-12_11_600x491.jpg

The end result is what is visible to people that walk by, not so much how pretty it is inside the cabinet. Just do not have the end result looking like this:
marino1.jpg
 
Last edited:

saltwater

Getting comfortable
Joined
Oct 6, 2019
Messages
485
Reaction score
630
Location
Melbourne, Australia
All good responses and I'm taking the advice on-board. Today my local internet provider, Telstra, ran Fiber from the street to my rack, and attached the NTD to the back of the unit just above the wall hole. Now that's one less device I must worry about being on a shelf.

20200831_103443.jpg
 

catcamstar

Known around here
Joined
Jan 28, 2018
Messages
1,659
Reaction score
1,193
What I tend to do during installation (because you never know what are the permanent locations/flows of the cables:

We call these things "Velcro" over here, they stick very good, but are easy to remove in case of. You can buy it on a roll, and tear of lengths of your wishes.

Once you are happy with your cabinet, you can either leave them, or, change them by "permanent" police-style binders.

Good luck with your cabinet!
CC

PS. do not forget airflow, heat must get out (preferably at the top :p In case it gets too warm, install a fan at the top.
 
Top