$50 BoaVision PTz Cam for portable completely-wireless use with Blue Iris

ptzguy

Getting the hang of it
Joined
Aug 11, 2016
Messages
87
Reaction score
77
I've been running BI for several years now. I have 20+ cameras, most of which are Amcrest IP5M-T1179 5mp "eyeball"-style. I also have several PTZ for taking a closer look. All of my cameras are POE or POE+. I don't generally trust WiFi for security applications, although I assume that it is secure and reliable if properly configured.

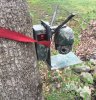
I sometimes have a need for a completely portable WiFi camera for special projects. For example, there's a storm drain about 50' downhill from my house. During heavy storms, there can be torrents of water rushing downstream and I've wanted to be able to keep an eye on it - especially at night. Another goal is to record license plates of cars speeding over 50mph on the residential road behind my house - a 25MPH zone with lots of seniors and young kids around.

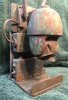
So I recently bought a low-cost ($50) PTz (lower-case z indicates digital zoom only - no optical zoom) BoaVision camera from Amazon. The specs looked promising for my needs. The first one I received never broadcast an IP address. After trying lots of things to get it to work, I gave up. Amazon had a replacement to me by the next day (!). Within minutes I accessed it directly from Chrome and Edge and from the vendor's web app, smartphone app, and Blue Iris.

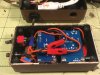
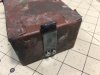
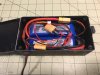
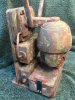
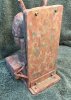
After a lot of testing and experimentation, I decided I would keep it and forge ahead with any modifications I needed to make. We have a lot of contractors coming through the yard for various services, so I wanted the finished camera and support electronics to be painted in a camo pattern to avoid attracting attention to the cam. In most cases, the cam is only set up for a particular job for a few hours at a time, so that's not too big of a concern.

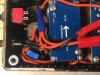
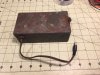
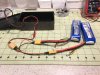
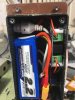
After a few days of work the project is coming along nicely. Last night, I recorded to BI for about 3 hours using a 2200mah LiPo battery. I chose LiPos because they have the highest energy density and because I had a lot of experience using them from an FPV truck project I did a few years ago. I'm using a low-voltage cutoff (LVC) module (about $12 from Amazon) along with a step/up-step/down "buck" voltage regulator (VR). The VR maintains a steady 12.0 V to the camera as the LiPo discharges from 12.6V to 10.4V. At 10.4V, the LVC cuts off power to the electronics to prevent over-discharging the LiPo. I think I can get at least 4 hours at night using the 2200mah LiPo, with the IR LEDs running. During daylight, I may be able to get 6 hours - haven't tested that yet.

Anyway, I thought that some of you might have an interest in this project. I may post a YouTube video if there's enough interest, so let me know.
 

Attachments

Last edited:

The Automation Guy

Known around here
Joined
Feb 7, 2019
Messages
1,374
Reaction score
2,734
Location
USA
Nice! There are always a ton of people asking about wireless cameras, so this is information that will help a lot of poeple.

The next step is to see if you can add some sort of solar system or larger power system to increase the runtime of the system!
 

ptzguy

Getting the hang of it
Joined
Aug 11, 2016
Messages
87
Reaction score
77
Thanks. I've already been playing around a little bit with using solar power, but I decided to put that on the back burner until I get farther along.

I'm working right now on Version 2.0. I've moved the electronic control modules into a small separate project box. That frees up enough space in the larger box to fit 2x 2200mah LiPos, doubling the potential run time.

Also, the first low-voltage cutoff (LVC) module I tried is problematic. The LED display draws power that cuts down on the run time. Also, when it cuts off the power to the camera, the LVC module continues to draw power. That kinda defeats the purpose of protecting the LiPos from over-discharge. I'm testing a new LVC module today.
 
Last edited:

TechieTech

Getting the hang of it
Joined
Aug 11, 2021
Messages
79
Reaction score
79
Location
USA
Can you wire the circuit for the LED display into a momentary button?
 

ptzguy

Getting the hang of it
Joined
Aug 11, 2016
Messages
87
Reaction score
77
Can you wire the circuit for the LED display into a momentary button?
Maybe... I thought about that but it seemed problematic since it would require changes to the PCB.

I'm working on another option for remotely monitoring the battery voltage. I hope to have either one or two (if I'm using two batteries in parallel) displays on the platform below the camera. Then I can just tilt the camera down 90 degrees to read the voltages. I used to use a similar setup on a long-range FPV truck I made a few years ago.
 

ptzguy

Getting the hang of it
Joined
Aug 11, 2016
Messages
87
Reaction score
77
Can you wire the circuit for the LED display into a momentary button?
Another problem with that solution is that the camera usually is located somewhere outside and maybe in the dark and in the rain. ;-)
 

pozzello

Known around here
Joined
Oct 7, 2015
Messages
2,270
Reaction score
1,117
i like these for battery-powered setups: Home A passive PoE splitter takes care of 21-to-12V duties and the board manages the batteries nicely, whether stand-alone (recharged occasionally) or directly connected to a solar panel...
they's also got 12V versions (using smaller 18650 batteries) and if you already have the cells, you can just get the holder/board and not the whole kit...
 

TonyR

IPCT Contributor
Joined
Jul 15, 2014
Messages
16,432
Reaction score
38,153
Location
Alabama
Nice rig, thanks for sharing.

Next improvement I'll bet ( because of ".....I wanted the finished camera and support electronics to be painted in a camo pattern to avoid attracting attention to the cam") will be to replace that RED strap around the tree! :lol:
 

ptzguy

Getting the hang of it
Joined
Aug 11, 2016
Messages
87
Reaction score
77
Nice rig, thanks for sharing.

Next improvement I'll bet ( because of ".....I wanted the finished camera and support electronics to be painted in a camo pattern to avoid attracting attention to the cam") will be to replace that RED strap around the tree! :lol:

That was merely a field-expedient proof-of-concept strap. Rest assured; the new strap is camo, approved for use in suburban settings.
 

ptzguy

Getting the hang of it
Joined
Aug 11, 2016
Messages
87
Reaction score
77
i like these for battery-powered setups: Home A passive PoE splitter takes care of 21-to-12V duties and the board manages the batteries nicely, whether stand-alone (recharged occasionally) or directly connected to a solar panel...
they's also got 12V versions (using smaller 18650 batteries) and if you already have the cells, you can just get the holder/board and not the whole kit...
Hmmm... looks interesting. Thanks.
 

Heyok

Pulling my weight
Joined
Dec 9, 2020
Messages
39
Reaction score
156
Location
Vancouver, Canada
..snip..

Also, the first low-voltage cutoff (LVC) module I tried is problematic. The LED display draws power that cuts down on the run time. Also, when it cuts off the power to the camera, the LVC module continues to draw power. That kinda defeats the purpose of protecting the LiPos from over-discharge. I'm testing a new LVC module today.
Maybe I can help with this. My hobby is building electronic parts for RC vehicles. I have built a few battery-powered items that include an LVC that completely disconnects the battery once the low voltage is reached. Mostly these are used on the Milwaukee M18 battery pack but it would work fine with RC Lipo batteries.
Feel free to contact me if I can help with this.
 

ptzguy

Getting the hang of it
Joined
Aug 11, 2016
Messages
87
Reaction score
77
Maybe I can help with this. My hobby is building electronic parts for RC vehicles. I have built a few battery-powered items that include an LVC that completely disconnects the battery once the low voltage is reached. Mostly these are used on the Milwaukee M18 battery pack but it would work fine with RC Lipo batteries.
Feel free to contact me if I can help with this.
Thanks, for the tip. I've solved the problem using a similar solution. I bought a second type of LVC module that seems to reduce the cutoff current nearly to zero. Just to be sure, I added a tiny 12V relay into the circuit. I turn on the power switch, then press a button to set the relay to ON. When the LVC reaches Vmin, it shuts off the relay. All power from the the batteries to the camera and everything else is controlled by the relay, so the current flow is zero. The only downside that I see is that the relay adds a small current drain to the batteries. But I think that it is pretty much negligible in turns of run time.
I'll be publishing more details soon.
 

ptzguy

Getting the hang of it
Joined
Aug 11, 2016
Messages
87
Reaction score
77
Here are some photos of the "Control Box". It contains the following:
  • Toggle switch DPDT with weatherproof cover to switch battery into the circuit (Twidec, Amazon 10 for $10.99)
  • Push button N/O (not weatherproof, yet...) to turn on the power relay
  • Tiny blue 12V SPST relay that turns power on and off to all devices (had on hand; maybe from Radio Shack?)
  • Voltage regulator ("Buck") circuit board (dsn6000aud, probably part of a cheap 5-pack from eBay a few years ago)
  • Low-Voltage cutoff circuit board (Amazon $10.39)
  • Hammond 1591BSBK project box
  • Split-bushings to pass cables between boxes (made in my shop)
  • Custom camo paint job - "Priceless!" :cool:
 

Attachments

Last edited:

ptzguy

Getting the hang of it
Joined
Aug 11, 2016
Messages
87
Reaction score
77
I've upgraded the battery box. I can run a very small 3S LiPo, if that's all I need, or run two 2200 MaH LiPos in parallel. In a test last night, I got about 7 hours of run time with the red LED illuminators running full time.
A nice feature of this setup is that I can "hot swap" batteries while the camera is running. So if I'm getting near Vmin, I can remove one of the two batteries while the other keeps the camera running, swap in a fully charged battery, then repeat with the other battery.
If I ever need to, I can go to much larger LiPos (expensive!) for longer run times. Since the battery box plugs into the junction box, I could make a larger battery box with bigger batteries.
One note, in case anyone's wondering, it does not matter that the wiring from the battery to the camera is much smaller in diameter than the cables on the batteries. The battery cables are sized for use with FPV vehicles that may have very high current draw. The camera only draws a max of about 500 ma during startup and only about 150ma when viewing a fixed scene. It draws significantly more ma when running the white LEDs but still well under the current rating for the wires I'm using. (I have the ma numbers in my notebook, but can't find them right now.)
I made a latch to keep the box lid shut when in use. The spring is made from steel strap cut and bent to shape. I smoothed out the sharp edges on a disk sander and added a blob of epoxy to make it "thumb-friendly." For, now, and maybe forever, the "hinge" at the other end of the lid is just a piece of brown Jobbers tape with camouflage paint scheme. I'll paint the spring and screws camo after I've done some more testing. I also plan to remove the screws on the spring and reinstall them after packing them with silicone grease to prevent water from seeping in through the screw holes.
 

Attachments

Last edited:

ptzguy

Getting the hang of it
Joined
Aug 11, 2016
Messages
87
Reaction score
77
Here are some photos of Version 3.1. The base and backboard are cut from a plastic cutting board I bought at Walmart. I had started with aluminum, but it seemed to be interfering with the Wifi signal. I then tried 3/8" acrylic sheet, but it was relatively heavy and harder to work with. The cutting board is, I think, UMHW polyethylene and is relatively light weight.
I put the battery box down low to make the whole assembly as stable as possible. Sometimes I set it on the ground, which often is sloping. In other cases I mount it on a stand that is driven a few inches into the ground.
I've pretty much given up on the idea (for now, at least) of hanging it from a tree. Trees seem to strongly block the WiFi signal.
The last few days I've been testing a setup with a 2nd router hard-wired to my primary internet router. The 2nd router is mounted much closer to where I'm using the camera. With just the primary router, the WiFi signal was often too weak to maintain a reliable connection. Now I can get a solid connection while still being able to route the signal directly to Blue Iris where the camera is set up just like any other PTz camera.
I added a small rain shield to help keep rain off the lens.
 

Attachments

sebastiantombs

Known around here
Joined
Dec 28, 2019
Messages
11,511
Reaction score
27,690
Location
New Jersey
Nice job! Love the overall look.

I use 3S and 4S lIPO batteries quite a bit. I've found that Turnigy, while less expensive, don't cycle as long as and are more prone to charge swelling than Venom Fly. Granted they are more expensive but in terms of battery life versus cost I feel like they work out pretty much the same.
 

ptzguy

Getting the hang of it
Joined
Aug 11, 2016
Messages
87
Reaction score
77
Thanks, and thanks for the battery tip. Next time I buy some I'll try Venom Fly. I'll have to say that I've had very good results with Turnigy over about 6 years of use but I've never done a side-by-side comparison with another brand. Running a test the other day powering a small Linksys router using a 3S Turnigy, I accidentally ran it all the way down to zero volts. I had a low-voltage alarm attached, but I was running a test out on my patio and forgot about it.

Anyway, when I tested it, it would not even light up the LEDs on the voltage tester. I carefully charged it to about 10v using the NiMh cycle on my AP606 charger. I watched it carefully and touched it frequently to make sure it was not getting hot or puffing. It quickly recharged to about 10v and, surprise, all three cells were pretty close in voltage. From that point I switched to the regular LiPo cycle and balance-charged it at 4400 ma, monitoring all three cells. it charged fully without a problem and with no noticeable heating or puffing. I've been using it all day today with no problems operating or charging, but I'm still keeping a close watch on it.
 
Last edited:
Top