Newbie with the most basic installation set-up questions

In regards to bringing the cables into the media room, I was looking for wall-mount patch-panels. Found lots of rack mount stuff but nothing that looked very appealing.

Then I found some 6 port faceplates for use with Keystone jacks. Two of those and another 4 port faceplate and I'd be set. Could place the switch and NVR right in front of the faceplates and run short cables in between. This now seems to be the best over-all option. Other than needing to pickup a punch-down tool, I don't see any downsides. Thoughts??
 
  • Like
Reactions: mat200
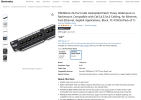
In my experience, having done my whole house, avoid using keystones with the face plates. Use something like this coupler below, instead. The keystones are too wide and don't fit side-by-side on the 2x3 face plates. You also would not need a punch down tool if you used these, just the same tools as you would if you terminated the other end of the cable.

 
As an Amazon Associate IPCamTalk earns from qualifying purchases.
  • Like
Reactions: zz28zz
In regards to bringing the cables into the media room, I was looking for wall-mount patch-panels. Found lots of rack mount stuff but nothing that looked very appealing.

Then I found some 6 port faceplates for use with Keystone jacks. Two of those and another 4 port faceplate and I'd be set. Could place the switch and NVR right in front of the faceplates and run short cables in between. This now seems to be the best over-all option. Other than needing to pickup a punch-down tool, I don't see any downsides. Thoughts??

This is what I used .. or the 6 port faceplates ( worked for me, sourced from monoprice along with keystone jacks )


1747165479380.png

dang .. price is higher now .. ( history from CamelCamelCamel shows a low of $34 .. )

1747165674913.png
 
Let me jump in ... as this is my wheelhouse!
gimme a couple though because on phone with Spectrum charter trying to migrate my Sim2 # over to a new smartphone and they are saying not possilble.
 
  • Like
Reactions: mat200
#1: do NOT put your switch in a bad heated place. You will need access to it very often here & there for edits/changes.
#2: buy whatever cable you can afford. CCA is not advised, but it is cheaper. Downside is that it is more highly fragile than copper (it breaks, it stretches) but I have used it for my cheaper customers who knew the pro's / con's.
#3: Cat5e or Cat6 non-plenum non-shield cable is the way to go. Non-Plenum because heck of a lot cheaper. If your house catches on fire, I highly doubt the toxic fumes from the cable will be high on the priority list as compared to furniture and tupperware plastics on fire. Non-shielded because you are not going underground where lightning is an issue or near 3-phase 480v power lines.
#4: I only use 98% of the time, Keystone jacks, Keystone faceplates, Keystone 24 port patch panels. "Keystone" is a widely used format for interchangability between manufacturers. Example: Panduit jacks are proprietary and only fit into Panduit faceplates. Same for Commscope and others. With that being said, the cheaper Keystone material you may find out there could be 0.010 wider than the Keystone format due to faulty uncaring manufacturing.
#5: Keystone jacks: is preferred to use a punch down tool as makes installation simpler, but does cost $50+. Could also use the push tool and side cutters instead of punch down tool. Have done both with same results.
#6: @mat200 24 port patch panel is a great brand. The backplane where cables are punched into their slots are angled to help with easier to slide in. Other patch panels (MonoPrice) are square top and splitting pairs is a huge pain. Of course, I prefer unpopulated patch panels that way I get to choose what color jack goes to what port on my patch panel. Yellow jacks for AP's, Blue jacks for Cameras, Red jacks for computers... you get the picture.
#7: You will NOT get 16 Cat5e or 16 Cat6 cables through a 1" hole. I would slap in a 2" EMT conduit. However, I am a professional cable installer so that is not always applicable for a DIY at home person to do.
 
  • Like
Reactions: Holbs
For reference:

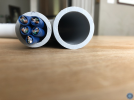
3/4" PVC with 5 CAT6
View attachment 220960

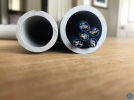
1" PVC with 5 CAT6
View attachment 220961
I stand corrected.
I would never pull 16 Cat5e or 16 Cat6 through a 1" hole due to my business / professional demon on my left shoulder says tight fit with no room for additional cables a couple weeks down the road.
But my little DIY angel on the right shoulder says do it and worry about things later.
 
  • Like
Reactions: zz28zz and mat200
Yeah, I was being overly optimistic thinking I could fir 16 Cat6 cables thru a 1" hole. With the multiple face plates option, I'l be making 3 much larger holes anyway in the sheetrock.

As far as drilling the header, planning on two 1" holes, maybe three?? Think they have to be 6" apart per code. My interior walls are also insulated, so,, that will be fun.. Any tip/tricks passing cables down an insulated wall?

I like the long patch panels but I don't want it mounted in a box to the wall and don't want to cut long holes in the sheetrock for a flush mount. Need something I can leave as is or install cover plates when we sell the house.

Kinda like the idea of using RJ45 pass-thru jacks as prev mentioned. That will save me buying a punch-down tool that I'll probably use once.
 
instead of 2 or 3 holes the size of 1", why not simply go 2" hole?
At work and residential, the cleaner look is to use EMT conduit for a pathway instead of cables magically appearing out of a ceiling hole. There is no way to make it look pretty if you have cable popping down a hole, no matter what magical powers one person may have with drywall patching. Of course, if you are drilling through 2x4 headers... 1" hole might be the only way to go. More efficient to drill multiple holes, like you mentioned. There is no "code" for networking cable / low voltage so does not need to be 6" apart. What I try to do, whatever method you pursue, it is easier to have wire be guided/pushed when it is against the inside drywall gap between drywall and insulation, not thru the insulation itself.
Insulated walls are the bane of wire installers. Old days, we used metal fish tape reels. But that stuff likes to bend or get caught on things. Nowadays, we use fiberglass rods to either install cable in the walls or install a pull string first. Many gimmicks out there (magnetized paint roller on the outside with metal fishing lure on the inside) that looks great in videos. Not so in practice.
 
The code part I referred to was something I saw somewhere and I thought it related to weakening of the header due to drilling holes too large and/or to close to each other. I did see something abt keeping ethernet cables and 120V wires at l;east 6" apart to prevent EMI with unshielded ethernet cable. I believe the 120V wire is in the next "bay". Need to find my stud finder.

I'm still debating on trying to do this by myself. The attic is challenging at this end of the house. Each room seems to have different height ceilings, blown-in insulation covers everything, it's dark and super hot now (just set a heat record yesterday).
 
I do there is a code to keep electrical 110vac at a distance from each other... not too sure what it is.
But yes...wise to put as much distance from 110vac or 220vac from networking cable.
Doing it by yourself... is fun. But comes with lots of frustration. Many unknowns to beat head against. You will educate yourself on building structure, by the end. Makes you smarter :)
 
  • Like
Reactions: looney2ns