This post is for how to create a clone camera for backing up a cameras video.
There are four parts of setting up a clone camera for backup
1) Create a video storage location for the clone camera
2) copy an original camera to create a clone.
3) modify the clone camera to reduce system load
4) modify the original camera definition.
1) create a storage folder to place the clone camera data.
Not covered how to create a network folder that allows BI to access it. (maybe later)

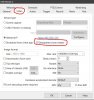
Create an AUX1 folder in the Blue Iris settings clips and archiving tab. Set the folder to delete. Make sure you allocate less than 90% or the free space of the drive for the storage of the Clones data.
In the above example there is a 4 TB USB drive attached to a ASUS router that is being used as a access point.
2) create a clone camera from an original camera.


Use the BI add camera function. Use the copy from another camera function, select the original camera. A new camera proprieties will be dispalyed
3)

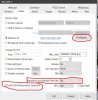
Set the camera group and check hidden, You normally will not view a clone camera, click ok to save the camera
4) clean up the clone camera settings so it is not using any unnecessary functions or BI processing.

Turn off hardware acceleration
check limit decoding
Make sure designated clone master is UNCHECKED.

Turn off all the network options.

Turn off all Motion detection.
5) set the storage location for the clone camera

set the folder to Aux1, and uncheck all the unnecessary options. Save the camera
6) set the original camera to be a designated clone master.

7) to access the hidden camera use the blue iris status button and then the camera tab.

click on the camera to bring up the properities menu.
If the clone is working correctly The bitrate will be zero
the pixels will not have a # in front as the hardware acceleration is turned off.
There are four parts of setting up a clone camera for backup
1) Create a video storage location for the clone camera
2) copy an original camera to create a clone.
3) modify the clone camera to reduce system load
4) modify the original camera definition.
1) create a storage folder to place the clone camera data.
Not covered how to create a network folder that allows BI to access it. (maybe later)
Create an AUX1 folder in the Blue Iris settings clips and archiving tab. Set the folder to delete. Make sure you allocate less than 90% or the free space of the drive for the storage of the Clones data.
In the above example there is a 4 TB USB drive attached to a ASUS router that is being used as a access point.
2) create a clone camera from an original camera.
Use the BI add camera function. Use the copy from another camera function, select the original camera. A new camera proprieties will be dispalyed
3)
Set the camera group and check hidden, You normally will not view a clone camera, click ok to save the camera
4) clean up the clone camera settings so it is not using any unnecessary functions or BI processing.
Turn off hardware acceleration
check limit decoding
Make sure designated clone master is UNCHECKED.
Turn off all the network options.
Turn off all Motion detection.
5) set the storage location for the clone camera
set the folder to Aux1, and uncheck all the unnecessary options. Save the camera
6) set the original camera to be a designated clone master.
7) to access the hidden camera use the blue iris status button and then the camera tab.
click on the camera to bring up the properities menu.
If the clone is working correctly The bitrate will be zero
the pixels will not have a # in front as the hardware acceleration is turned off.