
HIKVISION DS-2CD2432F-IW - Repairing (replacing) IR LED
- Thread starter romVsen
- Start date
You are using an out of date browser. It may not display this or other websites correctly.
You should upgrade or use an alternative browser.
You should upgrade or use an alternative browser.
paylesspizzaman
Young grasshopper
- Jun 19, 2015
- 31
- 11

paylesspizzaman
Young grasshopper
- Jun 19, 2015
- 31
- 11
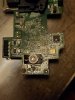
I wasn't able to find anything on the web. I have another Hikvision cube camera (2cd2432) which I tested. The specs were 1.63V, 0.264A. The IR angle seems to be greater than 130 degrees. The LED illuminated an 8.5" circle from 2" away. The light seemed to be restricted by the hole in the PCB slightly ahead of the LED. I'm guessing the plastic lens piece in the camera housing focuses/distributes the light. So my guess is that the wider the light angle the better. I think most of these cameras use IR that is near 850nm. The original LED is soldered on the back where it meets the PCB and the two legs are soldered down too. The (-) leg is shared with the base, so lifting the (-) leg won't turn off the LED. I'm not sure how to solder the back of a new LED, so I personally will likely try some thermal adhesive/glue. I believe the stuff lying around is Artic Silver ceramic adhesive. It comes in a 2 part solution that has to be mixed. If you want the glued part to be able to be removed later, I have had good luck mixing Artic Silver ceramic thermal paste in equal parts with the thermal adhesive. I.e. 1 part paste, 1 part A from adhesive, 1 part B from adhesive. I would be careful selecting a replacement IR LED, because it is possible to damage your eyes looking at too bright a light. In the case of IR you can't see it, so you won't know it's too bright and damaging your eyes (or other peoples). The pic is of where the IR LED was.
Update: Ordered 2x 1W 850nm LEDs from ebay for $2. Specs are 1.4v-1.7v 350mA, angle 120-140 degrees, "high power". Those were the closest I could find. I'm guessing the camera has a constant current supply, so it should just run the 350mA LED at 264mA. 5v seems to be the upper voltage limit for the supply. I'm hoping it still works. If you looking around, "bead" seems to refer to the type of LED used. Here's the link for what I bought. 2pcs 1W High Power LED Chip Lamp Bead Infrared IR Light 850nm | eBay
Update: Ordered 2x 1W 850nm LEDs from ebay for $2. Specs are 1.4v-1.7v 350mA, angle 120-140 degrees, "high power". Those were the closest I could find. I'm guessing the camera has a constant current supply, so it should just run the 350mA LED at 264mA. 5v seems to be the upper voltage limit for the supply. I'm hoping it still works. If you looking around, "bead" seems to refer to the type of LED used. Here's the link for what I bought. 2pcs 1W High Power LED Chip Lamp Bead Infrared IR Light 850nm | eBay
Attachments
![20191224_153807[1].jpg](/data/attachments/52/52842-5b261ad9b5cbed6e55476d536ce29e18.jpg?hash=WyYa2bXL7W)
Last edited:
As an eBay Associate IPCamTalk earns from qualifying purchases.
paylesspizzaman
Young grasshopper
- Jun 19, 2015
- 31
- 11
Next update:
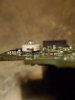
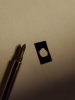
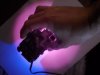
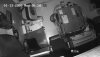
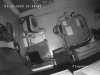
Got the IR LED in the mail the other day. I tested the new LED with wires before actually installing it. Judging by the fact that the LED barely feels warm to the touch after 10 minutes of being on, it may not have to be mounted with something thermally conductive. I will error on the side of safety though. What sucks, is it turns out that the LED I ordered is different with respect to the wiring. The back of the LED (both old and new) is metal and acts as a electrical connection (like the mounting tab on most MOSFETs and other transistors). Problem is the old LED had the back connection internally connected to the (-) leg, where the new LED has it internally connected to the (+) leg. What this means, is that once the LED is placed on its copper pad, it shorts out the power to it. So, to get around this, the LED must NOT be allowed to touch (electrically) the pad that it sits on. This completely rules out any ideas of soldering the new LED down to the pad, like the old one was. I opted for the thermal adhesive (non-conductive) and shimmed the edges of the LED with electrical tape. I used 3 layers of 3M Super 88 tape and cut a hole just big enough for the metal on the back of the LED to fit through (tape shown in picture). I also trimmed the outside edges of the tape to somewhat match the silkscreen box printed on the circuit board. That helped with alignment once the adhesive was applied. The tape held a small gap above the PCB, that the adhesive filled and prevented the LED from squishing the adhesive out and allowing the LED to make contact with the pad while I pressed on it, waiting for the adhesive to setup. It took about 10 minutes for the adhesive to set. The left over adhesive, still on whatever you mixed it on, is always a good indication of how setup the glue you used currently is. I let it set for another 2 hours, then removed the tape and tested with an ohm meter to make sure the back of the LED didn't somehow contact the pad. Next was to solder the two legs down, try it, take some pictures, assemble, take some more pictures and post this. The snapshots from the cameras themselves, were taken from a (now fixed) Hikvision 2410 (image says "Mila") and a Hikvision 2432 (image says "playroom"). I think they look nearly identical and am very pleased with the result. I plan to order a few more LEDs for spares. The 2410 is only 1MP whereas the 2432 is 3MP. Not sure what lenses are currently on them, but the field of view may be a little different as the image sensors are different sizes too (1/4" vs 1/3"). The pic where I'm holding the camera shows the IR illumination on a white 8.5x11" paper from approximately 2.25" away. The blue light at the top of that pic is the cameras power light. If any of this helps anyone, please feel free to reply to this post. Then I'll know typing this wasn't a waste. Hopefully I can save someone else $100.
Got the IR LED in the mail the other day. I tested the new LED with wires before actually installing it. Judging by the fact that the LED barely feels warm to the touch after 10 minutes of being on, it may not have to be mounted with something thermally conductive. I will error on the side of safety though. What sucks, is it turns out that the LED I ordered is different with respect to the wiring. The back of the LED (both old and new) is metal and acts as a electrical connection (like the mounting tab on most MOSFETs and other transistors). Problem is the old LED had the back connection internally connected to the (-) leg, where the new LED has it internally connected to the (+) leg. What this means, is that once the LED is placed on its copper pad, it shorts out the power to it. So, to get around this, the LED must NOT be allowed to touch (electrically) the pad that it sits on. This completely rules out any ideas of soldering the new LED down to the pad, like the old one was. I opted for the thermal adhesive (non-conductive) and shimmed the edges of the LED with electrical tape. I used 3 layers of 3M Super 88 tape and cut a hole just big enough for the metal on the back of the LED to fit through (tape shown in picture). I also trimmed the outside edges of the tape to somewhat match the silkscreen box printed on the circuit board. That helped with alignment once the adhesive was applied. The tape held a small gap above the PCB, that the adhesive filled and prevented the LED from squishing the adhesive out and allowing the LED to make contact with the pad while I pressed on it, waiting for the adhesive to setup. It took about 10 minutes for the adhesive to set. The left over adhesive, still on whatever you mixed it on, is always a good indication of how setup the glue you used currently is. I let it set for another 2 hours, then removed the tape and tested with an ohm meter to make sure the back of the LED didn't somehow contact the pad. Next was to solder the two legs down, try it, take some pictures, assemble, take some more pictures and post this. The snapshots from the cameras themselves, were taken from a (now fixed) Hikvision 2410 (image says "Mila") and a Hikvision 2432 (image says "playroom"). I think they look nearly identical and am very pleased with the result. I plan to order a few more LEDs for spares. The 2410 is only 1MP whereas the 2432 is 3MP. Not sure what lenses are currently on them, but the field of view may be a little different as the image sensors are different sizes too (1/4" vs 1/3"). The pic where I'm holding the camera shows the IR illumination on a white 8.5x11" paper from approximately 2.25" away. The blue light at the top of that pic is the cameras power light. If any of this helps anyone, please feel free to reply to this post. Then I'll know typing this wasn't a waste. Hopefully I can save someone else $100.
Attachments
Last edited:
steviemajor
n3wb
Hi Paylesspizzaman
Just wanted to say thanks for the above repair details. I have 2 hikvision cubes and on both of them the IR has stopped working. I'm going to have a go at repairing them using your method above. the only thing i wanted to ask. the ebay link you have posted has now expired. (it was a few years ago i realise). any chance if you get a min could you maybe find the IR led i need on ebay or aliexpress and repost the link or item number. Also just wondered how your getting on with the repair now its a few years later. Is it still working ok and any thing you would do differently.
Thanks
Steve
alastairstevenson
Staff member
And it was ebay.com, USA.the ebay link you have posted has now expired. (it was a few years ago i realise).
Suggestion :
Try a search for "ir led bead" on ebay.co.uk and you will see lots of potential sources, with slightly varying form factors.
You're looking for a 1w 850nm (IR) or similar.
steviemajor
n3wb
thanks for the reply.
I've found some on aliexpress and ordered 5.... £2.53 so really cheap

 www.aliexpress.com
1w 850nm.
Is it obvious which way round they go when i solder it in. (ie positive and negative)
I will also check the same as you to see if the heatsink on the back is positive or negative.
I've been using a separate I/R illuminator ever since they both broke and would love to go back to just using the camera and loose the separate illuminators.is your repair still working ok
Thanks again
I've found some on aliexpress and ordered 5.... £2.53 so really cheap
3.42US $ 20% OFF|1w 3w 5w Ir Infrared Emission Led Chip Plant Growth Infrared Lamp Beads 1.4-1.6v Wave Band 700 730 760 810 850 880 940 980 1030 - Led Chips - AliExpress
Smarter Shopping, Better Living! Aliexpress.com
1w 850nm.
Is it obvious which way round they go when i solder it in. (ie positive and negative)
I will also check the same as you to see if the heatsink on the back is positive or negative.
I've been using a separate I/R illuminator ever since they both broke and would love to go back to just using the camera and loose the separate illuminators.is your repair still working ok
Thanks again
paylesspizzaman
Young grasshopper
- Jun 19, 2015
- 31
- 11
The part you found on AliExpress looks good to me. Hopefully the polarity of the back part is correct for you. It would be much easier that way. As far as which way they go, I don't remember it being obvious. I used a multimeter to check the polarity of the voltage the camera produces, and also the polarity of the LED. You could probably just hook some wires up to the LED and touch them to the pads on the camera. If backward it just won't do anything. If planning to glue it down, the Artic Silver thermal adhesive I used is discontinued now. The camera I replaced the LED in is still working fine. However, I have another Hikvision cube camera that has stopped illuminating. I need to power cycle it, just to make sure it is indeed bad before I tear into it. I would love to hear how your replacement goes once you get around to it. Take your time and good luck!thanks for the reply.
I've found some on aliexpress and ordered 5.... £2.53 so really cheap
3.42US $ 20% OFF|1w 3w 5w Ir Infrared Emission Led Chip Plant Growth Infrared Lamp Beads 1.4-1.6v Wave Band 700 730 760 810 850 880 940 980 1030 - Led Chips - AliExpress
Smarter Shopping, Better Living! Aliexpress.com
1w 850nm.
Is it obvious which way round they go when i solder it in. (ie positive and negative)
I will also check the same as you to see if the heatsink on the back is positive or negative.
I've been using a separate I/R illuminator ever since they both broke and would love to go back to just using the camera and loose the separate illuminators.is your repair still working ok
Thanks again
steviemajor
n3wb
thank you sir
I was thinking about having a go for a while but was not sure if it was possible, finding your post has made me a lot more optimistic.
I will test the output from the camera with a multimeter and try figure out the led polarity i have a bench power supply so will limit the current so to not damage it during testing.
Will drop you a message when i get round to the repair. Its going to be a while just for the led's to arrive from china.
Have a good week and once again thanks for the assistance
trempa92
Getting comfortable
when we had those old models, we used to change entire led rings. Sometimes different models shared same led rings.
steviemajor
n3wb
HIThe part you found on AliExpress looks good to me. Hopefully the polarity of the back part is correct for you. It would be much easier that way. As far as which way they go, I don't remember it being obvious. I used a multimeter to check the polarity of the voltage the camera produces, and also the polarity of the LED. You could probably just hook some wires up to the LED and touch them to the pads on the camera. If backward it just won't do anything. If planning to glue it down, the Artic Silver thermal adhesive I used is discontinued now. The camera I replaced the LED in is still working fine. However, I have another Hikvision cube camera that has stopped illuminating. I need to power cycle it, just to make sure it is indeed bad before I tear into it. I would love to hear how your replacement goes once you get around to it. Take your time and good luck!
Just wanted to let you know both my cube hivision cameras fixed, IR is now working on both. (thanks to your advice)
I had the same issue as you the heatsink base of my replacement LED was tied to positive.
So i ended up super gluing a thin piece of plastic to the circuit board to cover the metal place the led is normally soldered to so it did not short out. Not ideal for heat dissipation but i will see how long the new led lasts. I have 3 spares and now i've done the swap i'm confident i could replace the led again pretty quickly.
Took a couple of photos if your interested but nothing very different to the ones you posted.
Have a good weekend.
Regards
Steve
paylesspizzaman
Young grasshopper
- Jun 19, 2015
- 31
- 11
Awesome! Glad it worked out for you. I'm going to order a couple of the same ones you did. I'm pretty sure one of mine is dead.HI
Just wanted to let you know both my cube hivision cameras fixed, IR is now working on both. (thanks to your advice)
I had the same issue as you the heatsink base of my replacement LED was tied to positive.
So i ended up super gluing a thin piece of plastic to the circuit board to cover the metal place the led is normally soldered to so it did not short out. Not ideal for heat dissipation but i will see how long the new led lasts. I have 3 spares and now i've done the swap i'm confident i could replace the led again pretty quickly.
Took a couple of photos if your interested but nothing very different to the ones you posted.
Have a good weekend.
Regards
Steve