
Per request of @chewie, I'd like to share how I set up my Huisun Mini PTZ as a standalone surveillance unit. I liked the idea of using higher end IP camera hardware instead of consumer level analog cams, but didn't want all the overhead, complexity, and expense of enterprise infrastructure. Hopefully this thread will help those seeking quality with simplicity as a middle ground for residential and small business installations.
Here are the key design constraints I had in mind when I set up my system:
Must-haves:
- Must monitor key areas of my property (front door, driveway) for intrusion / theft, day and night
- Must not have any recurring fees / contracts
- Must integrate to my existing bourgeois cable internet home network
- Must be relatively inexpensive, simple, and have few components; preferably not using a standalone computer or NVR due to complexity and power consumption
- Must alert me instantly via email and/or mobile device SMS/MMS if there is an intrusion, with a picture of the intrusion
- Must be capable of storing a high quality, continuous video recording
- Must be capable of storing at least a day's worth of data to a storage device on a FIFO (first in first out) basis, overwriting the oldest data as new data came in
Nice-to-haves:
- Allows audio recording
- Allows remote speaker (talking through a speaker mounted near the camera from a remote device, i.e. off-site mobile phone)
- Automatic PTZ zoom (zooming in on an area with detected motion) and resetting to a park position afterward
- Automatically disarming/arming when I am present/away (respectively) from the facility
----
Below document was written in consideration of the following cam f/w:
Program version: V1.0.2 Build 201509160901
Control version: MiniPtz_V1.0.2_build201509241507
Web page version: 1.1.1 Build 20150924
Plugin version: 1.0.3.39
----
Here is the BOM I am currently using on my system:
Must-haves:
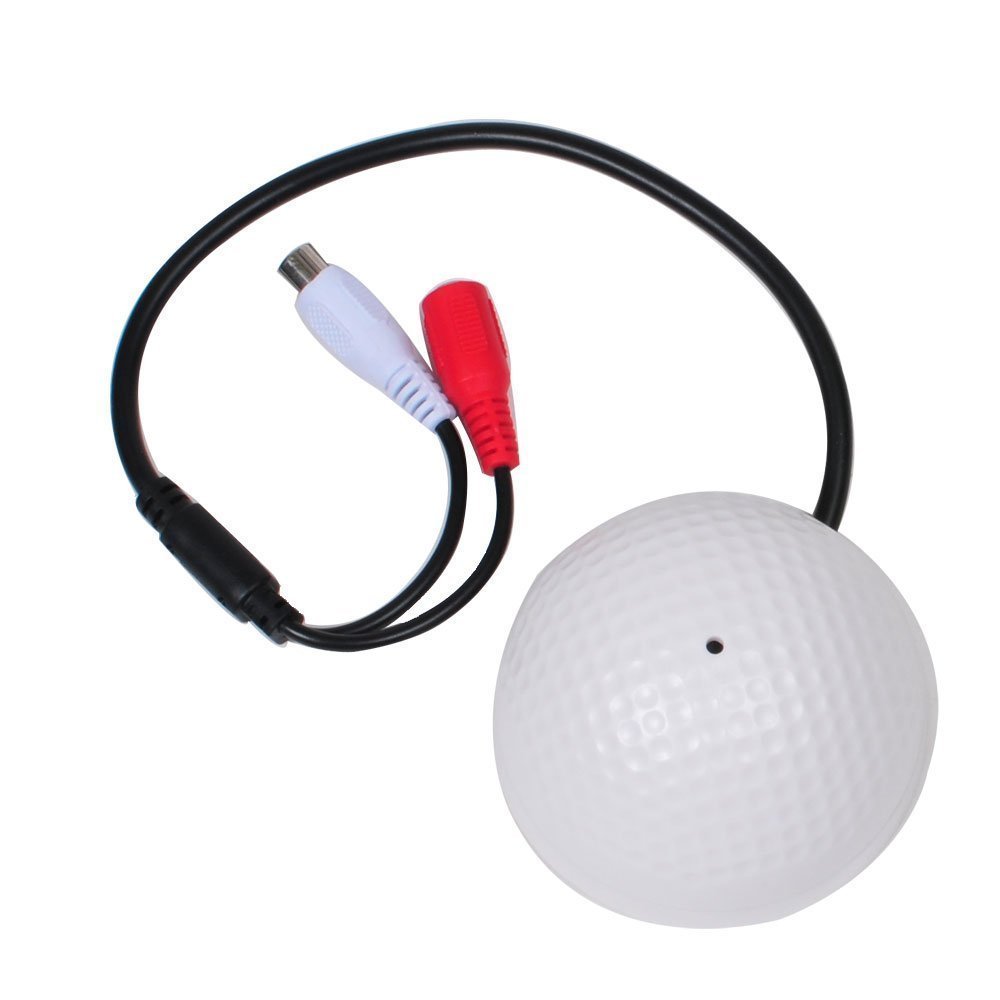
Camera
32GB SD Card
30W PoE Injector
Monoprice cat6 cable
RJ-45 connectors
Nice-to-haves:
Ability to hear what's happening at the camera:
12VDC PoE splitter
Shielded RCA cable
5.5mm 12VDC cable extension
Amplified 12VDC microphone
Ability to speak from the camera, remotely:
12VDC speaker amplifier and speaker
Ability to automatically zoom/park on motion detection:
(in progress)
Ability to disarm/arm automatically:
(in progress)
---
Must-Haves:
I won't go into all the detail about setup since it varies and much of network setup, etc. can be found elsewhere on the internet. I'll touch on the key points that are specific to the nature of the goal and hardware used.
Preliminary setup:
1. After the initial network setup, upgrade your firmware according to @klasipca's excellent firmware thread
2. This camera will spew data and consume > 400KB/s of bandwidth on your network with the main stream, so the first thing you want to do after firmware is decrease the framerate of the camera.
3. This camera, according to the supplier, will take a max of a 32GB micro SD card. I've tested both 32GB (29GB usable) AND 64GB (58GB usable) with success.
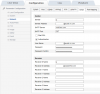
Here are the default settings of the camera. If you leave these settings and record video to a 32GB (29GB usable) card continuously, you will have a total buffer of about 10-15hrs of video depending on how much action your camera sees (due to the H.264 compression algo).

For my purposes, I dropped the frame rate down a lot to 3fps. Using the below settings with a 32GB SD card, you'll get about 9.7 days worth of continuous video recording footage:

Motion Detection setup:
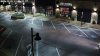
4. Next, you need to configure your motion detection parameters. I've found that a contiguous area (the red bricks) that occupies about 25-40% of the screen real estate works well with a lower sensitivity (< 10) for most applications. If you start covering an area (red bricks) that is too small, the detection algorithm seems to become very insensitive and will not trigger correctly. In general, this camera seems to be very sensitive, so low values are likely normal for most cases. For some people, it is unusably sensitive in outdoor environments with moving foliage and dynamic lighting conditions. According to Monica at Huisun, this is a known issue and Huisun has no plans of fixing it as this product will be superseded by the next gen mini PTZ.
This screen ARMS the motion detection. This means that if motion is detected, other routines within the software (which we will get to later) will trigger an action (such as emailing, storing to SD, etc).
Here are my settings:

Note that I have 'Capture', 'Capture Upload Mail', and 'Capture storage SD card' all checked. Capture upload mail means it sends me a screenshot of the live view when the motion detection event is triggered. Capture storage SD card means it writes this same screenshot to the SD card as well (may not entirely necessary depending on your use case as you'll have a video recording, an email, and a text message of the same thing). Also note that, according to the previous screenshot, I am only going to be pushing emails/texts/writing these screenshots to the SD card M-F from midnight to 7:45AM, M-F from 6:30pm - midnight, and all day Sat and Sun.
Mail Setup:
5. Setting up email is as per below. The top section, 'Sender' are the SMTP credentials and account. The bottom section, 'Receiver' are the email accounts you want to send to. The contents are the message are a subject of: "Motion Alarm Detected from <camera name>!", a blank body, and a full resolution attachment of a screenshot of when the motion alarm was triggered. Important note - most cell carriers have an 'email to MMS' service, which lets you send MMS (multimedia) messages (NOT SMS which is just text) to mobile phones from an email (SMTP) server. This is exactly what we want to do as we will be sending an email, with the screenshot of the motion event attached, to a mobile phone in the form of an MMS message. This means you receive it just like a text message. The delay is just a few seconds between when the event happens and when you receive the text message.

Here's what the received email looks like (attachment thumbnail shown):

Here's what the received MMS message looks like on a mobile phone:

Both the MMS message and the email contain a full resolution screenshot of the event:

SD card formatting:
6. To insert an SD card (the mini PTZ uses a micro SD card), unscrew the single screw located on the back side of the camera, lift the headshell slightly, and pull the head shell rearward. Beneath it is some dessicant, and under that is the SD card slot. Set the 'percentage of Picture' and the 'Percentage of record' settings. This puts quotas on how much of the disk can be used by the camera for pictures and video respectively. Finally, check the box next to HDD No. 0 (there will be only one option), and click Format. The process takes a few minutes. Afterward you should have a screen that looks similar to this:

Full motion video recording schedule:
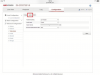
7. To set full motion video recording schedules to the SD card, set up the record schedule screen as per below:

The term 'Timing' on the schedule editor means the camera WILL record (to SD card) events within the specified time frame. The above schedule records the main stream to the SD card all days, all hours of the week.
The below screenshot shows an example of using the motion detection record feature (highlighted green). This schedule will record *only if both the motion detection is ARMED (see step #4 above) AND a somebody triggers motion within the camera's field of view.* This means that unless motion is detected, the camera won't record any video to the SD card. The pre-record and post-record setting are the time before and after the event is detected which are appended to the video to give context to the event. If the zone of interest is being continually triggered, the camera will continue to record as long as there is movement in the field above your threshold sensitivity level.

Just to clarify, the above screenshot:
- Only records upon motion from M-F, midnight to 7:45AM, M-F 6:30pm - midnight
- Does not record anything M-F from 7:46AM - 6:29pm
- Records continuously on Sat and Sun, regardless if there's motion detected or not
8. To review videos you have recorded, click on the playback tab. If you hover your mouse over the file name, you will be able to see information about the time period the file covers. By default (and you can't change it, afaik), after formatting the SD card, the camera will start recordings at '000000.h264' and count upward in integer values of 1. It will continue to do so until the quota allocated to the SD card for video recordings is consumed. At that point, the oldest file is deleted and naming continues upward in integer values of 1. I do not know when the limit of '999999.h264' is reached.

Things to note:
- Recordings cannot be downloaded via webui. This appears to be a bug as a button clearly exists and the file appears to progress in downloading (to the local client machine) to 100%, however no local file is ever produced.
- Recordings cannot be 'copied onto' an external server. There is the FTP capability of the software, however that only uploads still images, not whole video files
- There appears to be no way to telnet / SSH into this camera to 'pull' the raw video recordings off of it. If anybody can figure this out, please let me know so I can update this thread.
- The only way to 'pull' recordings off of the camera at this point appears to be to physically remove the SD card and read the SD card using a computer. All recordings are stored within the root directory of the SD card and named the same as they are within the web UI. They can be played on your local player using VLC player if you follow these steps to configure your VLC player. Additionally, still images (.jpg) are also stored within the root directory of the SD card. There also appears to be a logs.db and a records.db file, which appear to be SQLite databases containing the information about file recording (snapshots and vids) times and names, along with the log file of the cam (tracking config changes, logins, motion events, etc). If somebody can find a way to issue GET commands to this camera as a sortof web service, we would be able to do some potentially very cool stuff with scripts on an external client. I'm thinking a raspberry pi that effectively controls the file i/o and logic of a network of cams which ultimately do the heavy lifting.
----
Nice-To-Haves
Audio recording capability:
9. Per my above BOM, here is the mic I used for audio recording. This mic is a powered pass-through mic. That means it requires 12VDC (which we will pull off the PoE splitter) to amplify the signal it receives before it gives it to the camera as an amplified (line level) signal. I also used this RCA cable to carry the amplified output from the mic to the GPIO terminal block of the camera. The RCA cable part I specified is a stereo cable, meaning it is effectively two separate cables. You will only be using one of them for this installation. Furthermore, you will be cutting the end off of one of the sides to expose the conductors before you land it on the cam GPIO terminal block. It is a coaxial cable, meaning it has a center conductor (the signal), an insulator material, and a braided sheath to shield from noise. Both are very high gauge, so try to keep from losing any of the strands of copper when you strip the cable.
A goal of this installation was to run everything I needed to operate the camera, a mic, a speaker, and alarm GPI and GPO (we'll get to that at a future date) along one ethernet cable. To do this, I also need to use an ethernet splitter. This will take the ~48VDC run along my ethernet cable and step it down to 12VDC which is what my mic and speaker amplifiers use. Important note: this splitter will take the PoE into it, and GIVE you 12VDC, but you LOSE your PoE on the output end. That means that to operate your camera, you NEED to use the 12VDC to power your camera as well as your mic. That's why we use a pass-through 12VDC mic so we can also power the cam since we've lost our PoE in the splitter.
Here is the wiring:

And here is the audio that lands on the camera's audio GPIO block:

Here is a screenshot of settings I use which appear to work well:

And finally, I have a recording of the kind of quality audio you get at 3ft, 8ft, and 10ft from the microphone. There are passing cars in the background about 80ft away from the microphone. The microphone is simply hanging in mid-air from the camera connectors. It appears I'm unable to upload audio files to the website. If any member is willing and able to host an audio clip which I could link to, please PM me and I'll send you the file.
Another note is that the audio portion of the feed cannot be heard when the recorded video clip is replayed via the web interface. I have not yet tested to determine if the audio is recorded into the *.h264 file itself on the SD card. Additionally, audio feed is very choppy when the cam is viewed remotely (outside the LAN). This is on a 1mbps up connection, so it's possible you may have better luck on a faster connection. At 1mbps, sounds can be heard, but carrying any type of audio conversation with a person on the other end of a cam would be nearly impossible.
Audio Out Capability:
Here is the speaker I used to achieve this. It's simply a 12VDC amplified speaker. It takes 4 inputs and has two outputs. Two of the four inputs are 12VDC and gnd. These will both come off of the PoE splitter which takes the 48VDC PoE and 'bucks' it down to 12VDC. Keep in mind if you have multiple 12VDC devices you will need a splitter which effectively wires the 12VDC devices in parallel. The other two inputs to the amplified speaker board are the audio signal and ground shield from the camera. This is a low-level analog signal (sound) that is then amplified on the speaker board to a larger voltage. That larger voltage then gets played through the physical speaker. The final piece of the puzzle are the two outputs from the board, which are the amplified speaker wires, signal and ground. On the board I spec'd, these come pre-wired. Wiring of the audio portion of this board is functionally similar to the microphone input section of this guide (see above).
Here is the wiring, camera-side:

Here is the result:
Audio was transferred via wireless LAN using the huisun web interface, with a laptop on the sending end and a mobile device playing the joe rogan podcast into the speaker of the laptop. A very important note is that adding the audio out capability significantly taxes the CPU on this camera, to the point where the video and audio will quickly (over the course of 20-30 seconds of enabling 2-way audio) delay by up to 5-15 seconds. This basically makes this feature unusable, which is kind of a bummer. I haven't tried reducing the resolution of the main stream to help free up some CPU, although that trick may work. As-is, I'd recommend not adding this capability to your camera, and instead considering a dedicated intercom due to this (significant) latency issue.
Here are the key design constraints I had in mind when I set up my system:
Must-haves:
- Must monitor key areas of my property (front door, driveway) for intrusion / theft, day and night
- Must not have any recurring fees / contracts
- Must integrate to my existing bourgeois cable internet home network
- Must be relatively inexpensive, simple, and have few components; preferably not using a standalone computer or NVR due to complexity and power consumption
- Must alert me instantly via email and/or mobile device SMS/MMS if there is an intrusion, with a picture of the intrusion
- Must be capable of storing a high quality, continuous video recording
- Must be capable of storing at least a day's worth of data to a storage device on a FIFO (first in first out) basis, overwriting the oldest data as new data came in
Nice-to-haves:
- Allows audio recording
- Allows remote speaker (talking through a speaker mounted near the camera from a remote device, i.e. off-site mobile phone)
- Automatic PTZ zoom (zooming in on an area with detected motion) and resetting to a park position afterward
- Automatically disarming/arming when I am present/away (respectively) from the facility
----
Below document was written in consideration of the following cam f/w:
Program version: V1.0.2 Build 201509160901
Control version: MiniPtz_V1.0.2_build201509241507
Web page version: 1.1.1 Build 20150924
Plugin version: 1.0.3.39
----
Here is the BOM I am currently using on my system:
Must-haves:
Camera
32GB SD Card
30W PoE Injector
Monoprice cat6 cable
RJ-45 connectors
Nice-to-haves:
Ability to hear what's happening at the camera:
12VDC PoE splitter
Shielded RCA cable
5.5mm 12VDC cable extension
Amplified 12VDC microphone
Ability to speak from the camera, remotely:
12VDC speaker amplifier and speaker
Ability to automatically zoom/park on motion detection:
(in progress)
Ability to disarm/arm automatically:
(in progress)
---
Must-Haves:
I won't go into all the detail about setup since it varies and much of network setup, etc. can be found elsewhere on the internet. I'll touch on the key points that are specific to the nature of the goal and hardware used.
Preliminary setup:
1. After the initial network setup, upgrade your firmware according to @klasipca's excellent firmware thread
2. This camera will spew data and consume > 400KB/s of bandwidth on your network with the main stream, so the first thing you want to do after firmware is decrease the framerate of the camera.
3. This camera, according to the supplier, will take a max of a 32GB micro SD card. I've tested both 32GB (29GB usable) AND 64GB (58GB usable) with success.
Here are the default settings of the camera. If you leave these settings and record video to a 32GB (29GB usable) card continuously, you will have a total buffer of about 10-15hrs of video depending on how much action your camera sees (due to the H.264 compression algo).
For my purposes, I dropped the frame rate down a lot to 3fps. Using the below settings with a 32GB SD card, you'll get about 9.7 days worth of continuous video recording footage:
Motion Detection setup:
4. Next, you need to configure your motion detection parameters. I've found that a contiguous area (the red bricks) that occupies about 25-40% of the screen real estate works well with a lower sensitivity (< 10) for most applications. If you start covering an area (red bricks) that is too small, the detection algorithm seems to become very insensitive and will not trigger correctly. In general, this camera seems to be very sensitive, so low values are likely normal for most cases. For some people, it is unusably sensitive in outdoor environments with moving foliage and dynamic lighting conditions. According to Monica at Huisun, this is a known issue and Huisun has no plans of fixing it as this product will be superseded by the next gen mini PTZ.
This screen ARMS the motion detection. This means that if motion is detected, other routines within the software (which we will get to later) will trigger an action (such as emailing, storing to SD, etc).
Here are my settings:
Note that I have 'Capture', 'Capture Upload Mail', and 'Capture storage SD card' all checked. Capture upload mail means it sends me a screenshot of the live view when the motion detection event is triggered. Capture storage SD card means it writes this same screenshot to the SD card as well (may not entirely necessary depending on your use case as you'll have a video recording, an email, and a text message of the same thing). Also note that, according to the previous screenshot, I am only going to be pushing emails/texts/writing these screenshots to the SD card M-F from midnight to 7:45AM, M-F from 6:30pm - midnight, and all day Sat and Sun.
Mail Setup:
5. Setting up email is as per below. The top section, 'Sender' are the SMTP credentials and account. The bottom section, 'Receiver' are the email accounts you want to send to. The contents are the message are a subject of: "Motion Alarm Detected from <camera name>!", a blank body, and a full resolution attachment of a screenshot of when the motion alarm was triggered. Important note - most cell carriers have an 'email to MMS' service, which lets you send MMS (multimedia) messages (NOT SMS which is just text) to mobile phones from an email (SMTP) server. This is exactly what we want to do as we will be sending an email, with the screenshot of the motion event attached, to a mobile phone in the form of an MMS message. This means you receive it just like a text message. The delay is just a few seconds between when the event happens and when you receive the text message.
Here's what the received email looks like (attachment thumbnail shown):
Here's what the received MMS message looks like on a mobile phone:
Both the MMS message and the email contain a full resolution screenshot of the event:
SD card formatting:
6. To insert an SD card (the mini PTZ uses a micro SD card), unscrew the single screw located on the back side of the camera, lift the headshell slightly, and pull the head shell rearward. Beneath it is some dessicant, and under that is the SD card slot. Set the 'percentage of Picture' and the 'Percentage of record' settings. This puts quotas on how much of the disk can be used by the camera for pictures and video respectively. Finally, check the box next to HDD No. 0 (there will be only one option), and click Format. The process takes a few minutes. Afterward you should have a screen that looks similar to this:
Full motion video recording schedule:
7. To set full motion video recording schedules to the SD card, set up the record schedule screen as per below:
The term 'Timing' on the schedule editor means the camera WILL record (to SD card) events within the specified time frame. The above schedule records the main stream to the SD card all days, all hours of the week.
The below screenshot shows an example of using the motion detection record feature (highlighted green). This schedule will record *only if both the motion detection is ARMED (see step #4 above) AND a somebody triggers motion within the camera's field of view.* This means that unless motion is detected, the camera won't record any video to the SD card. The pre-record and post-record setting are the time before and after the event is detected which are appended to the video to give context to the event. If the zone of interest is being continually triggered, the camera will continue to record as long as there is movement in the field above your threshold sensitivity level.
Just to clarify, the above screenshot:
- Only records upon motion from M-F, midnight to 7:45AM, M-F 6:30pm - midnight
- Does not record anything M-F from 7:46AM - 6:29pm
- Records continuously on Sat and Sun, regardless if there's motion detected or not
8. To review videos you have recorded, click on the playback tab. If you hover your mouse over the file name, you will be able to see information about the time period the file covers. By default (and you can't change it, afaik), after formatting the SD card, the camera will start recordings at '000000.h264' and count upward in integer values of 1. It will continue to do so until the quota allocated to the SD card for video recordings is consumed. At that point, the oldest file is deleted and naming continues upward in integer values of 1. I do not know when the limit of '999999.h264' is reached.
Things to note:
- Recordings cannot be downloaded via webui. This appears to be a bug as a button clearly exists and the file appears to progress in downloading (to the local client machine) to 100%, however no local file is ever produced.
- Recordings cannot be 'copied onto' an external server. There is the FTP capability of the software, however that only uploads still images, not whole video files
- There appears to be no way to telnet / SSH into this camera to 'pull' the raw video recordings off of it. If anybody can figure this out, please let me know so I can update this thread.
- The only way to 'pull' recordings off of the camera at this point appears to be to physically remove the SD card and read the SD card using a computer. All recordings are stored within the root directory of the SD card and named the same as they are within the web UI. They can be played on your local player using VLC player if you follow these steps to configure your VLC player. Additionally, still images (.jpg) are also stored within the root directory of the SD card. There also appears to be a logs.db and a records.db file, which appear to be SQLite databases containing the information about file recording (snapshots and vids) times and names, along with the log file of the cam (tracking config changes, logins, motion events, etc). If somebody can find a way to issue GET commands to this camera as a sortof web service, we would be able to do some potentially very cool stuff with scripts on an external client. I'm thinking a raspberry pi that effectively controls the file i/o and logic of a network of cams which ultimately do the heavy lifting.
----
Nice-To-Haves
Audio recording capability:
9. Per my above BOM, here is the mic I used for audio recording. This mic is a powered pass-through mic. That means it requires 12VDC (which we will pull off the PoE splitter) to amplify the signal it receives before it gives it to the camera as an amplified (line level) signal. I also used this RCA cable to carry the amplified output from the mic to the GPIO terminal block of the camera. The RCA cable part I specified is a stereo cable, meaning it is effectively two separate cables. You will only be using one of them for this installation. Furthermore, you will be cutting the end off of one of the sides to expose the conductors before you land it on the cam GPIO terminal block. It is a coaxial cable, meaning it has a center conductor (the signal), an insulator material, and a braided sheath to shield from noise. Both are very high gauge, so try to keep from losing any of the strands of copper when you strip the cable.
A goal of this installation was to run everything I needed to operate the camera, a mic, a speaker, and alarm GPI and GPO (we'll get to that at a future date) along one ethernet cable. To do this, I also need to use an ethernet splitter. This will take the ~48VDC run along my ethernet cable and step it down to 12VDC which is what my mic and speaker amplifiers use. Important note: this splitter will take the PoE into it, and GIVE you 12VDC, but you LOSE your PoE on the output end. That means that to operate your camera, you NEED to use the 12VDC to power your camera as well as your mic. That's why we use a pass-through 12VDC mic so we can also power the cam since we've lost our PoE in the splitter.
Here is the wiring:
And here is the audio that lands on the camera's audio GPIO block:
Here is a screenshot of settings I use which appear to work well:
And finally, I have a recording of the kind of quality audio you get at 3ft, 8ft, and 10ft from the microphone. There are passing cars in the background about 80ft away from the microphone. The microphone is simply hanging in mid-air from the camera connectors. It appears I'm unable to upload audio files to the website. If any member is willing and able to host an audio clip which I could link to, please PM me and I'll send you the file.
Another note is that the audio portion of the feed cannot be heard when the recorded video clip is replayed via the web interface. I have not yet tested to determine if the audio is recorded into the *.h264 file itself on the SD card. Additionally, audio feed is very choppy when the cam is viewed remotely (outside the LAN). This is on a 1mbps up connection, so it's possible you may have better luck on a faster connection. At 1mbps, sounds can be heard, but carrying any type of audio conversation with a person on the other end of a cam would be nearly impossible.
Audio Out Capability:
Here is the speaker I used to achieve this. It's simply a 12VDC amplified speaker. It takes 4 inputs and has two outputs. Two of the four inputs are 12VDC and gnd. These will both come off of the PoE splitter which takes the 48VDC PoE and 'bucks' it down to 12VDC. Keep in mind if you have multiple 12VDC devices you will need a splitter which effectively wires the 12VDC devices in parallel. The other two inputs to the amplified speaker board are the audio signal and ground shield from the camera. This is a low-level analog signal (sound) that is then amplified on the speaker board to a larger voltage. That larger voltage then gets played through the physical speaker. The final piece of the puzzle are the two outputs from the board, which are the amplified speaker wires, signal and ground. On the board I spec'd, these come pre-wired. Wiring of the audio portion of this board is functionally similar to the microphone input section of this guide (see above).
Here is the wiring, camera-side:
Here is the result:
Audio was transferred via wireless LAN using the huisun web interface, with a laptop on the sending end and a mobile device playing the joe rogan podcast into the speaker of the laptop. A very important note is that adding the audio out capability significantly taxes the CPU on this camera, to the point where the video and audio will quickly (over the course of 20-30 seconds of enabling 2-way audio) delay by up to 5-15 seconds. This basically makes this feature unusable, which is kind of a bummer. I haven't tried reducing the resolution of the main stream to help free up some CPU, although that trick may work. As-is, I'd recommend not adding this capability to your camera, and instead considering a dedicated intercom due to this (significant) latency issue.
Attachments
Last edited by a moderator:
As an eBay Associate IPCamTalk earns from qualifying purchases.
As an Amazon Associate IPCamTalk earns from qualifying purchases.


") so there are only 2 wires that need to be connected to the GPIO? I'm assuming the female RCA cable has 2 wires internally that I would connect to the GPIO.
so there are only 2 wires that need to be connected to the GPIO? I'm assuming the female RCA cable has 2 wires internally that I would connect to the GPIO.