Plasti Dipped Huisun 10x Mini PTZ

digger11

Getting comfortable
Joined
Mar 26, 2014
Messages
370
Reaction score
376
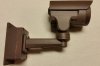
For our mountain home, I want to install one or more of the mini PTZ cameras, but I wanted something that blends in a little better than the camera's white housing does. I decided to give Plasti Dip a try, and was pleased to find that the local Pep Boy's auto parts store carries Plasti Dip. I was able to pick up an aerosol can of the Camo Brown for ~ $9.

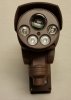
I was concerned about the spray getting into the moving parts of the PTZ, so initially I though that wedging a thin rubber band in between the moving parts to act as a gasket during the painting might work, but found that it really wasn't possible to remove the rubber band without tearing up the Plasti Dip once the Plasti Dip dried. What I found that seem to have worked well was to slide a piece of dental floss between the two moving parts, spray a coat of Plasti Dip, then prior to letting that coat dry, pull out the floss by lifting both ends, which seemed to do a good job of cleaning any Plasti Dip out from between the moving parts.

All in all I'm pretty pleased with how it turned out, even though I got a little heavy handed a couple of times and had a few runs to deal with. If you try this for yourself, just remember that it is a lot easier to give it a couple of more light coats than it is to have to clean up a run. :)

Too bad it's going to be a couple of weeks before I'll be able to go up and install it.
 

Attachments

klasipca

Banned
Joined
Mar 27, 2014
Messages
3,146
Reaction score
750
Nice, thinking to do the same thing, but in black for 2nd gen. Actually, it will be easier because you just mask the lens front since it's already black.
 

digger11

Getting comfortable
Joined
Mar 26, 2014
Messages
370
Reaction score
376
Nice, thinking to do the same thing, but in black for 2nd gen. Actually, it will be easier because you just mask the lens front since it's already black.
I was looking at your pics of the 2nd gen and thinking how much easier it would have been to plasti dip than my 1st gen. Oh well, once I see how this camera works out for me maybe I'll just have to buy a 2nd gen for the other side of the house. ;)
 

digger11

Getting comfortable
Joined
Mar 26, 2014
Messages
370
Reaction score
376
I finally got the camera mounted,


First I built a corner mount by taking a 4x4 and cutting a 6" piece off of it, which I then cut lengthwise along the diagonal.


I cut the top of it at a 15 degree angle so water wouldn't sit on top, and as you can see, I plasti dipped the wood block to protect it from the elements.


This block fits on the face of the trim, and the camera and it's junction box mounts on it, letting the camera look down both the rear and side walls of the house.


I'm hoping that I'll be able to pry the trim on the left away from the wall far enough to tuck the Cat5 into the space between and behind the two trim pieces so that only a couple of inches of the cable will be exposed, but tidying up the routing of the CAT5 is going to have to wait until spring when the 3+ feet of snow behind the house melts. I'll need to get up on a 25' ladder, and I just wasn't feeling that doing so on snow covered ground was a very good idea.
 

nayr

IPCT Contributor
Joined
Jul 16, 2014
Messages
9,329
Reaction score
5,325
Location
Denver, CO
Looks like your not going to have a problem but be weary about doing this when exposed to direct sunlight, in the summer time its going to get quite hot inside that housing if thats exposed to direct sunlight all day.. overheating is a major killer of cameras, and there is a good reason why they are all white.
 

SyconsciousAu

Getting comfortable
Joined
Sep 13, 2015
Messages
872
Reaction score
825
Is your Cat 5 Outdoor rated? Personally I like to put all of my cables that are exposed to the elements in PVC conduit.
 

digger11

Getting comfortable
Joined
Mar 26, 2014
Messages
370
Reaction score
376
Looks like your not going to have a problem but be weary about doing this when exposed to direct sunlight, in the summer time its going to get quite hot inside that housing if thats exposed to direct sunlight all day.. overheating is a major killer of cameras, and there is a good reason why they are all white.
At 9000' elevation we rarely see temps above 80. I've got an ESC camera that came in a finish that I'd call antique bronze and has been mounted on the south side of this house for 2 summers. No issues with it yet. The Huisun is on the north west corner, and sits behind and below the roof line of the garage, and should be shielded from direct sun most of the day.


Is your Cat 5 Outdoor rated? Personally I like to put all of my cables that are exposed to the elements in PVC conduit.
No, it's not outdoor rated, but it is closer to being outdoor rated than I am to being rated for a 20+ foot fall :)
In the spring I'll either get it routed behind the trim, or run conduit. I'll also decide whether I want to mount the camera higher or lower than it is right now.

I would have preferred doing a proper job of it the first time, but that would have meant leaving the camera in a box for the next few months.

I did leave 15' of slack in the attic, so even if the cable weathers in the next few months, I'll pull some of the slack and cut off the weathered section.
 

JDWX

Getting the hang of it
Joined
Aug 26, 2014
Messages
138
Reaction score
41
Location
Cleveland, Ohio
Good work. Looks nice. I've Plasti-dipped dome cameras. I live in the inner city and try to blend them in to the house as much as possible for several reasons, lol... Works well and worst case, you can peel it right off.
 

JFire

Getting the hang of it
Joined
Aug 26, 2015
Messages
407
Reaction score
40
Location
Pittsburgh, PA
I finally got the camera mounted,


First I built a corner mount by taking a 4x4 and cutting a 6" piece off of it, which I then cut lengthwise along the diagonal.


I cut the top of it at a 15 degree angle so water wouldn't sit on top, and as you can see, I plasti dipped the wood block to protect it from the elements.


This block fits on the face of the trim, and the camera and it's junction box mounts on it, letting the camera look down both the rear and side walls of the house.


I'm hoping that I'll be able to pry the trim on the left away from the wall far enough to tuck the Cat5 into the space between and behind the two trim pieces so that only a couple of inches of the cable will be exposed, but tidying up the routing of the CAT5 is going to have to wait until spring when the 3+ feet of snow behind the house melts. I'll need to get up on a 25' ladder, and I just wasn't feeling that doing so on snow covered ground was a very good idea.
Deffinately going to have to make that mount.

Sent from my SM-N920T using Tapatalk
 

nayr

IPCT Contributor
Joined
Jul 16, 2014
Messages
9,329
Reaction score
5,325
Location
Denver, CO
hope that big snow ledge hanging off the edge of the roof like that dont one day just break your camera off.. it looks like it might be okay but then that last image makes me doubt it.. chunk of ice or even a solid slab of snow falling will plow right through your camera even if it just makes minimal contact.. If wind breaks it loose it could also blow it up against the house so it'd be far enough away from your overhang to be right in the line of fire.. with all the pan/tilt mechanics is in that knee joint it could be fatal.

perhaps you can take a few wooden shingles cut for that corner and make a tiny lil awning to protect it from avalanches.. I think if you put it right under your overhang it'd be too high to be very usefull up close.
 
Last edited by a moderator:

digger11

Getting comfortable
Joined
Mar 26, 2014
Messages
370
Reaction score
376
The corner mount places the camera more to the side of the house than behind it, and gets the camera out from under the roof edge. Conceivably a stiff wind blowing at just the wrong angle might let falling snow or ice hit the camera, but I think the odds are against it. I already had that concern in mind, and when I redo the camera mount this spring it will be a factor in my decision as to whether to raise the camera so that it is just below the level of the soffit.
 

nayr

IPCT Contributor
Joined
Jul 16, 2014
Messages
9,329
Reaction score
5,325
Location
Denver, CO
on plastic? hardly.. plastics such as PET are virtually impermeable, cant even dye them.. plastidip is one of the best ways to get a good long lasting adhesion to such materials.
 

JFire

Getting the hang of it
Joined
Aug 26, 2015
Messages
407
Reaction score
40
Location
Pittsburgh, PA
on plastic? hardly.. plastics such as PET are virtually impermeable, cant even dye them.. plastidip is one of the best ways to get a good long lasting adhesion to such materials.
Would love to do mine but I'd be afraid of the heat factor. My house gets a lot of sun

Sent from my SM-N920T using Tapatalk
 
Top