It's been a good UPS. I've replaced the batteries not long ago but was surprised it did not pas the available commercial power through. A change is in the future. I have some timer relays that will hold off power for your set time after power is applied to relay. I'll have to wait till I find them in the loaded trailer I just finished moving with. For now it is no longer on the UPS. Now using Wireshark I see my faulted HFW5231 camera looking to load new software. If I just figure out what and how to serve it.
Hi Guys.
Got a Dahua NVR that just sits on the NVR 4.0 boot screen for a few minutes then re boots (Boot loop)
I cant get past this on the Serial connection.
Cant stop the autoboot
Tried spamming *
Tried other Keys
Nothing is allowing me to pass this (Tried with HDDs connected and without them connected also)
Any ideas or feedback would be appreciated!
Thanks!
Attachments
2023-04-15 17_57_35-(1) DHI-NVR5432-16P-4KS2 won't boot up after upgrade _ Page 5 _ IP Cam Talk.png
I have a problem with my DVR Dahua nvr5432-16p-4ks2 . I made an update to DH_NVR5XXX-4KS2_MultiLang_V4.002.0000000.6 with didn't worked. ( Certainly i have an English version from China )
My DVR is lopped in rebooting, only a firmware screen is showed and reboted quickly after.
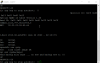
I tried to upload an older firmware to dvr by tftp, and everything seems working but... the problem is that the dvr keep reboot, even when the upload is started (check screen please).
Is there a solution to stop the dvr from rebooting every ~3 minutes ?
Check your computer and NVR's IP address
If you are lucky and your computer's IP is in 192.168.1.x subnet, then there is not too much you need to do.
Just note down your computer's IP address for later use
If your computer IP is in a different subnet, be sure that your NVR is also connected to the same network and note down your computer's IP for later use
Also extract the Update.rar into the same directory
Check the content of that directory, you should see the u-boot.bin.img and update.img in that directory
Open Tftpd64, click "browse" to change the Current Directory and select that directory where you extract your firmware to
Leave the Tftpd64 open ( windows might ask you to approve external connection to TFTPD64, approve that reuquest
Com port connection:
Bring NVR near your PC, make sure the network cable and power are connected on NVR. Leave NVR power off
Plug the USB to RS232 cable to computer and the DB9 COM port on the NVR
Look for the new COM port in the Com / LPT port section inside the Device manager, note the COM port number ( C'OM3 for my machine )
Open Putty, click on "Session" on the left side, select "Serial" as the connection type, and put 115200 for the speed, then click connect and power on the NVR
You should start seeing putty's serial console started showing output, as the NVR started booting up.
NVR currently should stuck in upgrading mode from your earlier upgrade failure, we need to stop it from auto booting into the broken kernel. A few second after you see the output, start clicking the '*' key on your keyboard
If you see it shows "hisilicon#" prompt instead of loading kernel, you have successfully stopped the auto boot and you are ready for the flashing
Flashing:
type "lip" and hit enter in the console. console should tell you current NVR IP. By default it should be 192.168.1.108
If the local IP is not in 192.168.1.x subnet, try set it to the same subnet as your computer's IP. For instance if your computer IP is 192.168.0.100, set lip to 192.168.0.240 by typing "lip 192.168.0.240" in console and hit enter
type "sip <your computer's IP address>" in console and hit enter. This tells NVR to look at this IP address for TFTP server
type "save" in console and hit enter. This saves the change you made into system
type "run dr" to download uboot.bin.img, the nvr will kinda reboot and start pulling data from TFTP server through Ethernet. Do not let TFTP server broke network connection or power down at this time
type "run up" to download update.img. This should get the system updated.
After both process is competed, the NVR should no longer auto reboot. Hooke it back up to a monitor to see if it can boot into the NVR OS correctly.
Hopefully everything works right and you can see your camera again! Your user / camera / system setting should stay unchanged.
Best of luck!
As an Amazon Associate IPCamTalk earns from qualifying purchases.