
For those who may be interested, I decided to see what was in my Lorex LNB9232S. I already believe this is a Dahua HFW1831EN based on a previous post of mine for: "http://<IP ADDRESS>/cgi-bin/magicBox.cgi?action=getSystemInfo".
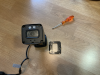
I must admit this is a very solid camera. Being IP67 rated, it better be. The housing is all solid cast iron. There are no visible screws. To get inside, there is a place where you can insert a screw driver beneath the shadow hood. It pops off a plastic front cover. See Pic #1
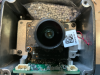
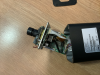
Looking inside the front cover, you will see four corner Phillips screws the allow you access to the full assembly inside. See pic #2. The cast iron front housing then comes off nicely. Be careful as there are two short connector cables. See pic #3
Thankfully cable connectors are not glued in and can be disconnected. There is a little bag of moisture beads, stuffed into the top that can be carefully removed. See pic #4.
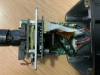
The whole internal assembly can then be pulled out enough to get a better look inside. See pic #5.
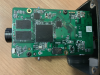
Finally pic #6 & 7 show the top and bottom of the main circuit board.
The reset button is K7, I believe, and is available without disassembling everything.
The on-board flash is probably U5 & U6. So much for upgrading that.
My final thought on the camera is that it is built solidly. Please don't reply that I probably voided the warranty. I knew that going in, though I did not see a sticker that said as much. ;-). And yes, it works fine afterwards.
John
I must admit this is a very solid camera. Being IP67 rated, it better be. The housing is all solid cast iron. There are no visible screws. To get inside, there is a place where you can insert a screw driver beneath the shadow hood. It pops off a plastic front cover. See Pic #1
Looking inside the front cover, you will see four corner Phillips screws the allow you access to the full assembly inside. See pic #2. The cast iron front housing then comes off nicely. Be careful as there are two short connector cables. See pic #3
Thankfully cable connectors are not glued in and can be disconnected. There is a little bag of moisture beads, stuffed into the top that can be carefully removed. See pic #4.
The whole internal assembly can then be pulled out enough to get a better look inside. See pic #5.
Finally pic #6 & 7 show the top and bottom of the main circuit board.
The reset button is K7, I believe, and is available without disassembling everything.
The on-board flash is probably U5 & U6. So much for upgrading that.
My final thought on the camera is that it is built solidly. Please don't reply that I probably voided the warranty. I knew that going in, though I did not see a sticker that said as much. ;-). And yes, it works fine afterwards.
John


")
