DIY - New home video surveillance system

Hakapik

Getting the hang of it
Joined
Dec 6, 2023
Messages
23
Reaction score
42
Location
Italy
Hi, I'm Matteo from Italy. I have almost finished renovating my new house and I want to install a video surveillance system.
I searched for information until I found this fantastic forum where I had the opportunity to learn a lot and clear my mind and I thank you for all the tips.
After countless days reading many very interesting threads I have abandoned the idea of a Reolink system behind me,
thanks to @Wildcat_1:clap:
and I am ready to make my first purchase.
Before spending a few thousand euros I would like to check everything with you.
I really liked the idea of being able to see colors at night, but unfortunately the budget and the critical issues of Color 4k cams with a 1:1/2 sensor (and the areas I want to cover) made me give up.
So apart from a couple of cams I would have opted for the B54IR-Z4E-S3 1/1.8".
The property presents some critical issues because there are some small trees and the house does not have completely linear walls (presence of recesses, chimney columns, etc) and
being 3 floors above ground (
ground floor, first & second floor) the height also needs to be taken into consideration.
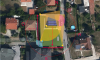
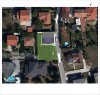
I am sharing the floor plans and photos with you to make things easier.
The cams marked in yellow are obviously B54IR-Z4E-S3, while the purple one is a T180 that I intend to install facing the main road which is well lit by street lamps.
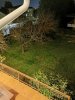
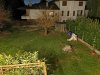
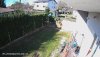
The photos I took with the P30 Pro in night mode were taken with the terrace lights on, but my goal is not to need to turn them on.
As for heights, taking into account that I have no intention of drilling the walls of the first floor,
while for the walls of the basement and the second last floor attic which are currently unfinished it is not a problem.
I would have decided to place the T180 which overlooks the illuminated street at about 6.2m in height and thus I have the possibility of filming the entire street.
As regards the 3 B54IR-Z4E-S3 cams that film the garden in front of the main entrance, I have 2 options (but perhaps I already know the answer...) I could install them under the first CLS beam of the roof or under the soffit of the first floor terrace (the highest one) at about 5m high or even 1.70m high below the main terrace..
There is also the "small" detail of the leaves to consider: the trees are now bare, but when the good weather begins, the foliage will cover most of the view.
last but not least, there is to consider: the European legislation regarding Privacy aka GDPR: it is not allowed to film public streets and keep recordings nor save license plate numbers... I probably wouldn't have problems with parking on the main street, but in my opinion the video camera that films from south to north part of the public road is a bit borderline (and once spring comes the view will probably be obscured by the treetops,
or when I will plant jasmine plants along the entire fence to prevent passers-by on the street from looking at the whole garden)

What do you think about my project? I am open to advice, if you have any suggestions I am very grateful.
PS: as soon as I get your approval, I will send a PM to the good Andy :lol:
@
EMPIRETECANDY
prepare the tissues for the quotation! ;)
thank you all, have a nice day


Aerial view
NOTE:

for the geographical representation of the camera coverage I only took Identify into consideration, based on the cam's specs!


Screenshot 2024-01-26 at 15-06-23 System Surveyor Cloud Workspace.jpg

East Prospect

Vista EST.png

photo_5857044552664334828_y.jpg

Night POV T180 4K (E)
IMG_20240112_181124.jpgIMG_20240112_181227.jpgIMG_20240112_181046.jpgIMG_20240112_181152.jpg


Night POV B54IR-Z4E-S3 EAST (S to N)

photo_5877750761797042849_y.jpg

Night POV B54IR-Z4E-S3 North (W to E)
photo_5877750761797042817_y.jpg
VISTA OVEST 2.png

photo_5877750761797042820_y.jpg

Night POV 3x B54IR-Z4E-S3 south garden
C
IMG_20240112_180628.jpgIMG_20240112_180534.jpgIMG_20240112_180342.jpg

B


IMG_20240112_180552.jpgIMG_20240112_180746.jpg

A


photo_5877750761797042837_y.jpgphoto_5877750761797042838_y.jpgphoto_5877750761797042840_y.jpg

Night POV B54IR-Z4E-S3 (S-W to N)

photo_5877750761797042845_y.jpg

NIGHT POV - SOUTH CAR Entrance T54-IR-AS-S3

photo_5882254361424412997_y.jpg
 

Attachments

Last edited:

steve1225

Getting comfortable
Joined
Apr 11, 2020
Messages
299
Reaction score
364
Location
Poland/Portugal
Varifocal 5442 is much better solution (in comparison to Color4K-X/T) for Your situation (high mounting point, narrow corridors around house).

You choose 5442-z4e as main type of camera - please remember that z4e models have bigger zoom but narrow horizontal field of view (15 to 43 degree). They are very good for high mounting points or bigger distances. But they can not take wide image (more that 43 degree).

In your project I see three cameras with wide field of view - one will be t180, but two are marked as z4e. If this is not a mistake - if you want wide field of view in this places - you should use 5442-ze models there (47 to 115 horizontal degree).
 

Hakapik

Getting the hang of it
Joined
Dec 6, 2023
Messages
23
Reaction score
42
Location
Italy
Varifocal 5442 is much better solution (in comparison to Color4K-X/T) for Your situation (high mounting point, narrow corridors around house).

You choose 5442-z4e as main type of camera - please remember that z4e models have bigger zoom but narrow horizontal field of view (15 to 43 degree). They are very good for high mounting points or bigger distances. But they can not take wide image (more that 43 degree).

In your project I see three cameras with wide field of view - one will be t180, but two are marked as z4e. If this is not a mistake - if you want wide field of view in this places - you should use 5442-ze models there (47 to 115 horizontal degree).
Hello and thanks for the feedback.
Which bullets are you referring to?
I made several attempts to cover the area with the wide range turrets, but the distance for identify would be limited.

in this example the purple cameras are T54IR-ZE-S3 with fow of 112°x6ft, while for example. the yellow one to the northwest is a B54IR Z4E-S3 @ 43°/14ft


Screenshot 2024-01-27 221129.png
 

Hakapik

Getting the hang of it
Joined
Dec 6, 2023
Messages
23
Reaction score
42
Location
Italy
update:
Today I received an IPC-DHW5442TM-ASE-S3 with 2.8mm focal length,
that I bought 2 weeks ago
I immediately flashed the EmpireTech firmware... everything was fine and the camera works.
Now I just need to get the cat7 plugs onto a 50 meter bundle of cable I got to test.
With this camera I will be able to understand if the ambient lighting is acceptable
 

Hakapik

Getting the hang of it
Joined
Dec 6, 2023
Messages
23
Reaction score
42
Location
Italy
HI,
I finally managed to do some testing with the latest arrival.
After some trouble on how to position it and manage the video stream, I took it for a walk in the garden all day :D
with a tripod and electrical junction box I positioned the camera at 4.2m/13.8ft.
Performance during the day is good and improvable,
but at night there is probably a lot of optimization work to be done before obtaining an acceptable result.
However, the important thing is that I managed to understand the limits of a camera without zoom and wide fov.
if I can then I will finish the tour at night..
It's not exactly easy to drag along 50 meters of cable in the dark :lmao:
for the rest, I still have to find a way to convert the videos and be able to watch the stream directly from the smartphone


photo_2024-01-30_20-47-28.jpgphoto_2024-01-30_20-47-40.jpgphoto_2024-01-30_20-47-35.jpg


207 - Inquadramento PRG-page-00001.jpg


position 1 night - lights on (4x1000lm lights bulb):

position 1 night - lights on (4x1000lm lights bulb)position 1 night color - lights on (4x1000lm lights bulb)
position 1 night - no lights:
(note: Vine Cat running)
position 1 night - no lights
View attachment Vine Cat_resized.mp4


position 1 day:

192.168.42.62_ch_1_20240130_123943.jpg192.168.42.62_ch_1_20240130_132344.jpg

position 2 day & night with LED street light:
(note: here, or rather in the center of the house facade, the T180 seems perfect to me)

192.168.42.62_ch_1_20240130_135741.jpg192.168.42.62_ch_1_20240130_135937.jpg192.168.42.62_ch_1_20240130_192445.jpg192.168.42.62_ch_1_20240130_180058.jpg

position 3 day:
(note: just for testing)

:192.168.42.62_ch_1_20240130_143059.jpg

position 4 day:

192.168.42.62_ch_1_20240130_152438.jpg

position 5 day:

neighbor's property192.168.42.62_ch_1_20240130_155115.jpgthe dark panther pisses around

position 6 day:

192.168.42.62_ch_1_20240130_161525.jpg

position 7:
(note: the noise of the outdoor heat pump unit does not allow for clean audio capture)

192.168.42.62_ch_1_20240130_163057.jpg192.168.42.62_ch_1_20240130_162007.jpg
 

Attachments

Last edited:

wittaj

IPCT Contributor
Joined
Apr 28, 2019
Messages
25,028
Reaction score
48,788
Location
USA
Keep in mind a camera on auto/default settings can produce nice static images, but motion is a blur.

In terms of getting the most out of the camera, here is my "standard" post that many use as a start for dialing in day and night that helps get the clean captures and help the camera recognize people and cars.

Start with:

H264
8192 bitrate
CBR
15FPS
15 iframes

Every field of view is different, but I have found you need contrast to usually be 6-8 higher than the brightness number at night.

We want the ability to freeze frame capture a clean image from the video at night, and that is only done with a shutter of 1/60 or faster. At night, default/auto may be on 1/12s shutter or worse to make the image bright.

In my opinion, shutter (exposure) and gain are the two most important parameters and then base the others off of it. Shutter is more important than FPS. It is the shutter speed that prevents motion blur, not FPS. 15 FPS is more than enough for surveillance cameras as we are not producing Hollywood movies. Match iframes to FPS. 15FPS is all that is usually needed.

Many people do not realize there is manual shutter that lets you adjust shutter and gain and a shutter priority that only lets you adjust shutter speed but not gain. The higher the gain, the bigger the noise and see-through ghosting start to appear because the noise is amplified. Most people select shutter priority and run a faster shutter than they should because it is likely being done at 100 gain, so it is actually defeating their purpose of a faster shutter.

Go into shutter settings and change to manual shutter and start with custom shutter as ms and change to 0-8.3ms and gain 0-50 (night) and 0-4ms exposure and 0-30 gain (day)for starters. Auto could have a shutter speed of 100ms or more with a gain at 100 and shutter priority could result in gain up at 100 which will contribute to significant ghosting and that blinding white you will get from the infrared or white light.

Now what you will notice immediately at night is that your image gets A LOT darker. That faster the shutter, the more light that is needed. But it is a balance. The nice bright night static image results in Casper blur and ghost during motion LOL. What do we want, a nice static image or a clean image when there is motion introduced to the scene?

In the daytime, if it is still too bright, then drop the 4ms down to 3ms then 2ms, etc. You have to play with it for your field of view.

Then at night, if it is too dark, then start adding ms to the time. Go to 10ms, 12ms, etc. until you find what you feel is acceptable as an image. Then have someone walk around and see if you can get a clean shot. Try not to go above 16.67ms (but certainly not above 30ms) as that tends to be the point where blur starts to occur. Conversely, if it is still bright, then drop down in time to get a faster shutter.

You can also adjust brightness and contrast to improve the image. But try not to go above 70 for anything and try to have contrast be at least 7-10 digits higher than brightness.

You can also add some gain to brighten the image - but the higher the gain, the more ghosting you get. Some cameras can go to 70 or so before it is an issue and some can't go over 50.

But adjusting those two settings will have the biggest impact. The next one is noise reduction. Want to keep that as low as possible. Depending on the amount of light you have, you might be able to get down to 40 or so at night (again camera dependent) and 20-30 during the day, but take it as low as you can before it gets too noisy. Again this one is a balance as well. Too smooth and no noise can result in soft images and contribute to blur.

Do not use backlight features until you have exhausted every other parameter setting. And if you do have to use backlight, take it down as low as possible.

After every setting adjustment, have someone walk around outside and see if you can freeze-frame to get a clean image. If not, keep changing until you do. Clean motion pictures are what we are after, not a clean static image.
 

Hakapik

Getting the hang of it
Joined
Dec 6, 2023
Messages
23
Reaction score
42
Location
Italy
Keep in mind a camera on auto/default settings can produce nice static images, but motion is a blur.

In terms of getting the most out of the camera, here is my "standard" post that many use as a start for dialing in day and night that helps get the clean captures and help the camera recognize people and cars.
...
Hi Wittaj, it's really nice to meet you, I'm learning a lot of things from your posts, you could write a Bible on it!
I played around with the settings and the defaults at night are pitiful.
Already by disabling some software algorithms things improve, but I have to study them all.
And not having a fixed position for the cam temporarily limits it a bit, especially when it comes to detection parameters.
Good you gave me a lot of tips, now I'll try to apply them! (11.50pm)
Thank you
PS: I haven't yet decided what to use to manage, but I will most likely use blue-Iris, to be associated with HomeAssistant with which I manage the house.
 
Last edited:

Hakapik

Getting the hang of it
Joined
Dec 6, 2023
Messages
23
Reaction score
42
Location
Italy
Keep in mind a camera on auto/default settings can produce nice static images, but motion is a blur.

In terms of getting the most out of the camera, here is my "standard" post that many use as a start for dialing in day and night that helps get the clean captures and help the camera recognize people and cars.
...
HI, I followed your advice and the video is clearly improved. The image is much clearer, the reolink effect disappeared at night and I no longer see Blur Motion Ghost,
not even with my dark combat cat, Etò or wine the red one while running everywhere defending the perimeter.
At night I can almost read the plates of parked cars and during the day also the moving ones.
Thanks it's an excellent result, you made me smile that you listed some of the mistakes I made with the first setting (Hight Exposure Compensation) :lmao:
Now I'm playing with Blue Iris to understand if the Ryzen notebook I recycled can hold the load .. I would prefer to invest the money in a nas to save the data rather than a new PC
 
Last edited:

Sammyf

Getting the hang of it
Joined
Apr 11, 2022
Messages
41
Reaction score
71
Location
EU
Note that motion activated lights might ruin the capture, as the cams might take some time to adjust for the change in amount of light.

For the installation height, did you consider digging some cables to the ground and installing some poles (or use some existing/planned fence for example) to attach the cams to?

My solution for privacy matters was to make a duplicate (can’t recall the correct term) from the cams that have public road in part of the field of view. In the copy I added privacy masking on the road part and record the substream. The main feed does mot have privacy masking and is recording with 5 seconds pre-trigger time when the camera detects human/car entering the property. I also can watch this in live feed. This way I’m utilizing the records purely on personal purposes, so gdpr doesn’t apply for the recordings. Even recording the public road would be legal (freedom of speech), but would require having some person register etc. But this is just my interpretation, never asked any lawyer about it (and local laws might vary).
Also, I installed some cams to watch towards the house rather than towards the street.
 

Hakapik

Getting the hang of it
Joined
Dec 6, 2023
Messages
23
Reaction score
42
Location
Italy
Note that motion activated lights might ruin the capture, as the cams might take some time to adjust for the change in amount of light.

For the installation height, did you consider digging some cables to the ground and installing some poles (or use some existing/planned fence for example) to attach the cams to?

My solution for privacy matters was to make a duplicate (can’t recall the correct term) from the cams that have public road in part of the field of view. In the copy I added privacy masking on the road part and record the substream. The main feed does mot have privacy masking and is recording with 5 seconds pre-trigger time when the camera detects human/car entering the property. I also can watch this in live feed. This way I’m utilizing the records purely on personal purposes, so gdpr doesn’t apply for the recordings. Even recording the public road would be legal (freedom of speech), but would require having some person register etc. But this is just my interpretation, never asked any lawyer about it (and local laws might vary).
Also, I installed some cams to watch towards the house rather than towards the street.
Installing posts at the corners of the garden perimeter is something I will definitely do, but near the facades of the house wouldn't look nice,
also because I still have to redo the sidewalks around the house.
Unfortunately, not having made provisions on the house walls, installing them directly on the wall at the height of the raised floor is not possible.
However, at the level of the top floor's floor, I can drill through the wall from side to side, making traces for the conduits inside, since it's still in the rough state.
The 14 cm graphite EPS insulation certainly doesn't help.
Regarding GDPR, the boundary between security and privacy is very thin, not easy to define,
and the law is so poorly written that it is often misinterpreted.
However, using a privacy mask for public roads and neighbors' houses in the recordings is the only solution.
I'm realizing that there are many things to consider, not least of which is the wife factor:
I wouldn't want her to get upset because the house has turned into a Guantanamo!
 

The Automation Guy

Known around here
Joined
Feb 7, 2019
Messages
1,413
Reaction score
2,812
Location
USA
I will just say that those camera positions look to be fine for an "overview" of your property. However if you want to be able to use that footage to "identify" a stranger if there was ever an "incident", I don't think any of those positions and/or camera choices will give you the results you want. The distances you are trying to cover are just too much. You really shouldn't expect "identifiable" footage out past about 20' in most cases (with a camera that has a 90 degree field of view). If you really want identifiable footage, then I think we need to go back to the drawing board to find the right cameras/installation locations now that we have a better idea of the overall property.

Now the truth is that you likely don't need that level of coverage for every inch of your property and overview cameras like these are completely appropriate if you understand their limitations. However if you do want identifiable coverage, you should find the "choke points" where people are going to be most often and/or identify "important" areas (like a driveway or entrance doors, etc) and start there.

Personally I would care less about covering my entire property with "overview" cameras, and more about focusing in on the most important areas where I want identifiable coverage. In other words, if the choice comes down to having an overview of my backyard, or having identifiable coverage of my driveway, I am picking the driveway every time because that footage would be much more valuable if needed. However it is just my personal opinion based on my situation (because I'm much more likely to have a car door "checker" than have someone randomly walk through my backyard). You need to ask yourself what is most important in your particular situation.
 
Last edited:

Hakapik

Getting the hang of it
Joined
Dec 6, 2023
Messages
23
Reaction score
42
Location
Italy
I will just say that those camera positions look to be fine for an "overview" of your property. However if you want to be able to use that footage to "identify" a stranger if there was ever an "incident", I don't think any of those positions and/or camera choices will give you the results you want. The distances you are trying to cover are just too much. You really shouldn't expect "identifiable" footage out past about 20' in most cases (with a camera that has a 90 degree field of view). If you really want identifiable footage, then I think we need to go back to the drawing board to find the right cameras/installation locations now that we have a better idea of the overall property...
Hello, I understand your concerns regarding the camera positions and their ability to identify potential intruders in case of incidents. I appreciate your advice to carefully assess the specific needs of my property.
However, I'd like to point out that there will be 3 wide-angle cameras (an HDW5442TM-ASE-S3, the T180, and an IPC-T54IR-ZE-S3),
while 4 others will be IPC-B54IR-Z4E-S3. I'm considering adding 2 more later, but they still wouldn't be enough to cover the entire garden.
Perhaps I didn't express myself clearly; I'm aware of the limitations of my English. From the quoted diagram at the beginning of the thread,
it's evident that I will prioritize covering the house initially. In the first phase, I plan to monitor the front road and various doors and windows along the entire perimeter of the house,
trying to extend coverage up to the middle of the garden. I will install the 2 IPC-B54IR-Z4E-S3 cameras to the south of the garden at a later stage.
I've also considered an alternative placement based on the distribution of the electrical system manholes. In your opinion, would this arrangement make more sense?
Give me a few minutes, and I'll post the drawing for you

nuoovo test.jpg
Or, if you're willing to spend some time on it, how would you arrange them?
 
Last edited:

Hakapik

Getting the hang of it
Joined
Dec 6, 2023
Messages
23
Reaction score
42
Location
Italy
Update: I don't know what time it is on your end, but last night I wrote to Andy to place the order for the cameras! Nice person, at least until you ask him for a discount;)
If he managed to ship before the year-end closure, then I'm fairly certain that in 10-14 days,
I'll receive the package with an HDW5442T-ZE, a PDW5849-A180-E2-ASTE, and four HFW5442E-Z4E;
I'll take my time with the junction boxes in the next few days, also because I still need to decide how (and for some, still where) to fix them.
Perhaps it's better for me to take a pickaxe and start digging where I'll need to bury the cables.
For the garden cameras, I was thinking of getting an S-FTP cable in pure copper CAT6a or 7 with double insulation (I don't want to touch it for the next 10 years, and I don't want packet loss),
while for those on the house facades, I think a standard cable should be enough.
 

Hakapik

Getting the hang of it
Joined
Dec 6, 2023
Messages
23
Reaction score
42
Location
Italy
I've come up with an idea that might solve the camera height problem; it's all to be verified, but perhaps it's feasible: The shutter boxes of the windows are all equipped with a 22mm conduit that serves to power the electric motors of the blinds. If I could manage to thread a cable through the shutter box and secure it without interfering with the movement, then perhaps I could gain some extra meters, especially regarding the east-facing facade!
Additionally, I wouldn't have to spend hundreds of euros on a massive fire ladder..
 

Hakapik

Getting the hang of it
Joined
Dec 6, 2023
Messages
23
Reaction score
42
Location
Italy
Hi everyone, I wanted to announce that the cams have finally arrived ;) Shipping went smoothly, they arrived on Friday morning, despite the Chinese New Year! In total, there were 2 packages, one of which arrived a bit damaged, but otherwise okay. I was a bit puzzled by the absence of seals and the fact that the box of the T180 was broken right at the opening tab... Once I opened the cam, unlike the others, it had some aesthetic scratches, and the screws didn't seem "brand new"... it almost seemed like it was second-hand. Besides that, the T180 works well, just like the other 2 I tried. What can I say, these cams are phenomenal! By touch (not to mention the weight of the aluminum shells, they are really solid!) you can immediately tell they are professional-grade products! I'm really happy!
Unfortunately, I haven't yet chosen a serious switch to install in my rack, so I managed by using a Ubiquiti AF+ PoE adapter and disconnecting one of my access points,
I don't have clear ideas yet about which switch to choose, but considering that the wall-mounted network rack I have is small, I would prefer a solution capable of managing both the cams and other devices, including future ones (a 24-port switch would already saturate, so I need at least 48-52 ports), with the ability to handle at least 4 uplinks at 10Gbit/s L2/L3 and not consume an unreasonable amount of power, while of course spending as little as possible :D
I'll also have to purchase the BI license because the demo is expiring soon.
For the rest, I'm doing positioning tests, one cam at a time, but this way it's quite difficult to get a precise idea. I still have to lay the cables, maybe next weekend, weather and wife + baby permitting, I'll manage to make progress at least on this front.

PS: I thank Mr. Cai for the impeccable service and for the super-fast shipping. If I had bought them from a European supplier, I would have paid at least twice as much! :rofl:

msg1046276011-229783.jpgmsg1046276011-229771.jpgmsg1046276011-229774(1).jpg
 
Last edited:

Hakapik

Getting the hang of it
Joined
Dec 6, 2023
Messages
23
Reaction score
42
Location
Italy
Hello guys, in these days I had to focus on other commitments, but finally I got rid of a great boredom and I found the switch I was looking for at a great price, with only 6 months of activity!
Having to replace the old HP 2510G-48 and having a 2.5G connection, I was looking for a model that, besides being "inexpensive", was not very power-hungry and relatively quiet, with 48 ports and at least 4 uplinks at 10G, all obviously POE.
Initially, I took a look at various Brocade options, but getting a switch with 10 years on its back wasn't really the best, so after a few weeks of research, I finally found the one that suits me: I got an Aruba Instant On 1930 sfp+ 48p poe JL686A.
It's really a beast with a switching capacity of 176 Gbps and a throughput of 130.95 Mpps @ only 34.5 watts when idle, the old ProCurve without POE consumes at least 60 watts on idle.
This weekend looks promising :)
 
Top