
One of the benefits of IP cameras over analog is the added versatility. Integration with the digital network has made accessing and viewing cameras much easier. One way of adding extra visual control of an IP camera system, is by having its stream accessible to be monitored on a standard modern television. This can be convenient for in-home use and can provide additional security.
Purpose and Uses of the Project
An example where displaying the image from a camera on your TV might be convenient, is by using it like an intercom. Imagine you're sitting down, finally watching that movie you've been waiting to see when the doorbell rings. You don't want to answer the door because it's probably just one of those annoying salesman again, right?... oh wait, what if it's that ebay order you're expecting! ...not to worry, just flip the channel on the TV and have a look! or what if baby is having a nap and dad is busy doing some "house work", it might be easier to view the baby monitor right on the TV.
The necessary equipment for this project
> IP Video Camera capable of data transfer over RSTP/RTP;
> DLNA compliant TV (Pre-configured);
> LAN (Pre-configured network devices);
> A Windows based PC, which will be acting as the video server.
Note: Mac OS and Linux can also be used. I am only using the Windows for the purpose of this guide.
This project assumes your TV already has the DLNA settings configured and is attached to the local network. Setting up DLNA is not the focus of this giude. If you have not done this step, there is a great article to get you started here: http://www.techhive.com/article/2020825/how-to-get-started-with-dlna.html

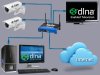
System Topology Diagram
IP cameras usually broadcast multiple video streams at different resolutions, compressed using MPEG, MJPEG or H.264 codecs. A standard TV generally cannot decode these streams over the local network. So to get around the limitation, we can make use of a free software application named Serviio which will create a DLNA server inside Windows. The DLNA server can transcode (decode and re-encode) streams "on the fly", taking the stream from the camera and translating it into an acceptable format for the TV to display.
Setting Up The System
> Download Serviio from the source: http://serviio.org/download and Install, following the prompts.
> After installation, go to the Programs menu to open the 'Serviio' folder, and run 'Serviio Console'.
> From the Serviio Console, select the 'Library' tab, and then 'Online Sources'.
> Within the Online Sources window, click the 'Add' button. Another window will open, prompting for user data.
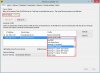
> For the 'Source type', choose 'Live stream' from the drop-down list.

Setting the data stream
Next we need to find out the address of the video stream for the IP camera. The live stream is sent to the streaming engine over the Real Time Streaming Protocol (RTSP), which is an application-level protocol for controlling the delivery of real-time data such as audiovisual media. IP camera manufacturers use proprietary URL syntax for their cameras and you may need to consult your camera documentation for the URL syntax of the stream. Another possible way to find out the address is by checking the large Camera Database on the iSpy website, available at the source: http://www.ispyconnect.com/sources.aspx Simply search your IP camera model.
An RSTP URL format looks like: rtsp://[IP_ADDRESS]:[PORT]/usr=[USERNAME]&pwd=[PASSWORD]_channel=1_stream=0.sdp?videoMain
(This is only an example RSTP address format)
> Enter the RSTP URL value in the 'Source URL' field.
> Click the 'Check URL' button. If the link location and credentials are correct, a green check-mark will be displayed. A red 'X' will indicate an error.
> Set a name for the stream in the 'Display name' field and leave the 'Media type' as the default 'Video' value.
> Click the 'Add' button at the bottom-left of the window.

Checking the RSTP stream value
Now that the server is accepting the stream from your IP camera, it's time to turn on your TV (pre-configured and network connected). For the TV to begin accepting the transcoded stream, we need to check that the server has recognised the TV on the network and that it assigns the correct DLNA device profile so the stream is rendered correctly.
> From the Serviio Console, go to the 'Status' tab.
> Click under 'Profile', on the entry for your TV in the list of DLNA-enabled connected devices.
> If your TV is in the list and has not been recognised correctly by Serviio, set the correct rendering profile and click the 'Save' button.

Selecting the rendering profile
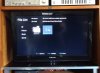
> Go to the TV, and set the source to DLNA, the Serviio server should be listed under the available devices to connect to.

Choosing the DLNA source
> Scroll through the available video folders to find the folder named 'Online', which is where the IP camera stream is located.

Accessing the IP camera stream
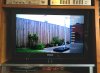
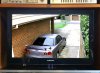
Finally, if everything is done correctly you will see your IP cameras' stream on your TV!

Displaying the IP camera stream
The picture quality will depend on you TV and IP Camera. There will also be the occasional loss of packets during data transmission due to the stream being converted on the fly, resulting in the odd minor glitch or a short delay... but after testing, I found it to be very stable and the image quality is very good.
The setup is very simple and should take about 10 minutes to complete.
Purpose and Uses of the Project
An example where displaying the image from a camera on your TV might be convenient, is by using it like an intercom. Imagine you're sitting down, finally watching that movie you've been waiting to see when the doorbell rings. You don't want to answer the door because it's probably just one of those annoying salesman again, right?... oh wait, what if it's that ebay order you're expecting! ...not to worry, just flip the channel on the TV and have a look! or what if baby is having a nap and dad is busy doing some "house work", it might be easier to view the baby monitor right on the TV.
The necessary equipment for this project
> IP Video Camera capable of data transfer over RSTP/RTP;
> DLNA compliant TV (Pre-configured);
> LAN (Pre-configured network devices);
> A Windows based PC, which will be acting as the video server.
Note: Mac OS and Linux can also be used. I am only using the Windows for the purpose of this guide.
This project assumes your TV already has the DLNA settings configured and is attached to the local network. Setting up DLNA is not the focus of this giude. If you have not done this step, there is a great article to get you started here: http://www.techhive.com/article/2020825/how-to-get-started-with-dlna.html
System Topology Diagram
IP cameras usually broadcast multiple video streams at different resolutions, compressed using MPEG, MJPEG or H.264 codecs. A standard TV generally cannot decode these streams over the local network. So to get around the limitation, we can make use of a free software application named Serviio which will create a DLNA server inside Windows. The DLNA server can transcode (decode and re-encode) streams "on the fly", taking the stream from the camera and translating it into an acceptable format for the TV to display.
Setting Up The System
> Download Serviio from the source: http://serviio.org/download and Install, following the prompts.
> After installation, go to the Programs menu to open the 'Serviio' folder, and run 'Serviio Console'.
> From the Serviio Console, select the 'Library' tab, and then 'Online Sources'.
> Within the Online Sources window, click the 'Add' button. Another window will open, prompting for user data.
> For the 'Source type', choose 'Live stream' from the drop-down list.
Setting the data stream
Next we need to find out the address of the video stream for the IP camera. The live stream is sent to the streaming engine over the Real Time Streaming Protocol (RTSP), which is an application-level protocol for controlling the delivery of real-time data such as audiovisual media. IP camera manufacturers use proprietary URL syntax for their cameras and you may need to consult your camera documentation for the URL syntax of the stream. Another possible way to find out the address is by checking the large Camera Database on the iSpy website, available at the source: http://www.ispyconnect.com/sources.aspx Simply search your IP camera model.
An RSTP URL format looks like: rtsp://[IP_ADDRESS]:[PORT]/usr=[USERNAME]&pwd=[PASSWORD]_channel=1_stream=0.sdp?videoMain
(This is only an example RSTP address format)
> Enter the RSTP URL value in the 'Source URL' field.
> Click the 'Check URL' button. If the link location and credentials are correct, a green check-mark will be displayed. A red 'X' will indicate an error.
> Set a name for the stream in the 'Display name' field and leave the 'Media type' as the default 'Video' value.
> Click the 'Add' button at the bottom-left of the window.
Checking the RSTP stream value
Now that the server is accepting the stream from your IP camera, it's time to turn on your TV (pre-configured and network connected). For the TV to begin accepting the transcoded stream, we need to check that the server has recognised the TV on the network and that it assigns the correct DLNA device profile so the stream is rendered correctly.
> From the Serviio Console, go to the 'Status' tab.
> Click under 'Profile', on the entry for your TV in the list of DLNA-enabled connected devices.
> If your TV is in the list and has not been recognised correctly by Serviio, set the correct rendering profile and click the 'Save' button.
Selecting the rendering profile
> Go to the TV, and set the source to DLNA, the Serviio server should be listed under the available devices to connect to.
Choosing the DLNA source
> Scroll through the available video folders to find the folder named 'Online', which is where the IP camera stream is located.
Accessing the IP camera stream
Finally, if everything is done correctly you will see your IP cameras' stream on your TV!
Displaying the IP camera stream
The picture quality will depend on you TV and IP Camera. There will also be the occasional loss of packets during data transmission due to the stream being converted on the fly, resulting in the odd minor glitch or a short delay... but after testing, I found it to be very stable and the image quality is very good.
The setup is very simple and should take about 10 minutes to complete.
Attachments

Last edited by a moderator:

") . I now just use a Google chromecast, either casting from my chrome on my laptop, or direct from the
. I now just use a Google chromecast, either casting from my chrome on my laptop, or direct from the