Long outdoors netwok cable run

Thanks @jnissen.
The above 800 ft spool you linked to would provide just the right amount of cable for my two runs.
The info you provided some time back, and the encouragement, got me ready to terminate my own cable,
Then, I got cold feet and started looking for pre-terminated cable!
In a preliminary/casual search for some odd reason multi-mode pre-terminated cable appears to be pricier than single mode.
OM3 in terms of capacity will be plenty for me.
I just have to figure out how to get it in.
BTW, the cable you linked to does not appear to be a burial grade cable ... you OK with that?
If it works, I'd go with it because the conduit gives flexibility.
I recently got some pull tape that is marked in foot-increments, and am going to get a measurement to validate my estimate of actual length.
Thinking of getting somebody to terminate the cable, much as I like to do stuff myself.

Yes I’m ok with that since I used a PVC conduit for the fiber to run inside. I would use direct bury if not using a conduit. Armored would provide more protection but does require careful consideration of the ground.

I’ve actually used both ground rated as well as the riser rated. I liked using the conduit and riser fiber better. Allows you to replace the fiber in the future if needed. You can use plain black poly pipe as conduit if you’re contemplating costs.

Like you I was afraid to try terminating my own fiber. After I’ve done a few I feel comfortable with that and wouldn’t hesitate to go this route. The snap on end kits are cheap enough and a few simple tools give you great results.


Sent from my iPad using Tapatalk
 
  • Like
Reactions: Virga
My understanding of FO is certainly growing - one needs a pair of fibers for one run, OM3 multi-mode is the way to go, and avoid unnecessary joints – run from switch to far point (like an outbuilding) without any intermediate terminations. Got that.
In my case, there are three possible paths forward, two of which depend on my ability to mobilize others.
For the moment, lets say I take a stab at running cable in my existing ¾” conduit, disregard burial rating of FO cable, and try terminating it myself (this would not preclude mobilizing others if the experiment fails).
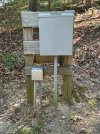
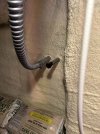
There is pull string in the conduits, see photos.
First step would be to use the string to pull ½” / 1,250 lb pull tape that I have at hand.
Questions:

1. How should the pull tape be secured to the FO for the 328' pull? Let’s assume:
- the FO is the 12-fiber riser cable linked in the discussion thread above
- Klein lubricating foam above will be at hand, as will be an air compressor to push the foam into the conduit.

2. Each multi fiber FO cable has a specified minimum bend radius, something like 3” – 4”.
How should this be handled at each end?
For example, at the house end the conduit comes up the wall, in to a box.
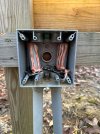
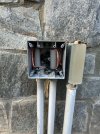
See photos for conduit conditions at far end, as well as at house end.

Edit:
I'll probably end up rebuilding the far end panel, and replace the wood with horizontal 1m standard DIN rails, installed on standard galvanized posts in concrete.
This will provide more room and flexibility for more gear.
 

Attachments

  • Far_end_overview_of_conduit.jpg
    Far_end_overview_of_conduit.jpg
    2 MB · Views: 11
  • Far_end_pull_string.jpg
    Far_end_pull_string.jpg
    895.6 KB · Views: 11
  • House_end_pull_string.jpg
    House_end_pull_string.jpg
    1.5 MB · Views: 11
Last edited:
The boxes may need to be removed to facilitate pulling/pushing cable. I used a similar pull string and didn’t require a separate pull rope. A more sturdy pull material would help. I pulled about 40-50 lbs worth and at times I was worried it may fail. Believe the rating on the poly string is a bit over 100 lbs.

I taped my pull string to the OM3 cable outer sheath. It stretched the outside sheath quite a bit and I ended up trimming several feet off after it was through conduit. I didn’t form a knot but taped around fiber about three feet in total. Not sure if I had trimmed the sheath back and tied to fibers may have been better?

I had 1” conduit so 3/4” will be a bit tougher but doable. Have a push person feeding fiber spool as well as the puller. I used plenty of Klein lubricant.

I have both ends of my run in watertight boxes similar to what you show. I’m sure some condensation is in the conduit. Will it eventually damage my fiber? No idea but the outer sheath is intact and out of UV light so it should last for years. I did some research and it was recommended to have a drain at the lowest spot. I did not provide a drain since it was buried conduit my electrician installed. I don’t believe he drilled drain lines. Prior to pulling the string I did run a shop vac on the conduit just to ensure bugs or anything else were not in there. It was dry and clear.

Bends are gradual all along the run. Once inside my rack I terminated the FO and left about 8-10 feet as slack I coiled up with about a 12” diameter loop. I only terminated the two fibers I needed. Have ten spares! Practice terminating fibers prior to install. I tested the entire spool just to make sure it didn’t have a break prior to install. The test laser worked great for this. I hooked to Sfp+ and actually checked performance as well with source and destination nodes next to each other.
The LC connectors were removed while I pulled the fiber.

Sent from my iPad using Tapatalk
 
Last edited:
  • Like
Reactions: Virga
This is how I tie the pull string to the cable to do the Big Pull.


Everything stated by the other member is spot on. Blow out or suck the line once complete to ensure no critters / moisture.

A drain port is also highly recommended.
 
  • Like
Reactions: Virga
Half hitch works well for larger wires. I just doubled the pull string back and taped over it. I used about a 1/2 roll of 3M electrical tape to ensure it was well bonded to the pull string.


Sent from my iPad using Tapatalk
 
  • Like
Reactions: Virga
I would do the pull a bit differently. I’d use the pull string to pull something stronger into the conduit like vinyl coated stainless wire rope (much higher breaking strength, you can pull quite hard without worry). I would use electrical tape on that wire rope the whole length of the cable (maybe every 3-4ft) you’re going to pull through the conduit. Then instead of pulling on the cable, you’ll pull on the wire rope (which takes nearly all of the stress off the cable). You’ll need enough wire rope to go the full length of the conduit twice (half in the conduit for the pull, the other half taped to the cable for strain relief). Once you’re done the pull, just cut off any excess.

Something like this would work for wire rope:

I would also dig down and cut off the vertical portions of the conduit so you are only pulling horizontal. This will help lower friction and get rid of the water inside the conduit. You can just pvc glue/sleeve those other sections back on when you’re done so no big deal. Make sure to use nice sweep bends on the conduit for any 90 degree turns (including where it enters the house), fiber doesn’t like tight bends at all.
 
Last edited:
As an Amazon Associate IPCamTalk earns from qualifying purchases.
  • Like
Reactions: Virga
Time to get a hands-on feel for FO. Ordered cable at the link @jnissen posted, and a few tools will be next. Even if I end up going to Plan B, this will be tuition to learn something. Until recently I had at best a vague understanding of FO.

Water in the conduit is going to be a serious consideration because on my site it is not just condensation in the conduit, I believe there is ground water seepage. A weep-hole(s) would likely let more water in, kind of like a hole in the hull of a boat would.

Removing the boxes should be straightforward.
Recently I procured a plentiful supply of 1/2" polyester pull tape, that is rated at 1,250 lb. I was going to use the existing pull string to pull this tape into the conduit.
Along the lines of what @MTL4 said, I was visualizing using the pull tape as a carrier line of sorts, to be left in the conduit.
The part that I haven't figured out is how to secure the FO cable to the pull tape. My concern is that the 3M electrical tape "ties" are going to come apart in the conduit over time because water will cause adhesive failure, and some subset of 100 pieces of tape are going to come loose and jam up the conduit.

I am making a reasonable assumption that my electrician used sweeps, not elbows, so may just use the conduit as-is it to pull.
Removing the verticals, and re-attaching after, would be straightforward.
However, I would have to dig a horizontal trench several feet long to avail of the straight pull. At the far end this is possible, but at the house end not really.

The 328' run has gradual bows over the run, so the actual conduit run is probably 328+12 = 340’, I looked at some photos from construction.
The bend radius at the house end is a concern.
Visualizing a cable on a plane (the wall), a cable within bend radius constraints will first have to move away from the plane to complete the bend before entering the wall, or part of the bend will have to occur in the thickness of the wall. Perhaps a six-inch deep box might work.
In an existing masonry foundation wall to go through, bend in the thickness of the wall is not feasible.
Perhaps I will have to revisit terminating in a box on the wall, and then using single pair indoor rated patch cables, that have a tighter bending radius.
I have some hands-on experience with copper, and in that case I would have gone straight through because I could manage the bends, don't know about FO, TBD.
 

Attachments

Last edited:
  • Like
Reactions: MTL4
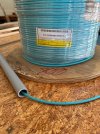
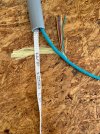
The spool of FO arrived, and I ripped a segment of cable to get a feel for it.
First photo: cable in a piece of ¾” conduit, for scale. Cable is approximately the size of Cat 6 copper, and about the same stiffness.
Second photo: the orange ripcord is at 4 o’clock, the 12 fiber strands are vertical, the aramid/Kevlar fibers are horizontal, and the pull tape is 3/8” wide and less than 1/16” thick.

Am thinking of ripping cable to open 18” of the fibers and tying them into a loop to function as a pulling-eye.

Edit to add:
Will use the foam lubricant discussed above.
Who knows how long this cable will survive in water, it is an experiment (digestible cost) to learn handling FO.
If it works it will enable more fun stuff - transceivers, media converters, outdoor switch(s), more cameras, long distance controls, etc.
Will replace cable as needed in future.

@jnissen what stripper and cutter did you use? I was getting ready to order the Jonard JIC-375 cable stripper. and JIC-186 cutter.
I watched a Jonard video on terminating, and I realized that single strand cable is depicted. The largest hole in the above stripper would not be relevant in the case of multi-strand cable,
Also wondering if some sort of sleeve should be added for the strand between the connector boot, and the point where the strand exits the main cable.
Those individual strands (with coatings) look fragile, once out of the main cable and the protection of the aramid sheathing.
 

Attachments

  • FO_cable_in_3-4_conduit.jpg
    FO_cable_in_3-4_conduit.jpg
    854.9 KB · Views: 14
  • FO_cable_detail.jpg
    FO_cable_detail.jpg
    1.1 MB · Views: 14
Last edited:
The spool of FO arrived, and I ripped a segment of cable to get a feel for it.
First photo: cable in a piece of ¾” conduit, for scale. Cable is approximately the size of Cat 6 copper, and about the same stiffness.
Second photo: the orange ripcord is at 4 o’clock, the 12 fiber strands are vertical, the aramid/Kevlar fibers are horizontal, and the pull tape is 3/8” wide and less than 1/16” thick.

Am thinking of ripping cable to open 18” of the fibers and tying them into a loop to function as a pulling-eye.

@jnissen what stripper and cutter did you use? I was getting ready to order the Jonard JIC-375 cable stripper. and JIC-186 cutter.
I watched a Jonard video on terminating, and I realized that single strand cable is depicted. The largest hole in the above stripper would not be relevant in the case of multi-strand cable,
Also wondering if some sort of sleeve should be added for the strand between the connector boot, and the point where the strand exits the main cable.
Those individual strands (with coatings) look fragile, once out of the main cable and the protection of the aramid sheathing.
As long as that pull tape won’t degrade in water over time and you use a compressor to blow out the standing water and push the foam lube throughout the conduit, I think your fiber pull will likely be alot easier than you anticipate. The lube will help ALOT so I think your idea of using the kevlar to make a pulling eye should work fine.
 
  • Like
Reactions: Virga
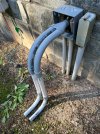
Have come up with a possible solution for the FO bend radius problem, see photos of mock-up.
Using parts laying around, I dry-fitted an assembly. I did have to buy the Y-adapter.
I could even lose the Y-adapter, and bring just one conduit up before the box.
This way much of the existing setup would stay intact, and I would not have to reseal openings.
(initial thinking was to remove the box and have the conduit going to the wall)

Will cap the cutoff conduit in the ground and leave the conduit in place.
So far did not find a cover for the box with a socket for the 3/4" conduit to terminate in.
May just drill a hole in a blank cover plate, and use a basic socket-thread conduit adapter that is used on the side of junction boxes.
Will leave upper elbow dry fitted so it can be eased out if needed, say, to replace cable.
Will use gray conduit in the final, white cut-offs just happened to be around.
Once through the wall, will run smurf conduit that happens to be around, to existing vertical conduit up to wiring room.
 

Attachments

  • Outside_FO_conduit_bend_radius_solution.jpg
    Outside_FO_conduit_bend_radius_solution.jpg
    1.3 MB · Views: 14
  • Inside_FO_conduit_bend_radius_solution.jpg
    Inside_FO_conduit_bend_radius_solution.jpg
    901.1 KB · Views: 14
I used a wire stripping tool I had already to score outer sheath and to dress each fiber down to the outer 125u sheath. It is for fine wires in electronics and it worked great.
I used the tools from my previous post to strip and clean the fibers then cleaved the bare fiber in a cleaving tool that came as a kit.

Good luck. I did not try to wrap the pull cord every few feet. I only anchored on the end and ensured the protective cord inside the cable was secured to pull string.

BTW I used plain Klein electrical pulling string. Think it’s only rated for a couple hundred pounds but worked very well.

I did use a liberal amount of pulling gel as the assembly was being pulled.

Lastly don’t forget to thread all your conduit extras on while setting up. Connectors. Boxes, etc…


Sent from my iPhone using Tapatalk
 
As an Amazon Associate IPCamTalk earns from qualifying purchases.
  • Like
Reactions: Virga
Any update on this? I just enabled my gate controller this weekend and so glad that I have fiber up there. 1Gb connection to the gate is overkill but still nice as I have four cameras, WiFi hot spot and gate controller up there.
 
  • Like
Reactions: MTL4
@jnissen thank you for asking, progress is slow, and this is where I am:

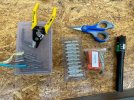
1. Recently I got the parts you had suggested as well as a Jonard JIC-375 stripper and Kevlar/Aramid snips.
I have the Klein electrical stripper, but since I am not paying somebody else to do the FO, decided to spring for the FO tools.
I also got a pair of GTek transceivers, and a switch for the gate end of the FO, not in photo .

I casually stripped a test piece of the FO cable and it worked, see photo.
The stripped orange "buffer" is visible, the stripped white "cladding" can be seen in a heap - it was as easy as 1-2-3.
Have not tried cleaning the glass strand and attaching the LC connectors yet.

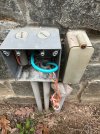
2. Tried to come up with a solution on how to turn 90 degrees to go through the wall, while observing the 2.3” min bend radius for the cable I have at hand.
Finally decided I’ll add this 1” extension ring to the existing box, and see what happens, even though I will not achieve the minimum bend radius.
See photo of cable in junction box without extension ring.

3. The gate itself is making progress. Steel posts are in. As part of this work, I had the existing wood structure removed and replaced with galvanized steel posts and DIN rails to mount the power panel and control enclosures.

4. In the next few days will pull the FO from the gate to the outside wall of my house (above photo), from there into the crawl space and then up to the wiring room.

… that’s how far I got so far.

What gate control did you go for? My gate supplier/installer installs the GBF PL963PMBL-POE but will install anything I buy and supply him with, and @tangent had suggested the Grandstream GDS 3710.
Also, what weather-tight enclosure are you using at the gate for FO termination, transceiver, and switch etc.

I anticipate ending up with two switches at the gate – one for cams, connecting back to my cams-only switch, and another for the gate control and other future stuff.
My networking knowledge/abilities are limited, and therefore setting up a non-cam VLAN to restrict network connectivity for the gate is a daunting prospect.

I will create a cogent new thread documenting/summarizing this project (and that it is!) once it is executed.
 

Attachments

  • FO_tools_&_parts_&_trial.jpg
    FO_tools_&_parts_&_trial.jpg
    1.6 MB · Views: 8
  • FO_bend_radius_violating.jpg
    FO_bend_radius_violating.jpg
    1.4 MB · Views: 8
As an Amazon Associate IPCamTalk earns from qualifying purchases.
  • Like
Reactions: MTL4
Funny I had purchased the GBF gate controller as well. I tried enabling it in Blue Iris and found the default ONVIF password was not a field they allowed to be edited.

Sorry but that was a dealbreaker for me. Having Chinese server support was very iffy as well. Combined I removed that device and selling it on EBay.

I purchased the Unify Gate kit with keypad/camera. My network is entirely Unify so it just works. Isolated networks for cameras and isolated the gate control as well.

My opener is a chain drive Liftmaster commercial unit. My gate is over 1500 lbs and is a cantilever slider. Welded it entirely ourselves. Only 32 feet long. My tractor was used to lift and place this thing on the 16 ball bearing wheels.
Took a stout cement base (anchor) to keep it from moving.

https://www.himotions.it/en/category/cantilever-sliding-gates.html
 
Last edited:
  • Like
Reactions: Virga
Thanks. My network router is a UDM Pro and now that I know Ubiquiti has a Gate kit, am going to look at it.
To the extent that UniFi creates a network for cameras as well as for gates, sounds like that would be the way to go.

Your gate setup sounds very nice, and approriate for a ranch.
My installer is putting in a Liftmaster LA400, a residential unit for one-to-four families, technically it is Usage Class I, whereas yours would be Class III or higher, or perhaps is beyond the scope of standard classification.
At my site the masonry opening between the two pillars is 16', and by the time we got the steel posts in that the swing gates are mounted to, and you figure 3 1/2" either side for hinges, I end up with 14' for double swing gates, so each leaf will be 6'-11" (they figure a two inch gap between the two leafs).
 
Best as I can tell the Ubiquiti Gate Kit would be best for me given what I have in place already.
At first I was perplexed as to whether the hub would go in my wiring room, or in the vicinity of the gate.
After looking through available details, best as I can tell it should go near the gate.

I updated a schematic of my network setup.
Attaching it here and would welcome input/comments to help me get things right.

Yesterday I got the smurf conduit I had at hand run in my crawl from the inside of the crawl space wall where the FO would come through, to my wiring room.
In next few days I am hoping to pull the FO cable through the 330 foot buried conduit outside, and then the final 80' feet through the crawl and up the wiring room.
Then I'll find out how well I can terminate FO.

If everything works as I am hoping it will, I'll soon be ready to start installing cameras in my gate area.
Folks here came up with seven suggested cameras, and I think we missed one angle and the number goes up to eight.

@jnissen thank you for all the information you have been shearing.

Also looking for input on what weather-tight enclosure to use for housing equipment depicted in the schematic, with some headroom for future add-ons.
That's two network switches, power strip, gate control hub and related PoE++ injector, and whatever the future might bring.
 

Attachments

Last edited:
Yes the gate hub goes out at the gate. If you have fiber with an Ethernet adapter your set out there. The hub buys you 3 spare POE ports. I already had an 8 port switch with SFP up at my gate already. The hub gives a few extra ports which isn’t a bad thing. Unify hub has an open/close input. See if your opener supports an output like that. If not, may require a magnetic sensor.

I decided to use the POE++ adapter to power the hub. Originally just had it plugged into a POE+ port on my switch. Never know what future holds so I opted for higher power. Was part of the kit and recommended. Never used the twisted pair extenders. May sell them on EBay.

I’m now working on a detection loop for my opener. Once delivery folks use the gate I have it setup to close automatically. Nearly trapped an Amazon driver!

On cameras… I have two Annke 4K bullets looking outward on road. Fine for regular use but attempted to setup for license plate recognition. Not good. Ended up ordering a dedicated LPR cam from Empire Tech. Will add a PTZ as well at same time so that will be a total of five cameras just at the gate. One built into Unify keypad, two existing bullets, one new LPR, and the new PTZ camera.


Sent from my iPhone using Tapatalk
 
Last edited:
  • Like
Reactions: Virga