
Mounting server rack to concrete basement wall
- Thread starter kickstart24
- Start date
You are using an out of date browser. It may not display this or other websites correctly.
You should upgrade or use an alternative browser.
You should upgrade or use an alternative browser.

SpacemanSpiff
Known around here
My standard goto: mount 2x4s to the concrete wall, then fasten a piece of 1/2" or better plywood. Then mount whatever cabinet is going up to the plywood. Make the plywood area bigger than the cabinet... it is inevitable that you'll need room to grow. Either a bigger cabinet, or co-locating additional equipment adjacent to the racks(s)
Either way, I suggest hammer drilling holes and using some decent anchor bolts. You local big box DIY store should have several to choose from.
Either way, I suggest hammer drilling holes and using some decent anchor bolts. You local big box DIY store should have several to choose from.
I would use tapcon screws to fasten a large piece of plywood and then mount the rack to the plywood. Probably 3/4 plywood, or some 2x4 where the mount points are for the rack.
Riclyo
Pulling my weight
This is what I did.My standard goto: mount 2x4s to the concrete wall, then fasten a piece of 1/2" or better plywood. Then mount whatever cabinet is going up to the plywood. Make the plywood area bigger than the cabinet... it is inevitable that you'll need room to grow. Either a bigger cabinet, or co-locating additional equipment adjacent to the racks(s)
Either way, I suggest hammer drilling holes and using some decent anchor bolts. You local big box DIY store should have several to choose from.

I would use tapcon screws to fasten a large piece of plywood and then mount the rack to the plywood. Probably 3/4 plywood, or some 2x4 where the mount points are for the rack.
Any suggestion on what size (diameter/length) tapcon screw to use? I was thinking about mounting a 2x4 where the mounting plate goes, then add a second 2x4 under the entire rack to support it from the bottom as well.
SpacemanSpiff
Known around here
Right there in the manufacturers specs:Any suggestion on what size (diameter/length) tapcon screw to use? I was thinking about mounting a 2x4 where the mounting plate goes, then add a second 2x4 under the entire rack to support it from the bottom as well.


Right there in the manufacturers specs:
Thanks. That's helpful.
Does this product seem reasonable to mount the 2x4 to the concrete wall?
SpacemanSpiff
Known around here
For $3 more, I'd go with the 1/4" tapcon at that length 2.75". I'd also counterbore (no more than 1/4" deep) for some washers, and to ensure the fastener head does not protrude


For $3 more, I'd go with the 1/4" tapcon at that length 2.75". I'd also counterbore (no more than 1/4" deep) for some washers, and to ensure the fastener head does not protrude
View attachment 219596
Thanks. yes, the 1/4" tapcon at that length 2.75" is a better option.
Can you explain a little more about the counterbore? Now I see that head of the anchor that attaches the wood do the cement has to be flush with the wood. If it sticks out, it will interfere with the mounting bracket that I need to attach to the wood that will hold up the server rack.
I was going to use this drill bit:
Do I need something different? Do I also need washers for the tapcon concrete anchor?
mat200
IPCT Contributor
- Jan 17, 2017
- 19,155
- 32,054
I am trying to mount a 9U Eaton Tripp Lite to a concrete basement wall. The server rack comes with a mounting plate. The instructions say each mounting hole can accommodate an M8 or 5/16” bolt.
What's the best practice for mounting the server rack onto the concrete wall?
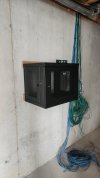
Getting some great advice @kickstart24
Feel free to share a picture or 2 of what you ended up doing.
SpacemanSpiff
Known around here
In the counterbore pic above envision your tapcon bolt in place of the the hex head bolt seen in the image. The size (diameter) of the counterbore will depend on the diameter of the washer you use. Remember, the inner hole of the washer should be just big enough for the tapcon to fit through.Thanks. yes, the 1/4" tapcon at that length 2.75" is a better option.
Can you explain a little more about the counterbore? Now I see that head of the anchor that attaches the wood do the cement has to be flush with the wood. If it sticks out, it will interfere with the mounting bracket that I need to attach to the wood that will hold up the server rack.
I was going to use this drill bit:
Do I need something different? Do I also need washers for the tapcon concrete anchor?
You can use a wood spade bit or a forstner bit to make the counterbore hole (see below). Note: the wood spade bit does NOT have threads on its point. There is a similar bit that does have the threads, and they are very aggressive when drilling... it will go right through the 2x4 in an instant.
Determine the washer size, then the wood spade bit (WSB) size. Drill the counterbore first... only needs to be about 1/4" deep. The center divot from the WSB/forstner marks the center where you drill the 1/4" hole for the tapcon to go through the 2x4. You can use the bit you mentioned in your last post to drill through the 2x4 before moving to the next step. Now hold the 2x4 against the foundation and use the hammer drill and drill 5-7 seconds through each hole to mark the foundation. Remove the 2x4, and finish drilling all the holes to mount first 2x4. Repeat the steps above for the remaining 2x4's
wood spade bit

Forstner bit

Wow. What a greatIn the counterbore pic above envision your tapcon bolt in place of the the hex head bolt seen in the image. The size (diameter) of the counterbore will depend on the diameter of the washer you use. Remember, the inner hole of the washer should be just big enough for the tapcon to fit through.
You can use a wood spade bit or a forstner bit to make the counterbore hole (see below). Note: the wood spade bit does NOT have threads on its point. There is a similar bit that does have the threads, and they are very aggressive when drilling... it will go right through the 2x4 in an instant.
Determine the washer size, then the wood spade bit (WSB) size. Drill the counterbore first... only needs to be about 1/4" deep. The center divot from the WSB/forstner marks the center where you drill the 1/4" hole for the tapcon to go through the 2x4. You can use the bit you mentioned in your last post to drill through the 2x4 before moving to the next step. Now hold the 2x4 against the foundation and use the hammer drill and drill 5-7 seconds through each hole to mark the foundation. Remove the 2x4, and finish drilling all the holes to mount first 2x4. Repeat the steps above for the remaining 2x4's
Thanks! This is so detailed and helpful.In the counterbore pic above envision your tapcon bolt in place of the the hex head bolt seen in the image. The size (diameter) of the counterbore will depend on the diameter of the washer you use. Remember, the inner hole of the washer should be just big enough for the tapcon to fit through.
You can use a wood spade bit or a forstner bit to make the counterbore hole (see below). Note: the wood spade bit does NOT have threads on its point. There is a similar bit that does have the threads, and they are very aggressive when drilling... it will go right through the 2x4 in an instant.
Determine the washer size, then the wood spade bit (WSB) size. Drill the counterbore first... only needs to be about 1/4" deep. The center divot from the WSB/forstner marks the center where you drill the 1/4" hole for the tapcon to go through the 2x4. You can use the bit you mentioned in your last post to drill through the 2x4 before moving to the next step. Now hold the 2x4 against the foundation and use the hammer drill and drill 5-7 seconds through each hole to mark the foundation. Remove the 2x4, and finish drilling all the holes to mount first 2x4. Repeat the steps above for the remaining 2x4's
Do you think I need a washer with the tapcon? Can I just make the size of the counterbore the widest part of the screw head of tapcon? It almost looks like it has a "built in" washer.

mat200
IPCT Contributor
- Jan 17, 2017
- 19,155
- 32,054
Wow. What a great
Thanks! This is so detailed and helpful.
Do you think I need a washer with the tapcon? Can I just make the size of the counterbore the widest part of the screw head of tapcon? It almost looks like it has a "built in" washer.
View attachment 219673
I personally would still add a separate washer ...
Also, remember to put up a humidity / temp meter by the rack and ensure you have at least some airflow over the equipment.
SpacemanSpiff
Known around here
The washer is low cost improvement on the project and will increase the holding properties of the fasteners, etc...
Do you think I need a washer with the tapcon? Can I just make the size of the counterbore the widest part of the screw head of tapcon? It almost looks like it has a "built in" washer.
How many guys have used the recommended bit and found it to be a little too tight unless you do a little wobble reaming?
I broke a couple two 3 over the years when the tapcon stopped spinning and the head snapped off.
It's almost a case by case basis on each hole....get a feel for how much wobble-reaming to do based on application.
Also try backing them in and out a bit if it's close to fitting right.
Hole depth is important, Ask Arjun.
SpacemanSpiff
Known around here
Agreed... each one is a case by case basis, even when it is on the same material, mere inches from the last one drilled. I despise the couple/few snapped head tapcon's I've experienced so far. I've had far more frustration from the tapcon stripping out in an instant.How many guys have used the recommended bit and found it to be a little too tight unless you do a little wobble reaming?
I broke a couple two 3 over the years when the tapcon stopped spinning and the head snapped off.
It's almost a case by case basis on each hole....get a feel for how much wobble-reaming to do based on application.
Also try backing them in and out a bit if it's close to fitting right.
Hole depth is important, Ask Arjun.
IMHO, I believe the snapped head issue is most likely due to the faster bottoming out. Regardless of what I'm drilling, I hold the fastener against the bit as it sits in the chuck to ensure it will get the correct depth+. Likewise, I give thought to whether or not the bit will blow out the back side of the material.