Ooops .. Looks like I bricked my cam ....

DaveW

n3wb
Joined
May 4, 2020
Messages
10
Reaction score
2
Location
Okotoks, AB, CA
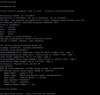
I had 3 IP cams that I ordered from Amazon - no name knock offs it appears - can't seem to find any 'brand' name anywhere. I had two of them installed and working just great. Then I made the mistake of checking their status - lo and behold it mentioned that there was an 'update' available to the software and I was foolish enough to believe that it would work. Over the Air update - sure, great chance of success! Luckily I only did one of the cameras. It got about half way thru the process and then just sat there …. after about 30 minutes I cancelled the process and sure enough -- the camera is bricked. Couldn't even see it on the network anymore. Luckily I had the third camera available and was able to use it to replace the dead one. But now I have a camera that is hooped unless I can breathe some life back into it.
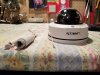
As I said, it is not a brand name - it's a LOOKCCTV 2MP POE IP Camera made in China. Does what I need to monitor the home area while away on vacation and provide that little bit of visible security to the house. I have tried various steps to see if I can even connect to the cam again but SADP does not show it on the network (PC to stand alone router with IP of 192.0.0.128 and connected cam using separate power), TFTP does nothing since camera does not talk. Wondering whether try to use USB-TTY connect would accomplish anything?
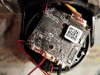
I have attached a couple of pics and am hoping someone might be able to point me in the right direction as to where I would connect to? I'm thinking the three 'copper' connections on the left side might be the power, TX and RX points - one is square and the other two are rounded - 1=power, 2=RX/TX?, 3=RX/TX? Of course once I get connected it might be all in vain if the camera is really bricked …. but what do I have to lose except time (retired) and maybe a few more strands of hair.
Appreciate any and all help … and remember, this PENSIONER is just trying to save money and these cameras did work well before I tried to update … lesson learned! Here's the pics ….
 

Attachments

ljw2k

Known around here
Joined
Jun 9, 2014
Messages
1,486
Reaction score
2,260
Location
United Kingdom
There is a utility in the kitchen called a BIN head directly to that and throw it in and forget you ever had it and move on. Look for a well branded for not much more Hikvision or Dahua.
Remember your time is precious especially as you are older and worrying about cheap Chinese Junk, buying cheap is not always the best option.
 
Last edited:

SamM

Pulling my weight
Joined
Mar 29, 2020
Messages
245
Reaction score
109
Location
SA
Hello Dave

1. What software do you use to view them?
2. Any idea what webserver it uses for the update?

Perhaps some screen shots of the web interface and software may help track this OEM
 

area651

Getting comfortable
Joined
Aug 18, 2018
Messages
471
Reaction score
411
Location
San Antonio/McAllen Texas
That QR code traces back to Xiongmai. I wouldn't hesitate to use a hammer to fix these. Is there any chance to reach out to Amazon and get a return authorized?

Xiongmai is known for its parts being used in botnets who can be commanded to attack banks, companies, anyone. I wouldn't want my cameras open to be pilfered by spying eyes or even have my own ISP come down on me because an attack came from my home (via what I had on my network).


DaveW

n3wb
Joined
May 4, 2020
Messages
10
Reaction score
2
Location
Okotoks, AB, CA
Hello Dave

1. What software do you use to view them?

I'm using Zoneminder on a UBUNTU machine to manage the cams. They did come with two utilities - Device Manager to find the cameras on the network and then CMS to manage the camera settings, etc. They are also accessible from the cloud using the XMEye android app.

2. Any idea what webserver it uses for the update?

No idea on where it was connecting to when it tried the update … I was connected thru CMS and one of the screens had the UPDATE available. See pics below.

Perhaps some screen shots of the web interface and software may help track this OEM
 

Attachments

SamM

Pulling my weight
Joined
Mar 29, 2020
Messages
245
Reaction score
109
Location
SA
Dave

Try this

also wireshark should point you to the repository where you possibly could get the older firmware

Although I think that the system has exploits, it still is a nice picture. Maybe a good off net cheap solution.
 

pozzello

Known around here
Joined
Oct 7, 2015
Messages
2,270
Reaction score
1,117
it does look like you've identified where a serial connection could be made (those 3 copper pads.) With the proper UART adapter, it may be possible to see & interrupt the boot process and force a firmware fetch via TFTP from a local server. but just 'cuz it's possible doesn't mean it'll be easy or worth your time... :)

and yes, wireshark can show you what the cam is trying to do at bootup (if anything,) but you may need to plug the cam and your PC into an ethernet HUB (not a switch) in order to see it all, as switches tend to hide traffic not sent to a broadcast address or your own IP address (that's what switches are for after all...)
 

DaveW

n3wb
Joined
May 4, 2020
Messages
10
Reaction score
2
Location
Okotoks, AB, CA
Well … I've received my serial device and managed to get it connected via Putty to the camera and have a log of what is happening ... it gets as far as "Uncompressing Linux … done, booting the kernel." and then just sits there … I have tried everything I can think of to interrupt the loading process but U-boot has the bootdelay set at 0 and I can't get a Ctl-C in there for the life of me ….. nothing else seems to work either ….
I have attached a copy of the log file for review and would appreciate ANY suggestions as to where to go from here ….
Just having some fun and enjoying the experience of debugging/fixing/understanding the camera ….. but would be great to get this one working again. I have a copy of the original system that was on the camera so if I can get past the loading error hopefully I can reload the system.

Thanks to all …..
 

Attachments

pozzello

Known around here
Joined
Oct 7, 2015
Messages
2,270
Reaction score
1,117
maybe try holding down the shift-8 (*) keys while booting? this works for some versions of U-boot (at least some of the Dahua's)...
 

DaveW

n3wb
Joined
May 4, 2020
Messages
10
Reaction score
2
Location
Okotoks, AB, CA
Tried the shift-8 and all I got was a row of *'s …. skips right past the ctrl-c option …… but thanks for the suggestion … hopefully there is a 'magic' key combo that will work ...

Dave
 

alastairstevenson

Staff member
Joined
Oct 28, 2014
Messages
15,930
Reaction score
6,778
Location
Scotland
I can't get a Ctl-C in there for the life of me
I think for that bootloader you need to have Control-C auto-repeating before you power on the camera.
And if that firmware is Xiongmaitech they do the Dahua trick of stopping the serial console in the kernel.
But unlike Dahua, it can't be overridden with an environment variable.

If / when you do manage to interrupt the bootloader, use
printenv
and
help
to list variables, and available commands.
 

DaveW

n3wb
Joined
May 4, 2020
Messages
10
Reaction score
2
Location
Okotoks, AB, CA
What a dummy ….. I had the TX/RX pins both hooked up and of course getting the output on my Putty screen … was able to enter letters, etc so knew I was talking back ….. BUT, I had neglected to connect the GND wire from the camera to the TTL device … DUH! Connected it this morning and lo and behold .. magic happens. I was able to get the printenv and help info and have included the listings … will do some more reading on next steps which I believe are to get the TFTP stuff going to reload the OS ..I am just dangerous enough with LINUX to probably screw this up and not smart enough to know when to stop .... could be fun!....

Code:
hisilicon # printenv
NID=0x0251
appCloudExAbility=hCswjwAU97M=
baudrate=115200
bootargs=init=linuxrc mem=${osmem} console=ttyAMA0,115200 root=/dev/mtdblock1 rootfstype=squashfs mtdparts=hi_sfc:0x40000(boot),0x2E0000(romfs),0x420000(user),0x40000(web),0x30000(custom),0x50000(mtd)
bootcmd=setenv setargs setenv bootargs ${bootargs};run setargs;sf probe 0;sf read 43000000 40000 550000;squashfsload;bootm 0x42000000
bootdelay=0
bootfile="uImage"
da=mw.b 0x42000000 ff 1000000;tftp 0x42000000 u-boot.bin.img;sf probe 0;flwrite
dc=mw.b 0x42000000 ff 1000000;tftp 0x42000000 custom-x.cramfs.img;sf probe 0;flwrite
dd=mw.b 0x42000000 ff 1000000;tftp 0x42000000 mtd-x.jffs2.img;sf probe 0;flwrite
de=mw.b 0x42000000 ff 1000000;tftp 0x42000000 u-boot.env.img;sf probe 0;flwrite
dl=mw.b 0x42000000 ff 1000000;tftp 0x42000000 logo-x.cramfs.img;sf probe 0;flwrite
dr=mw.b 0x42000000 ff 1000000;tftp 0x42000000 romfs-x.cramfs.img;sf probe 0;flwrite
du=mw.b 0x42000000 ff 1000000;tftp 0x42000000 user-x.cramfs.img;sf probe 0;flwrite
duty_state=0
dw=mw.b 0x42000000 ff 1000000;tftp 0x42000000 web-x.cramfs.img;sf probe 0;flwrite
ethact=eth0
ethaddr=00:12:31:40:ed:77
gatewayip=192.168.1.1
ipaddr=192.168.1.10
netmask=255.255.0.0
osmem=35M
serverip=192.168.1.107
stderr=serial
stdin=serial
stdout=serial
tk=tftp 0x42000000 uImage;setenv setargs setenv bootargs ${bootargs};run setargs;bootm 0x42000000
ua=mw.b 0x42000000 ff 1000000;tftp 0x42000000 upall_verify.img;sf probe 0;flwrite
up=mw.b 0x42000000 ff 1000000;tftp 0x42000000 update.img;sf probe 0;flwrite
ver=U-Boot 2016.11 (Oct 29 2018 - 16:06:38)
verify=n
Environment size: 1640/65532 bytes

hisilicon # help
?       - alias for 'help'
base    - print or set address offset
bdinfo  - print Board Info structure
bitwait - bit compare and wait for equal
boot    - boot default, i.e., run 'bootcmd'
bootd   - boot default, i.e., run 'bootcmd'
bootm   - boot application image from memory
bootp   - boot image via network using BOOTP/TFTP protocol
clearenv- clear env partition.
cmp     - memory compare
coninfo - print console devices and information
cp      - memory copy
crc32   - checksum calculation
dcache  - enable or disable data cache
ddr     - ddr training function
dispaddr- display the value of 'addr'
dispenv - display the value of 'env_var'
dispver - display the uboot version
editenv - edit environment variable
env     - environment handling commands
erase   - erase FLASH memory
exit    - exit script
false   - do nothing, unsuccessfully
flinfo  - print FLASH memory information
flwrite - SPI flash sub-system
getinfo - print hardware information
go      - start application at address 'addr'
gzwrite - unzip and write memory to block device
help    - print command description/usage
icache  - enable or disable instruction cache
loadb   - load binary file over serial line (kermit mode)
loadx   - load binary file over serial line (xmodem mode)
loady   - load binary file over serial line (ymodem mode)
loop    - infinite loop on address range
md      - memory display
mii     - MII utility commands
mm      - memory modify (auto-incrementing address)
mw      - memory write (fill)
nm      - memory modify (constant address)
part    - disk partition related commands
ping    - send ICMP ECHO_REQUEST to network host
printenv- print environment variables
protect - enable or disable FLASH write protection
pxe     - commands to get and boot from pxe files
reset   - Perform RESET of the CPU
run     - run commands in an environment variable
saveenv - save environment variables to persistent storage
setenv  - set environment variables
sf      - SPI flash sub-system
showvar - print local hushshell variables
sleep   - delay execution for some time
squashfsload- fsload  - load binary file from a filesystem image
sysboot - command to get and boot from syslinux files
test    - minimal test like /bin/sh
tftpboot- boot image via network using TFTP protocol
true    - do nothing, successfully
unzip   - unzip a memory region
version - print monitor, compiler and linker version
waitus  - wait for n us
hisilicon #
Appreciate any and all updates ….. would like this to work ….

Dave
 

alastairstevenson

Staff member
Joined
Oct 28, 2014
Messages
15,930
Reaction score
6,778
Location
Scotland
Ok, so despite initial indications, the run command is available and even more there is a rich set of pre-defined variables to load up firmware segments.
 

DaveW

n3wb
Joined
May 4, 2020
Messages
10
Reaction score
2
Location
Okotoks, AB, CA
Ok, so despite initial indications, the run command is available and even more there is a rich set of pre-defined variables to load up firmware segments.
OK …. I think I understood about half of that statement …. something is good and there's lots of 'stuff' that can be done. So far, the only command I recognize after all my reading is the TFTPBOOT that other people have talked about using to load software with. I only have the camera 'powered' at the moment but I can connect it to a standalone PC. I 'think' I should be able to use the PC as the TFTP server and then try and load the LINUX system again from the serial console. I found a copy of the same system that was originally on the camera (V5.00.R02.000559B0). Do I rename that as digicap.dav and put it in the TFTP folder on the server? Do I have to change any of the IP addresses (cam and/or laptop) before doing anything? What position do I hold my tongue in when I hit the enter key?

Still more reading I think before I jump in ….. thanks all for your help and advise …. (aren't us n3wb's just a pain in the ….).
Dave
 

alastairstevenson

Staff member
Joined
Oct 28, 2014
Messages
15,930
Reaction score
6,778
Location
Scotland
I think I understood about half of that statement
Sorry, that wasn't the intention.
The bunch of variables below 'bootfile' in your listing hold the commands to bring in an individual firmware segment (check the names out) and apply it to the flash memory.
So they could be used one by one to replace what unsuitable data has been written.

I found a copy of the same system that was originally on the camera (V5.00.R02.000559B0).
Are you absolutely sure this is the same as was originally on the camera? That's important. Apparently the same version could be used for different cameras.
If so - it's likely to just be a zip file which when unpacked will yield the component parts.
You could always attach it here to get it checked out.

Do I rename that as digicap.dav and put it in the TFTP folder on the server?
No - that's Hikvision, not relevant here.

I should be able to use the PC as the TFTP server and then try and load the LINUX system again from the serial console.
Yes - but what's needed first is to decide on what segments to try.
DO NOT touch anything related to the bootloader. That's da and de
I'd try dc dd dr du in that order assuming you've extracted the files from the firmware.

I 'think' I should be able to use the PC as the TFTP server
Yes, that's necessary.
This one usually works OK :

I can connect it to a standalone PC.
Probably easiest to just have both hooked up to the switch / router as normal.

Do I have to change any of the IP addresses (cam and/or laptop) before doing anything?
Check out the camera IP address and the IP address that it expects to find the tftp server on in your listing in Post #12.
 

DaveW

n3wb
Joined
May 4, 2020
Messages
10
Reaction score
2
Location
Okotoks, AB, CA
Alistair ….. please, do NOT think I was unhappy with your response -- exactly the opposite …. but after 25 years of COBOL, PL/1, RPG and other languages this old man is struggling with LINUX. Windows I can just about handle these days … (not cleaning them tho … too scared of heights!). Anyways, as to your reply - thanks again. I'll try and put them into my own understanding and go from there ….

1) The system file is a single binary file .. 559B0General_IPC_HI3516EV200_85H30AI_S38.Nat.dss.OnvifS.HIK_V5.00.R02.20190925_all.bin that is supposedly for the camera I have. When I looked at the camera before it bricked, the system was named V5.00.R02.0005559B0.10010.040300.0020000 and I remember seeing that in the site I downloaded from. The 5559B0 matches, the HI3516EV200 matches (my chip is actually HI3516ERNCV20) and the date of 20190925 matches what was on the cam originally. So hopefully this is it. I have attached for your perusal. I took a quick look with HxD and did see the custom-x.cramfs.img (dc seg?) and the romfs-x.cramfs.img (dr seg?) names.

2) Have downloaded and installed the Tftpd64 installer and it is on the laptop ready to go.

3) Will connect laptop and camera back on the network via ethernet (disable laptop wireless). Will have to reset the cam IP address so it does not conflict with current devices. Will also have to reset the serverip address so it matches the laptop. I do believe these are "setenv ipaddr 192.168.1.xxx, setenv serverip 192.168.1.xxx, saveenv". Do I have to do a "reset" after that to get the new variables loaded? Once done then I should be able to PING the laptop (server) from the camera, correct? So far any attempt to ping from the camera doesn't work but I'm hoping that's just because of where it's at right now.

4) Using the Tftpd64 program, can I just load the whole binary file at once and then let the system handle it or is there some 'magic' involved in checking out what parts are "bad"?

Really appreciate your patience and help …. I'm enjoying the challenges and it is helping me understand the new systems better.
Dave
 

Attachments

DaveW

n3wb
Joined
May 4, 2020
Messages
10
Reaction score
2
Location
Okotoks, AB, CA
Okay.... I updated the camera IP and the serverip addresses and I can ping OUT from he camera to devices on the network but I CANNOT ping the camera from any other device on the network.... and if it does not "appear" on the network how will the TFTP be able to find it? Or di I just have to worry about the camera being able to ping and access the laptop(server)?
 

pozzello

Known around here
Joined
Oct 7, 2015
Messages
2,270
Reaction score
1,117
If you can ping the TFTP server PC from the cam, you should be OK, despite whatever is going on with ARP in that setup preventing connections in the other direction.
you might try adding an explicit ARP entry for the cam's MAC & IP using 'arp -s' at the DOS or Powershell command prompt, if it bugs you...
 

alastairstevenson

Staff member
Joined
Oct 28, 2014
Messages
15,930
Reaction score
6,778
Location
Scotland
can I just load the whole binary file at once and then let the system handle it or is there some 'magic' involved in checking out what parts are "bad"?
That would be the case if the normal 'maintenance / update' facility was available in the web GUI - but it apparently isn't.

It got about half way thru the process and then just sat there …. after about 30 minutes I cancelled the process and sure enough -- the camera is bricked. Couldn't even see it on the network anymore.
Before you start flashing firmware it may be worth double-checking that it hasn't just been reset to defaults as part of the update and changed it's IP address.
Depending on how you checked if it's on the network - if it's using a new static IP address, it may not show in your router DHCP lease list if that's how you checked.
It might be interesting to try the portable version of this scanner that forum member @UniversalScanner has been developing. Easy enough to do, no need to mess with the registry.

So - with the web GUI gone, the bootloader provides a fallback position.
The firmware file you attached is just a zip file with a .bin extension.
If you make a copy, rename the .bin extension to .zip, you will be able to extract the components, the files shown as below :
Code:
custom-x.cramfs.img     
Install                 
InstallDesc             
romfs-x.cramfs.img     
u-boot.bin.img         
u-boot.env.img         
user-x.cramfs.img       
web-x.cramfs.img
That will allow you to use the
run dc
and so on commands at the bootloader.

I do believe these are "setenv ipaddr 192.168.1.xxx, setenv serverip 192.168.1.xxx, saveenv". Do I have to do a "reset" after that to get the new variables loaded?
Yes, that's correct.
The saveenv makes the changes permanent.
reset will restart the camera.

I'd try dc dd dr du in that order assuming you've extracted the files from the firmware.
And I'd missed dw in that list.
 

DaveW

n3wb
Joined
May 4, 2020
Messages
10
Reaction score
2
Location
Okotoks, AB, CA
Wow …. love the information, this is wonderful stuff … I was thinking last nite (I sometimes remember to do that even at my age!) about the system and comparing to what I know .. so u-boot is really like the old IPL deck that we used to feed into the card reader to get the system going. It told the machine a few things about itself and then where to go to get more information and get ready for work ….. love it!

Looking at the bin/zip file and comparing to the current u-boot environment, I would match the files as follows:t

da=mw.b 0x42000000 ff 1000000;tftp 0x42000000 u-boot.bin.img;sf probe 0;flwrite >>>> this would be the u-boot-all.bin.img segment/file
dc=mw.b 0x42000000 ff 1000000;tftp 0x42000000 custom-x.cramfs.img;sf probe 0;flwrite >>>> this would be custom-x.cramfs.img
dd=mw.b 0x42000000 ff 1000000;tftp 0x42000000 mtd-x.jffs2.img;sf probe 0;flwrite >>>> this is NOT part of the update
de=mw.b 0x42000000 ff 1000000;tftp 0x42000000 u-boot.env.img;sf probe 0;flwrite >>>> this is NOT part of the update
dl=mw.b 0x42000000 ff 1000000;tftp 0x42000000 logo-x.cramfs.img;sf probe 0;flwrite >>>> this is NOT part of the update
dr=mw.b 0x42000000 ff 1000000;tftp 0x42000000 romfs-x.cramfs.img;sf probe 0;flwrite >>>> this would be the romfs-x.cramfs.img
du=mw.b 0x42000000 ff 1000000;tftp 0x42000000 user-x.cramfs.img;sf probe 0;flwrite >>>> this would be the user-x.cramfs.img
duty_state=0
dw=mw.b 0x42000000 ff 1000000;tftp 0x42000000 web-x.cramfs.img;sf probe 0;flwrite >>>> this would be the web-x.cramfs.img

And according to the "install" instructions,
1) The upgrade command sequence must be executed in order.

2) The burn command of the flash partition.
"Commands": [ "burn u-boot-all.bin.img boot", "burn custom-x.cramfs.img custom", "burn romfs-x.cramfs.img romfs", "burn user-x.cramfs.img user", "burn web-x.cramfs.img web"]

da=mw.b 0x42000000 ff 1000000;tftp 0x42000000 u-boot.bin.img;sf probe 0;flwrite
Is this saying that step 1 (da) is to do a memory write starting at 0x42000000 of binary 'ff' for the next 1000000 bits, then do a tftp (from where?) of the file u-boot.bin.img and start writing it at 0x42000000, then check the device on bus 0 and finally do a write from memory to the flash?
q1) where does tftp find the img components?
q2) where does flwrite output the contents to?
q3) are these "lines" actually processed or is it more like setting a variable to hold the commands for later? (ie da is a list of these commands and will be run later)

bootargs=init=linuxrc mem=${osmem} console=ttyAMA0,115200 root=/dev/mtdblock1 rootfstype=squashfs mtdparts=hi_sfc:0x40000(boot),0x2E0000(romfs),0x420000(user),0x40000(web),0x30000(custom),0x50000(mtd)
It appears that the mtdparts=hi_sfc: part aligns with the da (boot), dr (romfs), du (user), dw (web), dc (custom), dd (mtd) lines. What about the rest of them - dd,de,dl ? are they not needed to be defined?

tk=tftp 0x42000000 uImage;setenv setargs setenv bootargs ${bootargs};run setargs;bootm 0x42000000
ua=mw.b 0x42000000 ff 1000000;tftp 0x42000000 upall_verify.img;sf probe 0;flwrite
up=mw.b 0x42000000 ff 1000000;tftp 0x42000000 update.img;sf probe 0;flwrite

And what about these lines that are later. Is tftp looking for more files? Or again, is it setting variables that "could" be used if needed?

Now that I have the files available on the laptop and the camera is connected the network and I have the serial console … I'm still confused over what commands I should be running in order to copy/load the OS back onto the camera.
I guess this would be the "next steps" for me to try. OK …. FLASH moment ….. are you saying that since the "variables" da,dc,dr,du,dw are already defined, and the file segments exist on the laptop, and I start the TFPTd64 server and make sure the segments are available, and I have defined the serverIP as being for the laptop then all I have to do is go to the console and type "run da" and all the others? Should I try it? Will I mess anything up? Wholly cow … I think I am starting to understand ….. but, if I run these manually this time, will they need to be run again next time or will the flwrite have taken care of that and loaded them to the right place as in the mtdparts?

I ran the Universal IP Tool to check and the camera does not show on the network. Again, I can ping OUT and see things on the network but anyone on the network is not able to see me (at this time).

SORRY for all the questions but really want to understand and ensure I don't mess it up worse.
 
Top