
I do have an angle grinder. I tend to be wretched at anything freehand, but if I use the hole saw that would give me a shape to work with. This guy carves out a nice cavity with some additional tools.Angle grinder with a 40 or 60 grit flap disk has a surprisingly fine control for free form woodworking.
POE Trigger/Switch for Mailbox Cameras on BI?
- Thread starter TheWaterbug
- Start date
You are using an out of date browser. It may not display this or other websites correctly.
You should upgrade or use an alternative browser.
You should upgrade or use an alternative browser.
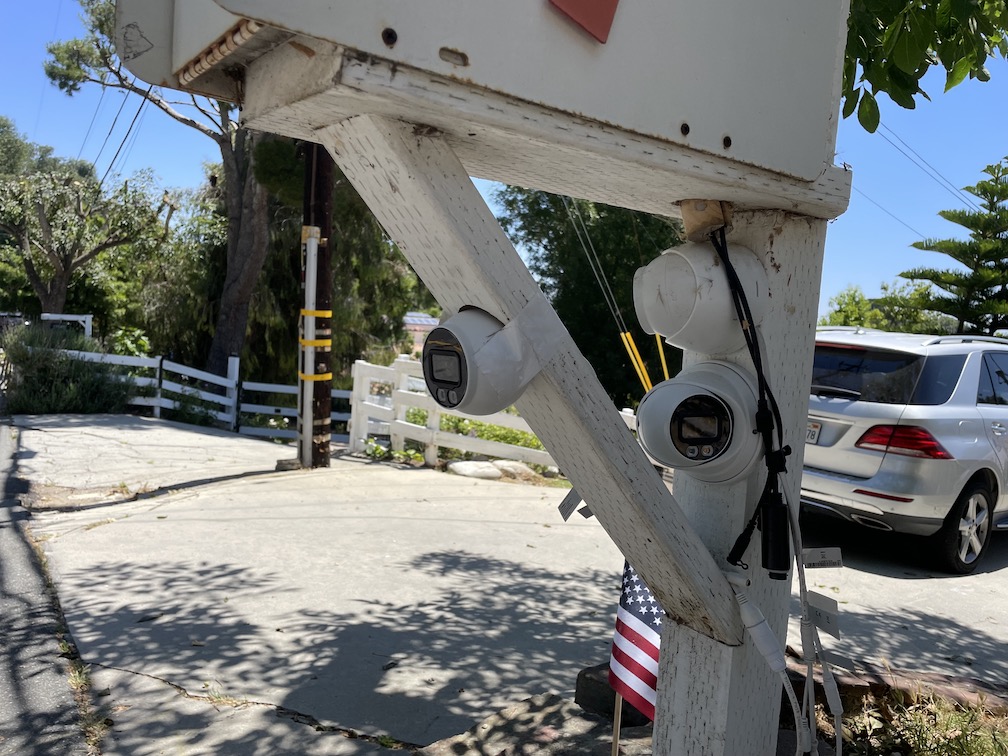
What about adding a second 2x4 on top of the existing 2x4 that is holding the hanging sign. This would double the thickness. Once that is completed you could carve out a space that could hold your round camera at the end. Most of the body would be embedded into the two 2x4's and the camera would be at the tip and at a good height.
Further, you could run the cable in between the two 2x4's (use a router to make a channel in the new 2x4)
That's a good idea, too.
The difficulty of all these approaches is the inconvenient position of that piece, so I'll see if I can remove it temporarily, or even remove it destructively and insert replacement piece(s) with the required cavity/ies.
Edit: I just re-read your comment, and now I see that you're talking about doubling the top-most, horizontal pieces and not doubling the diagonal piece. I hadn't considered that, but now I will. But I kind of like the profile of the wood pieces the way it is now. But a thicker wood piece might be preferable to an ugly camera mount.
The diagonal piece also appeals to me because it's closer to the other two cameras, which will make blending the FOVs in post-processing easier.

I do have an angle grinder. I tend to be wretched at anything freehand, but if I use the hole saw that would give me a shape to work with. This guy carves out a nice cavity with some additional tools.
And I just learned that "ball gouges" exist. This might be the ticket to carving out a real hemisphere. Because buying a tool isn't an expense; it's an investment!

As an Amazon Associate IPCamTalk earns from qualifying purchases.
Gimmons
Getting comfortable
You'll be surprised how controllable a flap disk is. You're working with a scrap 2x4 anyway, so you won't ruin anything.And I just learned that "ball gouges" exist. This might be the ticket to carving out a real hemisphere. Because buying a tool isn't an expense; it's an investment!
As an Amazon Associate IPCamTalk earns from qualifying purchases.
Gimmons
Getting comfortable
You can also use a regular metal cutting disk to make some slices in the wood that you can knock out with a hammer/chisel to quickly rough the shape. It's not a pretty way to do woodworking -- lots of smoke, etc., but your fingers won't be in any danger, and it gets the job done.You'll be surprised how controllable a flap disk is. You're working with a scrap 2x4 anyway, so you won't ruin anything.
You can also use a regular metal cutting disk to make some slices in the wood that you can knock out with a hammer/chisel to quickly rough the shape. It's not a pretty way to do woodworking -- lots of smoke, etc., but your fingers won't be in any danger, and it gets the job done.
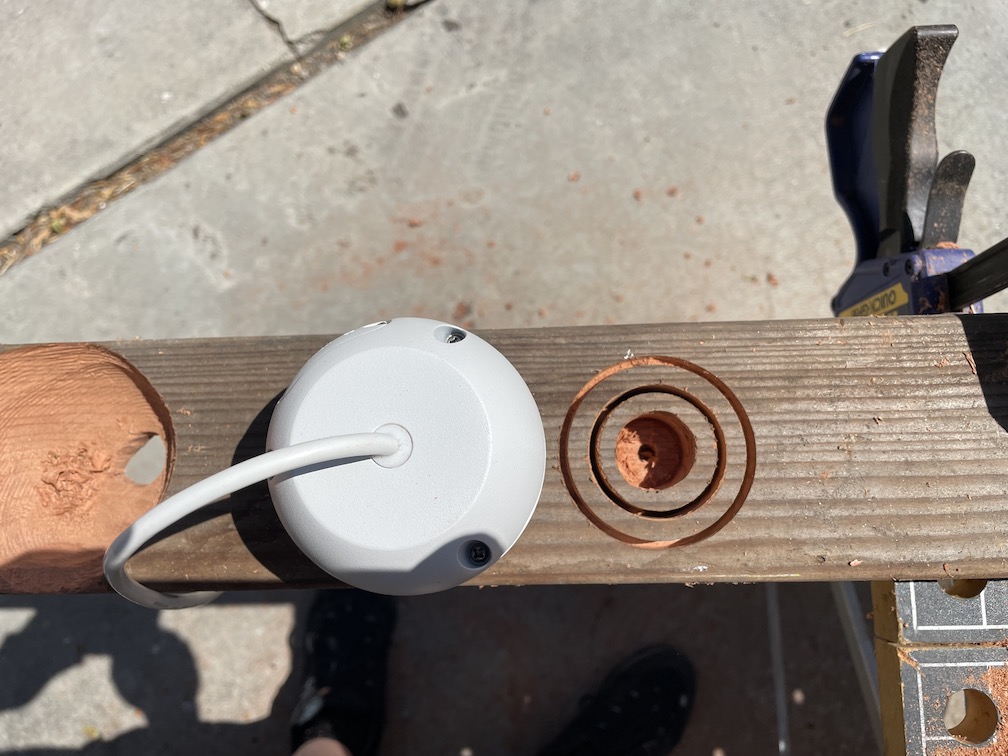
I ended up using two hole saws and a spade bit to rough out the general extents of the hemisphere:
and then I got this ball gouge for $23.39 on amazon:
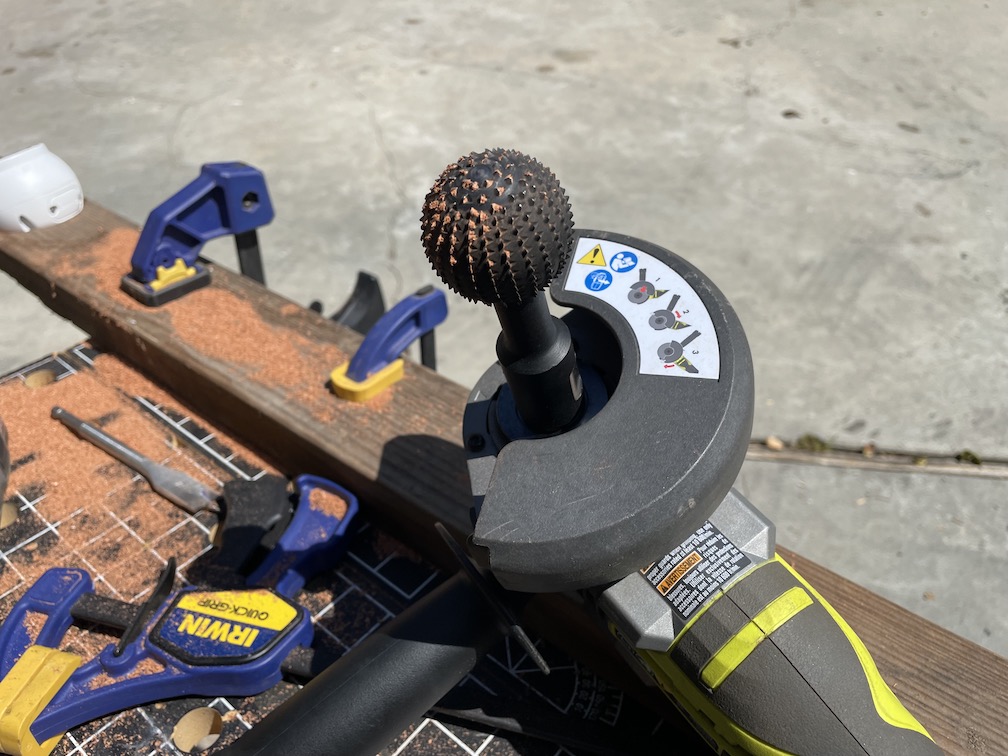
It takes a little bit of practice to get accustomed to, but it cuts quickly, and it's reasonably controllable in the right hands (e.g. not mine!!!). You can see my first test/failure on the left, above, and this was my second (sloppy) test run:
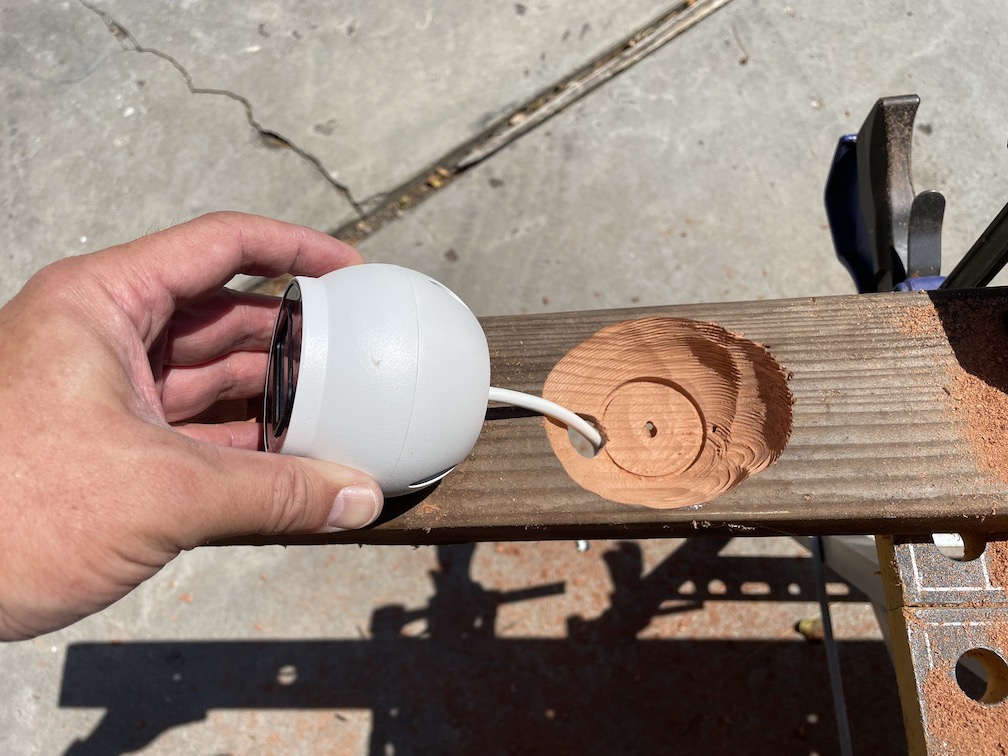
It worked well enough:
for me to commit for real:
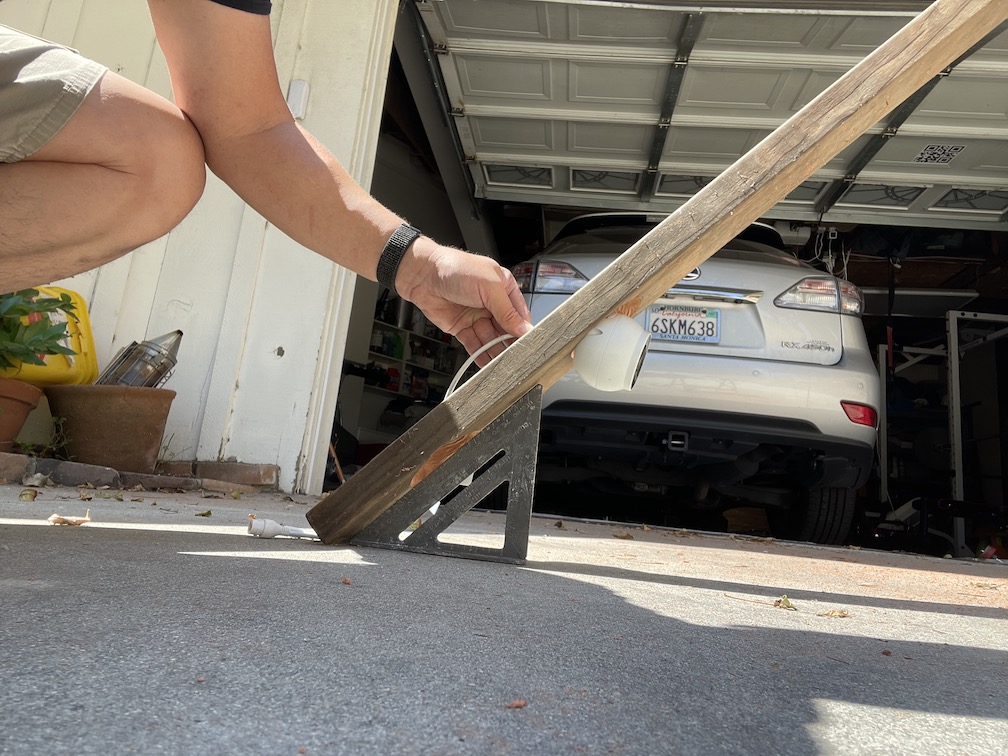
I could have gone a bit deeper, but it's good enough for now, and it accomplishes the main goal of getting it mounted without a mounting plate that's wider than the wood. I'm still not sure how to secure it; I might go with a zip tie. Ugly, but I've done worse.
I've made some progress on burying those cables in the post, but that's not ready for photos just yet.
As an Amazon Associate IPCamTalk earns from qualifying purchases.
Gimmons
Getting comfortable


You can also use a regular metal cutting disk to make some slices in the wood that you can knock out with a hammer/chisel to quickly rough the shape. It's not a pretty way to do woodworking -- lots of smoke, etc., but your fingers won't be in any danger, and it gets the job done.
Ah, I just read this again. If I were to use a 3" cutting wheel and do 6-8 "pizza cutter" cuts to the depth of half the wheel, it would rough out a perfect hemisphere with a 3" diameter. I may try that, just as an experiment.
Actual diameter of the camera ball is 3.25"

I don't know any easy way to make a hemispherical cavity

Apparently tools of such a form exist, but they're typically for orthopedic purposes, e.g. reaming out a hip socket for an implant, so they'd be both too small and prohibitively expensive.
Makes me wonder whether it would be possible to make some sort of giant bit out of this 3" hardened steel sphere. It's only $30:

so affordable enough to experiment with, but apparently also tool-hardened, so hard to machine.
It's a 1/4" too small, but if I had a perfect 3" hemispherical tool I suppose it wouldn't be too difficult to make the hole slightly larger.
edit: there's also these 80mm hollow steel balls for $12.50/2-pack (thickness unknown) and these 75mm half spheres for $10/2-pack (only 1mm thick)
Attachments
Last edited:
As an Amazon Associate IPCamTalk earns from qualifying purchases.
Gimmons
Getting comfortable
Interesting. I see a nut with angle grinder threads welded to the steel ball. On the other side, an adhesive-backed sanding disk.
Ah, that’s the answer to the question I’ve had in my head the last couple of days, eg how to attach such a contraption to a tool.Interesting. I see a nut with angle grinder threads welded to the steel ball. On the other side, an adhesive-backed sanding disk.
I wonder how good the alignment would be if I just tacked on a nut.
I have visions of a runaway 3”, 4 lb. steel ball zipping up my driveway and rocketing down the street at 9,000 RPM
Or maybe I could use something like this 3” sanding ball:
and impregnate some much coarser abrasive material.
and impregnate some much coarser abrasive material.
Last edited:
As an Amazon Associate IPCamTalk earns from qualifying purchases.
If you go that way, make sure that you have cams set up and post the outcome! Would love to see that rocketing down the street.I have visions of a runaway 3”, 4 lb. steel ball zipping up my driveway and rocketing down the street at 9,000 RPM
dmcIPCAM
Getting comfortable
There are some clever and resourceful folks on this forum - including yourself.
Take these few thoughts with a grain of sand.
1) Consider a hole angle that is not perpendicular to the board face - difficult without a drill press, however.
You could also two (or maybe just one slot) about and below the hole and then place two screws
into the side of the board to pinch the camera:

2) I've seen commemorative baseball holders constructed this way. Simple construction. Drill hole, cut slots with jig saw. You
can change the angle slightly by cutting the "ears" (the purple colored areas) asymmetrically. Maybe this will give you some ideas:

3) Don't laugh, but I've made Bondo casts for oddball jobs like this. Consider casting an insert made with Bondo or silicone. You could fill a
cut-out in the board or take a rectangular Tupperware container and fill it with Bondo. Stretch a condom over a correct size ball so the Bondo does
not stick to the ball. When it dries, trim as much as the Bondo as you need to remove the ball. Bondo is incredibly easy to machine.
Great thread, btw, and awesome project!
Take these few thoughts with a grain of sand.
1) Consider a hole angle that is not perpendicular to the board face - difficult without a drill press, however.
You could also two (or maybe just one slot) about and below the hole and then place two screws
into the side of the board to pinch the camera:
2) I've seen commemorative baseball holders constructed this way. Simple construction. Drill hole, cut slots with jig saw. You
can change the angle slightly by cutting the "ears" (the purple colored areas) asymmetrically. Maybe this will give you some ideas:
3) Don't laugh, but I've made Bondo casts for oddball jobs like this. Consider casting an insert made with Bondo or silicone. You could fill a
cut-out in the board or take a rectangular Tupperware container and fill it with Bondo. Stretch a condom over a correct size ball so the Bondo does
not stick to the ball. When it dries, trim as much as the Bondo as you need to remove the ball. Bondo is incredibly easy to machine.
Great thread, btw, and awesome project!
Attachments
OK, I'll confess....I found this thread by searching the forum for "condom"......just kidding!Stretch a condom over a correct size ball so the Bondo does not stick to the ball.

Great post, @dmcIPCAM !
Gimmons
Getting comfortable
Tacking is the key to aligning. Tack, try, cut, adjust, repeat.Ah, that’s the answer to the question I’ve had in my head the last couple of days, eg how to attach such a contraption to a tool.
I wonder how good the alignment would be if I just tacked on a nut.
I have visions of a runaway 3”, 4 lb. steel ball zipping up my driveway and rocketing down the street at 9,000 RPM
Search ebay for steel ball, you'll find some hollow ones, also hemispheres. Some are stainless, which you'd want to silver solder, unless you're a fantastic welder.
I wonder how good the alignment would be if I just tacked on a nut.
I have visions of a runaway 3”, 4 lb. steel ball zipping up my driveway and rocketing down the street at 9,000 RPM
On that note, which would be safer? A hollow ball with a greater likelihood of rupturing and sending out light, small shards? Or a solid steel ball that's stronger, but with 100x the kinetic energy if something were to go wrong?
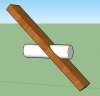
I love SketchUp!
Gimmons
Getting comfortable
Maybe you don't need steel. A wooden ball or half ball with an angle grinder nut attached and a sanding disk adhered to it.On that note, which would be safer? ...