Bird Feeder Hide

MrSurly

Getting comfortable
Jun 6, 2020
389
708
TX
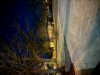
For a long time I have been planning to set up a full-color cam to watch over the street to cover the same general area as my previously chronicled Mailbox hide.
The cans in the mailbox are set to work as ersatz LPRs but of course that means they are effectively blind to everything else at night. I wanted a cam to see the late night pedestrians as well.
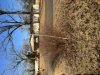
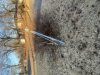
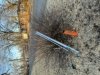
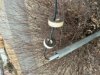
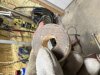
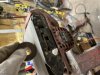
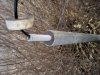
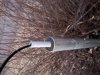
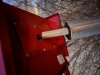
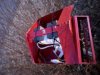
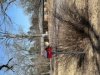
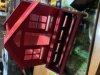
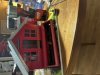
To this end…. back when I ran the pipe for the mailbox hide, I also ran a pipe to the Northeast corner of the property, near the street. I already had a bird feeder that looks like a little house, complete with windows and I’ve finally gotten around to starting the build. In the two years delay, the bird feeder has been in use and has rusted a bit but that’s okay. If the setup works out, I can repair that bit if needed. I DO intend to continue to put at least a small amount of seed in the thing.
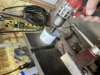
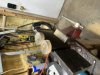
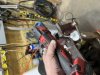
These pics are the beginning….
19F2C095-8886-4E04-AF0D-60397CDA7C05.jpeg
C3560743-A685-409F-A616-62102ABC4CA6.jpeg
208B5721-B02C-42AE-9888-1E9415BDD71D.jpeg36648465-BFD4-4AB1-93CC-CAFD383600DB.jpegB9663D82-5040-4B2D-A048-6FF9CE975DA8.jpegEC3564F0-77DB-403C-84C0-841F2459E6DB.jpeg125F5715-AEC0-4569-84A1-0E072DC799FE.jpegCF1E5F8A-9E0E-4436-9015-225FF86773C3.jpeg5639E208-4586-40E5-B29C-16DA715C6FBE.jpegE927F6E7-51F2-464A-ADC5-DDC51FE63550.jpeg302089D6-C0BF-448E-A246-A708376743DE.jpeg
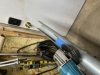
EDIT: I see that I didn’t snap a picture one of the steps… in the middle of this sequence after removing the lock bar at the top of the house, I had to drill the cap portion of the post socket ; just big enough for the RJ45 but not TOO big, or the conduit would go through it.
 

Attachments

  • C3560743-A685-409F-A616-62102ABC4CA6.jpeg
    C3560743-A685-409F-A616-62102ABC4CA6.jpeg
    34.6 KB · Views: 129
  • 208B5721-B02C-42AE-9888-1E9415BDD71D.jpeg
    208B5721-B02C-42AE-9888-1E9415BDD71D.jpeg
    29.1 KB · Views: 127
  • 302089D6-C0BF-448E-A246-A708376743DE.jpeg
    302089D6-C0BF-448E-A246-A708376743DE.jpeg
    27 KB · Views: 135
Last edited:
( I need help rotating the pics, please)

It’s done!
Back when I ran the pipe,I left it jutting out of the ground by a bush… no regard for it looking goofy.
BCC28EC9-354A-4598-803D-3302F5F2813B.jpeg
I doubled the Cat6 over and fed it back in and slipped a cap on top to wait for another day.
There’s a joint above grade that I didn’t glue.

So, I had a metal fence post saved from
my last fence redo on the back and i cut a big ol’ slot in it such that I could put it over the conduit, rather than leave it exposed.
BC05CC96-048D-4C4E-80E3-081EBDC7A0D7.jpeg

this would allow me to drive the post over the conduit as long as I successfully missed the 90* underground.
I had to remove the conduit at the low joint, feed the wire through the post pipe, place the post and wad the wire up inside the post so that I could use the go-Devil to drive the pipe.
84C99821-5E7A-4E75-B788-E2B4757C8E6F.jpeg
BD58374F-3A20-43AD-8B1A-4BEF68049BB0.jpeg
 

Attachments

  • BCC28EC9-354A-4598-803D-3302F5F2813B.jpeg
    BCC28EC9-354A-4598-803D-3302F5F2813B.jpeg
    43.4 KB · Views: 88
  • BC05CC96-048D-4C4E-80E3-081EBDC7A0D7.jpeg
    BC05CC96-048D-4C4E-80E3-081EBDC7A0D7.jpeg
    27.3 KB · Views: 91
  • 84C99821-5E7A-4E75-B788-E2B4757C8E6F.jpeg
    84C99821-5E7A-4E75-B788-E2B4757C8E6F.jpeg
    42.2 KB · Views: 90
  • BD58374F-3A20-43AD-8B1A-4BEF68049BB0.jpeg
    BD58374F-3A20-43AD-8B1A-4BEF68049BB0.jpeg
    42.7 KB · Views: 91
Last edited:
Next, I cut the conduit piece to length. since the top of the conduit would serve as the support and pivot point for the feeder, I had to somehow secure the conduit rigidly and hopefully centrally within the post pipe.
The post I.D. is 2.25 and the conduit OD is 7/8”.
I used a hole saw to almost cut two plugs, stopped to drill 7/8 holes in them, then finished cutting the plugs out.
7CA036BB-5503-4A2C-A42A-4F7D81900508.jpeg
6B203D14-731C-4655-9285-156F2C978F5B.jpeg
40E162EB-039C-403C-A606-7105ABE2C085.jpeg

A trial fit confirmed my suspicion that they were a bit too big. So, back to the shop for some sanding after marking about a sixteenth all the way around.
49949DA4-2414-4791-A115-1074E17259B9.jpeg
E767FFBF-343B-49C4-9D48-B63AA27D44E6.jpeg
AF172E1E-E0C7-41D6-8316-DF7C5EE4A43A.jpeg
Then, back to
the post site, place the collars, with a little help from a small hammer, drive both in to secure and center (and seal) the conduit within the post.

AA1B2374-4A51-4613-AC74-6D966E644FE8.jpeg
F59EA16C-4750-4380-9BCC-AEE51DC8867D.jpeg
E5FA89DA-168A-4E24-97B0-1B69E3D93E88.jpeg
 

Attachments

  • 7CA036BB-5503-4A2C-A42A-4F7D81900508.jpeg
    7CA036BB-5503-4A2C-A42A-4F7D81900508.jpeg
    36.2 KB · Views: 84
  • 6B203D14-731C-4655-9285-156F2C978F5B.jpeg
    6B203D14-731C-4655-9285-156F2C978F5B.jpeg
    35.9 KB · Views: 84
  • 40E162EB-039C-403C-A606-7105ABE2C085.jpeg
    40E162EB-039C-403C-A606-7105ABE2C085.jpeg
    32.1 KB · Views: 84
  • 49949DA4-2414-4791-A115-1074E17259B9.jpeg
    49949DA4-2414-4791-A115-1074E17259B9.jpeg
    38.8 KB · Views: 87
  • E767FFBF-343B-49C4-9D48-B63AA27D44E6.jpeg
    E767FFBF-343B-49C4-9D48-B63AA27D44E6.jpeg
    34.4 KB · Views: 85
  • AF172E1E-E0C7-41D6-8316-DF7C5EE4A43A.jpeg
    AF172E1E-E0C7-41D6-8316-DF7C5EE4A43A.jpeg
    35 KB · Views: 86
  • AA1B2374-4A51-4613-AC74-6D966E644FE8.jpeg
    AA1B2374-4A51-4613-AC74-6D966E644FE8.jpeg
    38.5 KB · Views: 85
  • F59EA16C-4750-4380-9BCC-AEE51DC8867D.jpeg
    F59EA16C-4750-4380-9BCC-AEE51DC8867D.jpeg
    31.7 KB · Views: 87
  • E5FA89DA-168A-4E24-97B0-1B69E3D93E88.jpeg
    E5FA89DA-168A-4E24-97B0-1B69E3D93E88.jpeg
    23.8 KB · Views: 86
Last edited:
Now that the feeder is resting on top on the conduit and the wire is fed thru, I need to crimp a connector on and hook ‘er up!
3EF1428F-4CF1-40E7-89EF-4ECA447483BB.jpeg
8AC28654-C231-43E2-8BFB-861F55B9F1CD.jpeg
6372FB11-D748-4696-AFEF-028FFD9AC75D.jpeg

0F9752B4-E640-4DCA-815B-6920C7A78EE8.jpeg
 

Attachments

  • 8AC28654-C231-43E2-8BFB-861F55B9F1CD.jpeg
    8AC28654-C231-43E2-8BFB-861F55B9F1CD.jpeg
    30.9 KB · Views: 94
  • 6372FB11-D748-4696-AFEF-028FFD9AC75D.jpeg
    6372FB11-D748-4696-AFEF-028FFD9AC75D.jpeg
    109 KB · Views: 95
Last edited:
By the time I got inside it was already on the screen! (the camera had already been set up and running elsewhere)
In the view of this camera you can see the original Mailbox Hide, still running, three cams on board.
And, yes, I hastily clipped a bunch the stalks out of the view.
This will need a real dressing up in the daylight!
D5FD32D1-45EB-4A54-B1B7-91C35ADECF70.jpeg
 

Attachments

  • 9A18BFBC-50ED-4354-ADA6-A727AD2CB1A1.jpeg
    9A18BFBC-50ED-4354-ADA6-A727AD2CB1A1.jpeg
    3.3 MB · Views: 22
Every pic is rotated 90* to the left, except for the last pic. They are ALL correctly oriented on my phone. Could someone show me how to
fix their rotation, please?
 
  • Like
Reactions: mat200
Did you get the lens close enough to the glass in the feeder to avoid IR reflection or did you have to turn them off?
It is jammed tight against the plastic window because the minimum length of the cam is precisely a teensy bit more than the available space (which was pure happenstance).
I had to cut the ‘nonremovable’ (HAH!-hold my beer) hood from the cam to get it i there and it’s pretty tight. I have the IR turned off anyway and don’t ever plan to have them on. I MAY add an IR gun to the area at some point. The direction the cam is aimed has decent light as i’ve added a couple of LED floods at the front of the house. If I decide to turn this cam to the North, some kind of lighting will be needed.
 
Last edited:
One nice thing about this is that I can turn the bird feeder 360* and record whatever. What I’d LOVE to do is motorize and automate it! Let THAT freak ‘em out.
Honey, that bird feeder is following us…..

I am seriously contemplating a round or octagon feeder with a ptz inside. No. Stop that.

The feeder cam right now is having trouble recording continuously. I’m about 99% sure that the connector cutting/stripping/assembling that I did in the dark…. is likely the cause.
However, I’m laid up sick (likely Covid again) ANNNNNNNDDDD it’s raining. So sorting that out is on hold.

If someone can pass along the instructions that I can follow to fix da pix….
 
Last edited:
Thanks. I’m only operating with an iPhone at the moment… and they look right on the phone…. but all wrong looking at the thread in Safari.
 
  • Like
Reactions: Flintstone61
It seemed a bit of a PITA but I THINK I successfully rotated the errant pics.

I did something similar to steps described above…. I went each pic and “saved as” each pic into a new folder on my PC. I then went that folder and right-clicked and ‘rotate right’ on each. I did not actually have to save each again, which seemed odd. But anyway, back to the forum page >edit> tap a pic, use the forum’s little context menu’s ‘replace’ command and then drag the matching pic from the folder to each.
 
Last edited:
Hello @MrSurly , My wife bought another of these bird houses and I absconded it. She likes the idea of a camera installed. I have some retired amscrest wireless bullet cameras that look like they will fit perfectly. Just curious if you fill yours with bird feed and does the feed dust up the lens? Also is the focal length such that you can actually see the birds?