I have had a tough time starting out with the whole IP camera thing.
So much of the information on this forum is just a single degree past the noob like me that it was difficult to grasp much of the stuff talked about or understanding how it worked and because of that I decided to make the following guide for the total noob / dense person / old guys / I really don't want to become an expert on this also...... type of people!
Written 10-2017 and I will add as I go along.
A) First off this is a great camera, easy to install and set-up if you know the tricks.
B) I do not use a NVR so nothing here about that, might save you some reading.
C) I have 5 cameras purchased through Andy at Empire. Good deal fast shipping if he has them in stock.
D) Out of 5 cameras 2 are for live viewing only and 3 have a MicroSD card to record motion detection events plus live viewing.
1) You do not 'need' anything else to mount it onto a flat wood surface. It has plastic anchors included for drywall / siding. I mounted on wood so never used them. I also mounted a few on angled siding and it does not matter because of how you can angle the camera.
2) If you want to cover all the wire connections to be super neat then a junction box of some kind would work. I have not studied what Dahua offers. The ethernet connection comes with a waterproof connection which is pretty neat!
3) I used the POE (Power Over Ethernet) but there is a power connection cable which 'y's off the main cable coming off the camera. Do the POE sooooo simple!!
4) I have 5 cameras and some other ethernet cables in an electric connection cabinet so I purchased this POE switch.
If you do not need so many POE connections there are many with 4 POE connections. I plugged this in connected to my router, connected first camera and it worked, done, finished. Nothing else to do with the switch.
5) I upgraded my router so I would have one that acted as a VPN server. Got the Netgear AC1900 Nighthawk Model R7000. Have not at this point setup the VPN so will add info after doing it. Pretty much left the settings as they were out of the box but I did change the password, sort of a must do thing, never leave a factory installed password on a router!
Steps and tips
Tip 1) If you want to record to the camera itself you must install a microsd card inside the camera body. Nayr has pics detailing all this here. Nayr does great on all this so check out his pics.
Tip 2) Get a microsd card made for this, I used a Lexar 64GB. I'm not recording vids just snapshots so even a 32 GB would work for me but I did make sure it was made for rewriting but don't ask me how long it will last me I have no idea how many rewrites, I'll switch them out when they die.
Install the microsd card before mounting the camera. Use a #2 size phillips head screwdriver. It seems like a smaller one would work better but the heads of the screws fit tight with a #2, smaller slips and could strip the head. The #2 is your most common size screwdriver.
INSTALLING
1) The camrea comes with a base plate attached. This you take off and install on whatever surface you want to place the camera. I suggest predrilling holes in wood for the screws. When you mount it I found you needed to install one screw then drill the second hole and start the second screw just so it catches firm. Now loosen the first most of the way out. Hold the plate out and slip the wires under the plate so they come out and match where the slot is for the wire. Now tighten the frist and second screw. The camera will hang from the bracket just fine while you install the thrid screw. Draw the wire out through the slot as you put the camrea body in place. Put the case over the camera body. You need to put the side opposite the set screw on first at an angle then wiggle the camera body to latch it correctly, then push the side with the set screw down to seat and tighten the set screw.
2) If you are installing the ends on the ethernet cable you need to remember to install the waterproof housing supplied with the camera first then install the ethernet clip end. (Guess how I figured this out) If you have cables already made up with the end connectors you cannot put the waterproof connection on so plan ahead and make the cable ends yourself. If course using a waterproof junction box negates the need for this.
3) Once you have it mounted you can connect the ethernet cable.
NOTE: I connected one camera at a time so as not to get conflicting IP addresses because all the cameras come loaded with the same IP address. (I found one with a different IP??? Go figure!)
NOTE 2: Before plugging in the camera check in your router to make sure the cameras initial IP address is not taken by something else. If not, you can do what I did below if it is then use the instructions in the booklet received with the camera.
Setting up the camera via software
1) The camera comes with it's own software. In the instructions it will tell you the IP address of the camera. You can just enter this in your browser.
***(CHANGE 10-6-17: All my instructions are now via the Pale Moon browser, download the X86 version which is actually the 32 bit version)
The browser will show the startup screen and as of now the user name and password is "admin". It will then prompt you to change the password.
2) Once you get in you will have a link message in the window telling you to get the plugin to view the camera picture.
FIRST click on the "Setting" tab and on the left click on "Network" then the "TCP/IP". Change the IP Address to something else which is within the range of IP addresses allowed by your router setup. Good idea to go into your router and check the IP address range and also to see the attached devices so you don't use one already taken.
Click on "Save" and then click on the "Live" tab on the top.
3) NEW 10-6-17: On the "Live" view you will see the notice telling you to get the plugin. Click on this and download the plugin.
NOTE: I had to disable my AV to allow the download. (It told me of malware but it seems OK)
Once downloaded I logged out of the camera software and exited the Pale Moon browser then double clicked on the downloaded file to extract it and install it. It tells you it is installing but nothing ever pops up telling you it succeeded.
*Reactivate your AV!!
4) Restart Pale Moon and type in the ip address for the camera, enter the login info and the live view will show up. (Hopefully!)
5) NOTE: 10-6-17 The camera software with the chrome browser and plugin is buggy as hell!!!! I found the motion detection section had places selected in the Pale Moon browser that were NOT selected in chrome, drove me nutz!! Will add info below on that section.
6) Now that you can see the live view go back and adjust the camera to view what you like.
You have the camera working to see live view but there is so much more.
I will add more tonight along with pics 10-5-17
Added 10-9-17
Here are a few things once I got into the camera software.
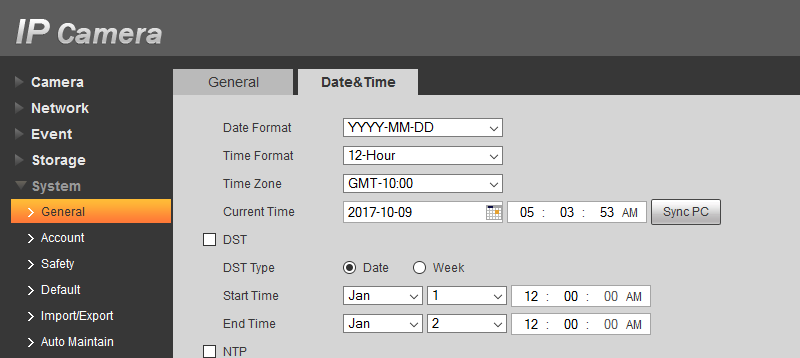
1) DATE: Oh boy this caused me issues to view the recorded pics from the motion detection. There is a place shown here to set your time. Mine defaulted to 2000 and then I tried to view pics for the current date......no pics. So remember to set the time.

2) Storage: Like I mentioned above I only send snapshots to the "local" storage in the camera. This is a micro SD card you need to install and then shown here is where you choose to send movies/recordings or snapshots to the SD card.

Then go to "Local" to see the SD Card

TIP: Not sure if just me but I tried to format the card via the camera software and it lost sight of the SD Card afterward. I had to take the card out and re-format it on the computer then reinstall it. After that it showed up again.
I tried the NAS feature to record to a local USB hard drive attached to my router but have not found the correct settings as of yet. Maybe someone else can chime in on this.
3) Motion detection: So to set up capturing snapshots via motion detection is easy once you know a few things. I had a bad time trying to do it in chrome as the plugin was really buggy and then once over to Pale Moon 32 bit everything worked correctly.
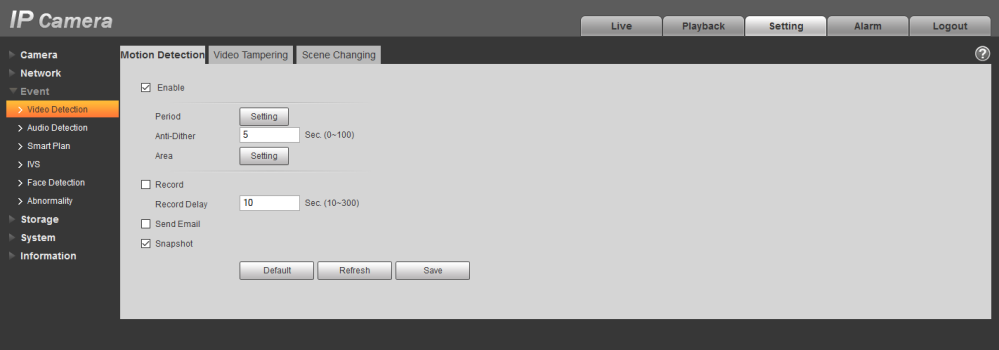
Here is the main page for motion detion recording. As I have it setup it will record snapshots only. If you also check off the "Record" box it will record movies. If you check off the "Send Email" box it will send you emails each time it is tripped. I have not done this yet and until I get the motion detection perfected I will not.

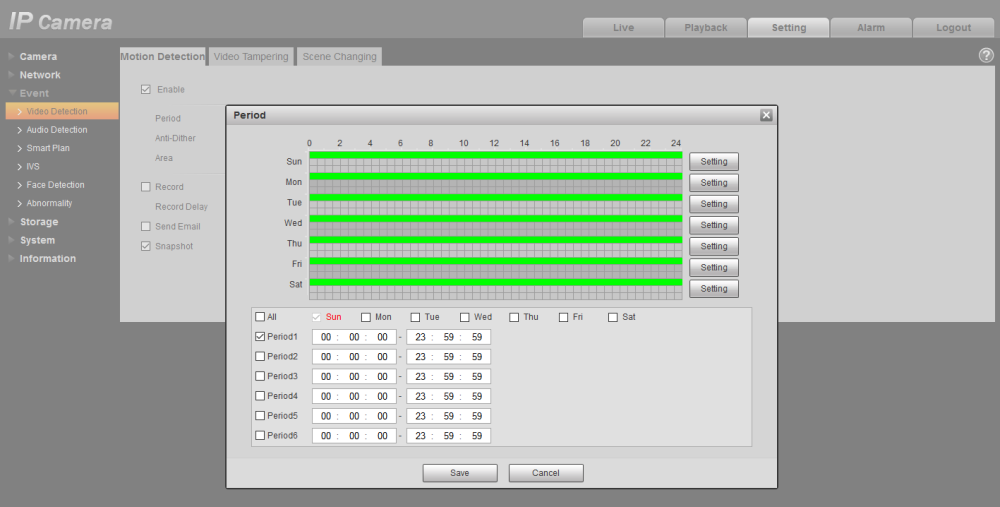
When you click on the "Period" "Setting" Box here is what you get.
Once you set this up you need to click "Save" and when you get back to the main screen click "Save" there also.

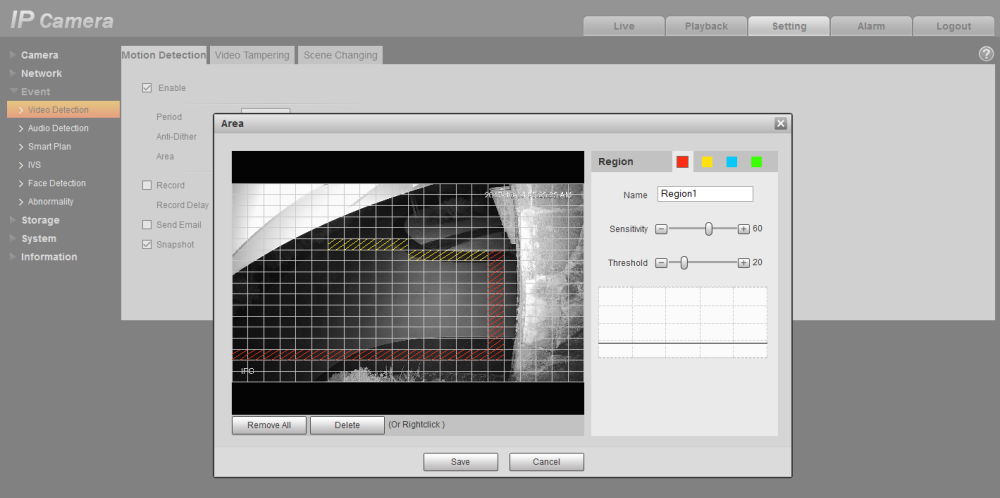
Setting the motion detection areas is just clicking on the squares you want it to be activated to take the snapshots if something crosses the area. Each "Region" you can choose different squares and different tolerances to activate the snapshot recording. I'm still playing with this and trying to get it so bugs do not activate it. You will need to change things around here a bit to get it dialed in for what you want. I'm about 80% there now and just fine tuning it.

TIP: This messed with my head so remember this one. When done with your settings click "Save" and when back to the main page click "Save" again or it will not save the settings you just made.
4) Path for live snapshots/Recordings: So I have not been able to save the motion detection snapshots to my USB drive attached to the router but I can take live snapshots and have it record to it. That's all I can help you with here :-(

Pete
So much of the information on this forum is just a single degree past the noob like me that it was difficult to grasp much of the stuff talked about or understanding how it worked and because of that I decided to make the following guide for the total noob / dense person / old guys / I really don't want to become an expert on this also...... type of people!
Written 10-2017 and I will add as I go along.
A) First off this is a great camera, easy to install and set-up if you know the tricks.
B) I do not use a NVR so nothing here about that, might save you some reading.
C) I have 5 cameras purchased through Andy at Empire. Good deal fast shipping if he has them in stock.
D) Out of 5 cameras 2 are for live viewing only and 3 have a MicroSD card to record motion detection events plus live viewing.
1) You do not 'need' anything else to mount it onto a flat wood surface. It has plastic anchors included for drywall / siding. I mounted on wood so never used them. I also mounted a few on angled siding and it does not matter because of how you can angle the camera.
2) If you want to cover all the wire connections to be super neat then a junction box of some kind would work. I have not studied what Dahua offers. The ethernet connection comes with a waterproof connection which is pretty neat!
3) I used the POE (Power Over Ethernet) but there is a power connection cable which 'y's off the main cable coming off the camera. Do the POE sooooo simple!!
4) I have 5 cameras and some other ethernet cables in an electric connection cabinet so I purchased this POE switch.
If you do not need so many POE connections there are many with 4 POE connections. I plugged this in connected to my router, connected first camera and it worked, done, finished. Nothing else to do with the switch.
5) I upgraded my router so I would have one that acted as a VPN server. Got the Netgear AC1900 Nighthawk Model R7000. Have not at this point setup the VPN so will add info after doing it. Pretty much left the settings as they were out of the box but I did change the password, sort of a must do thing, never leave a factory installed password on a router!
Steps and tips
Tip 1) If you want to record to the camera itself you must install a microsd card inside the camera body. Nayr has pics detailing all this here. Nayr does great on all this so check out his pics.
Tip 2) Get a microsd card made for this, I used a Lexar 64GB. I'm not recording vids just snapshots so even a 32 GB would work for me but I did make sure it was made for rewriting but don't ask me how long it will last me I have no idea how many rewrites, I'll switch them out when they die.
Install the microsd card before mounting the camera. Use a #2 size phillips head screwdriver. It seems like a smaller one would work better but the heads of the screws fit tight with a #2, smaller slips and could strip the head. The #2 is your most common size screwdriver.
INSTALLING
1) The camrea comes with a base plate attached. This you take off and install on whatever surface you want to place the camera. I suggest predrilling holes in wood for the screws. When you mount it I found you needed to install one screw then drill the second hole and start the second screw just so it catches firm. Now loosen the first most of the way out. Hold the plate out and slip the wires under the plate so they come out and match where the slot is for the wire. Now tighten the frist and second screw. The camera will hang from the bracket just fine while you install the thrid screw. Draw the wire out through the slot as you put the camrea body in place. Put the case over the camera body. You need to put the side opposite the set screw on first at an angle then wiggle the camera body to latch it correctly, then push the side with the set screw down to seat and tighten the set screw.
2) If you are installing the ends on the ethernet cable you need to remember to install the waterproof housing supplied with the camera first then install the ethernet clip end. (Guess how I figured this out) If you have cables already made up with the end connectors you cannot put the waterproof connection on so plan ahead and make the cable ends yourself. If course using a waterproof junction box negates the need for this.
3) Once you have it mounted you can connect the ethernet cable.
NOTE: I connected one camera at a time so as not to get conflicting IP addresses because all the cameras come loaded with the same IP address. (I found one with a different IP??? Go figure!)
NOTE 2: Before plugging in the camera check in your router to make sure the cameras initial IP address is not taken by something else. If not, you can do what I did below if it is then use the instructions in the booklet received with the camera.
Setting up the camera via software
1) The camera comes with it's own software. In the instructions it will tell you the IP address of the camera. You can just enter this in your browser.
***(CHANGE 10-6-17: All my instructions are now via the Pale Moon browser, download the X86 version which is actually the 32 bit version)
The browser will show the startup screen and as of now the user name and password is "admin". It will then prompt you to change the password.
2) Once you get in you will have a link message in the window telling you to get the plugin to view the camera picture.
FIRST click on the "Setting" tab and on the left click on "Network" then the "TCP/IP". Change the IP Address to something else which is within the range of IP addresses allowed by your router setup. Good idea to go into your router and check the IP address range and also to see the attached devices so you don't use one already taken.
Click on "Save" and then click on the "Live" tab on the top.
3) NEW 10-6-17: On the "Live" view you will see the notice telling you to get the plugin. Click on this and download the plugin.
NOTE: I had to disable my AV to allow the download. (It told me of malware but it seems OK)
Once downloaded I logged out of the camera software and exited the Pale Moon browser then double clicked on the downloaded file to extract it and install it. It tells you it is installing but nothing ever pops up telling you it succeeded.
*Reactivate your AV!!
4) Restart Pale Moon and type in the ip address for the camera, enter the login info and the live view will show up. (Hopefully!)
5) NOTE: 10-6-17 The camera software with the chrome browser and plugin is buggy as hell!!!! I found the motion detection section had places selected in the Pale Moon browser that were NOT selected in chrome, drove me nutz!! Will add info below on that section.
6) Now that you can see the live view go back and adjust the camera to view what you like.
You have the camera working to see live view but there is so much more.
I will add more tonight along with pics 10-5-17
Added 10-9-17
Here are a few things once I got into the camera software.
1) DATE: Oh boy this caused me issues to view the recorded pics from the motion detection. There is a place shown here to set your time. Mine defaulted to 2000 and then I tried to view pics for the current date......no pics. So remember to set the time.
2) Storage: Like I mentioned above I only send snapshots to the "local" storage in the camera. This is a micro SD card you need to install and then shown here is where you choose to send movies/recordings or snapshots to the SD card.
Then go to "Local" to see the SD Card
TIP: Not sure if just me but I tried to format the card via the camera software and it lost sight of the SD Card afterward. I had to take the card out and re-format it on the computer then reinstall it. After that it showed up again.
I tried the NAS feature to record to a local USB hard drive attached to my router but have not found the correct settings as of yet. Maybe someone else can chime in on this.
3) Motion detection: So to set up capturing snapshots via motion detection is easy once you know a few things. I had a bad time trying to do it in chrome as the plugin was really buggy and then once over to Pale Moon 32 bit everything worked correctly.
Here is the main page for motion detion recording. As I have it setup it will record snapshots only. If you also check off the "Record" box it will record movies. If you check off the "Send Email" box it will send you emails each time it is tripped. I have not done this yet and until I get the motion detection perfected I will not.
When you click on the "Period" "Setting" Box here is what you get.
Once you set this up you need to click "Save" and when you get back to the main screen click "Save" there also.
Setting the motion detection areas is just clicking on the squares you want it to be activated to take the snapshots if something crosses the area. Each "Region" you can choose different squares and different tolerances to activate the snapshot recording. I'm still playing with this and trying to get it so bugs do not activate it. You will need to change things around here a bit to get it dialed in for what you want. I'm about 80% there now and just fine tuning it.
TIP: This messed with my head so remember this one. When done with your settings click "Save" and when back to the main page click "Save" again or it will not save the settings you just made.
4) Path for live snapshots/Recordings: So I have not been able to save the motion detection snapshots to my USB drive attached to the router but I can take live snapshots and have it record to it. That's all I can help you with here :-(
Pete
Last edited:
