Hikvision Mini-Dome Conduit Base -- Make Your Own

Craig Conrad

Young grasshopper
Joined
Jan 31, 2017
Messages
51
Reaction score
11
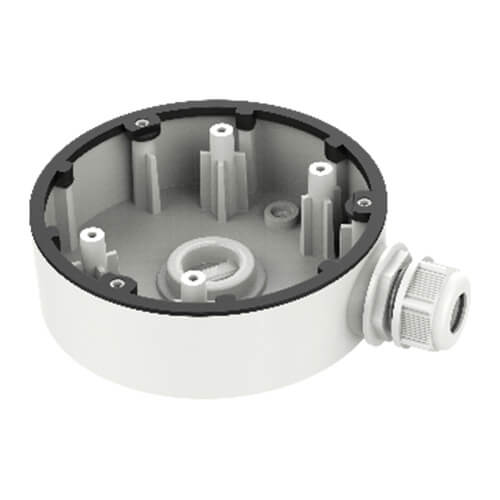
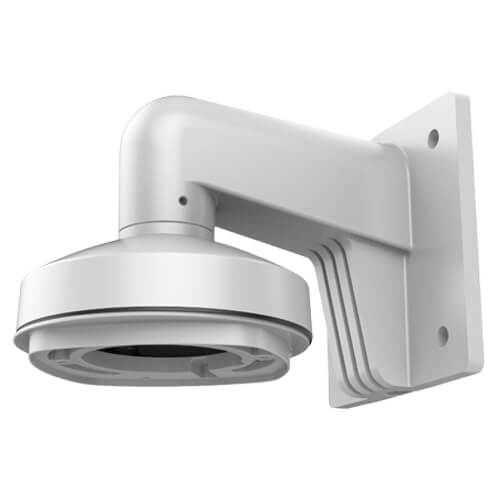
I have a total of four Hikvision mini-dome cameras (models DS-2CD2543G0-IS [aka IPCam IPCT-HDBW4432F-IS], DS-2CD2563GO-IS). All are wall mounted outdoors, though generally shielded from the rain. The difficulty with these cameras is that they have a non-optional cable bundle (ethernet, audio in, DI.DO) that need to be placed somewhere (I only use the ethernet). Two of my cameras are located under soffit, so that the cable bundle can be tucked up into that area. The other two are installed on 6x6 posts (one on a porch, the other on a pier). On these latter two, there is no place to hide and secure the bundle cable. So, I needed a conduit box under (behind) the camera that would hold all the cable bundle. I spent at least two hours trying to find what Hikvision recommended, and I found conflicting information in the sales pages and the manuals, finding possibilities of CB120, CBD-MINI and CBS. When looking at the schematics for these, it didn't appear that any would line up with the screws on the camera, so I called (twice) Hikvision USA. They each spent at least 15 minutes trying to find what is supposed to work, and gave me conflicting information again. However, it seemed that CBD-MINI was the best candidate. So, I ordered two of them -- backordered for nearly two months, but finally got them and they do NOT fit, naturally, at least. I suppose you could make new holes in it.

Anyway, I decided to make my own using a 4 x 4 x 2.5" "project box" (probably not the right name, but it is a water-proof box with no holes in it at all) from Lowe's. These have worked out great for me and I thought I'd share it with others that might be in the same position. I have attached photos of the steps.

Here is the "project box" (4x4x2.5):
1a - Camera & Project Box.jpg
1b - The Project Box (4 x 4 x 2.5) - Bottom.jpg


1c - The Project Box (4 x 4 x 2.5) - Inside.jpg

Step 1: Create a hole in the lid that will be used to pass the cable bundle. NOTE: if you follow the photos, you will notice that I actually added this hole later, but I should have done it at this point, so I arranged the photos as they should have been done. I drilled a pilot hole at about 7/8" from the top edge and 1 3/4" from the left edge. The pilot hole helps keeps the final drill bit cut centered. Then I used that pilot hole to drill a 7/8" hole (you can certainly use a somewhat larger one, as long as you don't cut too close to the edge as that would break the box's seal.
2a - Cable Bundle Hole - 0.875 from top.jpg
2b - Cable Bundle Hole - 1.75 from left.jpg
2c - Cable Bundle Hole - 0.875 inch.jpg

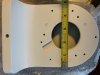
Step 2: Attach the camera's base plate to the box's lid. When marking the holes in each of the four slot areas, pick a spot as far from the lid's edge as possible. After marking, I again used a pilot hole, then the final hole (I used 3/32" for my #6 x 3/4" metal Pan-head screws (1/2" would be long enough, but I already had these). Complete all four holes, then attach the camera base with the four screws. Be careful to center it well so that the box's corner screws are all accessible and not blocked by the base (you will want to be able to remove the lid with the camera base on it).
3a- Camera Base Holes Marking.jpg
3b - Camera Base Holes Marked.jpg3c - Camera Base Holes Drill Pilot.jpg3d - Camera Base Holes Drill to Size.jpg
3e - Camera Base Holes Complete.jpg
4a - Camera Base Attached Loosely.jpg4b - Camera Base Adjust and Hand Tighten.jpg4c - Camera Base Attachment Complete.jpg

Step 3: Feed cable bundle through the box lid. Push the fattest things through first, of course.
5a - Feed Cables into Box.jpg
5b - Feed Cables into Box.jpg

Step 4: Secure camera to the camera base (which is already attached to the box lid).
6a - Secure Camera to Base.jpg
6b - Secure Camera to Base.jpg
6c - Camera Secured to Base.jpg

Step 4: Install Camera Cover
7 - Install Camera Cover.jpg

Step 5: Take a look at the project box -- all is nice and neat. Now, all you need to do is to secure the project box to whatever surface you want, and make provision for the ethernet cable. In my case, I simple drilled a 1/4" hole through the back of the box and on through the 6x6" post. The ethernet cable passes through this hole into the box, and I then attached the RJ45 end to the cable, re-attach the lid and it's all set. Of course, there are other ways to install conduit to this box as well, but I'll leave that to you!
8 - A Peak Inside Box.jpg

Let me know of any suggestions or questions!
 
Last edited:

aesterling

Getting comfortable
Joined
Oct 9, 2017
Messages
352
Reaction score
346
Cool, thanks for sharing! Would also love to see photos of it installed in the final location when you’re done.
 

eggsan

Getting comfortable
Joined
Jul 24, 2015
Messages
619
Reaction score
528

Craig Conrad

Young grasshopper
Joined
Jan 31, 2017
Messages
51
Reaction score
11
When limited space to hide the cables, I normally use an universal (multi-holes) metal wall mount. The “L” shaped space between the camera and the wall, provides ample space to accommodates the cables/connectors

Does that Honeywell mount have holes that align with the Hikvision mini-dome models I mentioned? On these Hikvision cameras, the cable bundle is not in the center of the camera base, but less than an inch from the outer edge -- would these be routable? If so, this mount looks pretty good. Thanks!
 

eggsan

Getting comfortable
Joined
Jul 24, 2015
Messages
619
Reaction score
528
Not necessarily, normally use Dahua products, but you may use self tapping metal screws (TEK) to mount the camera. I usually mark with pencil the camera mounting holes, drill using a small bit and insert the TEK. Check the diameter of this mount. You may find larger size if needed.
 

Attachments

eggsan

Getting comfortable
Joined
Jul 24, 2015
Messages
619
Reaction score
528
regarding the cable bundle alignment, the base have like an “u shaped” canal (see photo) for pass the cable. The center hole of the base is wide enough for many cameras, Check yours and compare with the measurement provided in the photo
 

Craig Conrad

Young grasshopper
Joined
Jan 31, 2017
Messages
51
Reaction score
11
regarding the cable bundle alignment, the base have like an “u shaped” canal (see photo) for pass the cable. The center hole of the base is wide enough for many cameras, Check yours and compare with the measurement provided in the photo
Yeah, that might fit ok. I think Hikvision sells a similar design. I know I bought one of that design for one of their larger cameras and it is poorly designed and poorly fit (the camera remains loosely in it), even though recommended for the camera I got it for. Love most of the Hikvision cameras, just not impressed with the mounts. Thanks for your help!
 

alastairstevenson

Staff member
Joined
Oct 28, 2014
Messages
15,930
Reaction score
6,779
Location
Scotland
Terrific detail in the very many pictures!
A comment if I may -
Is it my imagination - or is the seal on the right side displaced, and is the top right corner not fully tightened down?

Have you weather-sealed the pigtail joints inside the box, and the unused cables of the pigtail?
 

Craig Conrad

Young grasshopper
Joined
Jan 31, 2017
Messages
51
Reaction score
11
Terrific detail in the very many pictures!
A comment if I may -
Is it my imagination - or is the seal on the right side displaced, and is the top right corner not fully tightened down?

Have you weather-sealed the pigtail joints inside the box, and the unused cables of the pigtail?
Hi! Thanks for checking it out and for the comments.

It isn't your imagination as to the top-right corner. I actually noticed it myself when posting the photos and went and tightened both top corners. And, yes, the gasket does bulge out a minor bit on that spot. I don't know why, but all the boxes I'd looked at at Lowes had one or two spots that did this, though there was still plenty of material on the seal itself, so I don't know if it matters. Actually, for this particular camera, these may be moot points because the camera is waterproof (IP66) even without a base. The cable connections themselves, of course could be subject to exposure, though I have the plugs in each unused one, and the sealed ethernet connector in use.

I'm not sure what you mean by weather-sealing the pigtail joints inside the box. Can you explain? The only hole I made in the box is 1/4" for the ethernet cable. That hole continues through the 6x6 post. I didn't specifically seal the hole with anything (e.g. silicon) -- should I?

Thanks!
 

Craig Conrad

Young grasshopper
Joined
Jan 31, 2017
Messages
51
Reaction score
11
BTW, I had considered putting a 6x6" "rubber packing" gasket from the plumbing or electrical department at Lowe's between the camera base and the box. Of course, I would have to cut about a 1" dia hole for the pigtail, and I'd trim it to a circle for best appearance. That would make it all more weatherproof, but as the camera itself (in this case) is waterproof on its own, I didn't think that necessary. Am I wrong?


alastairstevenson

Staff member
Joined
Oct 28, 2014
Messages
15,930
Reaction score
6,779
Location
Scotland
I'm not sure what you mean by weather-sealing the pigtail joints inside the box.
I meant the joint between the male and female RJ45 connectors.
I'd normally wrap this tightly with 'self-amalgamating tape' known as coax seal over your way.
And I'd do the same on the ends of any unused cables, just to protect against any humidity / dewpoint effects.

the sealed ethernet connector in use.
I'm not quite sure what you mean by this.
 

Craig Conrad

Young grasshopper
Joined
Jan 31, 2017
Messages
51
Reaction score
11
I'm not quite sure what you mean by this.
I'm not sure what it is called, but the camera's ethernet connector (female) has a twist-on cover built in, and came with the other side of the twist-on (slipped over the end of the cable before you put the male connector on it), so, once you connect the RJ45 together, these "cover" pieces twist together to create a weather-proof shield to the RJ45.
 

Securame

Pulling my weight
Joined
Mar 25, 2014
Messages
664
Reaction score
214
Location
Barcelona, Spain

Craig Conrad

Young grasshopper
Joined
Jan 31, 2017
Messages
51
Reaction score
11
I am surprised no one at Hikvision could give you the correct part number, you only need to look up on the datasheet.

The junction box for this camera is the DS-1280ZJ-DM46.

You can also use DS-1272ZJ-120.
Thanks!! I knew about the second one (assuming that is "WML" as listed in the accessories list of their PDF document), but I had a very bad impression of getting one from them of this design for one of their larger cameras -- it fit very poorly and loosely and did not provide the weather protection that that particular camera needed (not an issue with this mini-dome.

As to the first one, absolutely no one suggested that -- even in the two calls (one named Richard, I don't recall the other name) at Hikvision US. It is odd that I was never able to find the PDF document that you link above. Instead, on the Hikvision site, I do find:
1. --> this has an accessory list, but doesn't list any conduit base
2. --> this has an accessory list, and only lists the CBD-MINI as a conduit base

It appears that the document you found for the 2543 has a 2020 creation date, yet I bought the first of those cameras in 2019. I wonder if they updated the manual more recently.

Anyway, I do appreciate your finding the reference to what is likely the correct base. I wish I'd known it earlier, as I now have two CBD-MINI. They each arrived after I'd given up waiting on the backorder and made my own first one. One of these I opened and tried to make it work before building my own second one, the other still in sealed box. I will see if B&H will take the latter one back.

I love these little cameras and am likely to buy more, so I'll keep this new base reference in mind.

Thanks again!
 

Securame

Pulling my weight
Joined
Mar 25, 2014
Messages
664
Reaction score
214
Location
Barcelona, Spain
Never heard of CBD-MINI, I guess that is a US only reference? I only know the worldwide referencies, not the rebranded ones.

Any Hikvision IPC always has a full datasheet that includes the accessories that work with that exact model. Sometimes the easier way to find it is just to google it, something like "site:hikvision.com 2cd2543"

The other one valid is DS-1272ZJ-120B, that one is good if you need to make alarm/audio connections and do not want to make them on the bracket, or if you need to put a power supply.

 
Top