
3tb WD Purple Drive/ External/BI Help
- Thread starter born2ride
- Start date
You are using an out of date browser. It may not display this or other websites correctly.
You should upgrade or use an alternative browser.
You should upgrade or use an alternative browser.
I install the WD 3 tb Drive inside pc with jumper and cable , powered up will not recognize drive. I swapped it out using same connections to a WD 80gb drive it power up and pc and it recognize and read drive. Any thought besides a DOA?
fenderman
Staff member
- Mar 9, 2014
- 36,890
- 21,419
fenderman
Staff member
- Mar 9, 2014
- 36,890
- 21,419
does it show up in the bios?The drive is not listed there. Only C drive is

lojix
Getting the hang of it
The drive is not listed there. Only C drive is
First, check that the HDD is recognized in the BIOS through the Setup Utility program. To enter the Setup Utility, do the following:
1. Make sure your computer is turned off.
2. Repeatedly press and release the F1 key when turning on the computer. When you hear multiple beeps or see a logo screen, stop tapping the F1 key.
Note: If a Power-On Password or an Administrator Password has been set to access the Setup Utility program, enter the password when prompted.
3. From the Setup Utility program main menu, select ➙ Devices ➙ ATA Drive Setup to view, enable or disable an internal or external SATA device. Confirm the HDD is listed.
- If HDD is listed: Continue on.
- If HDD is not listed: Power off PC, check cables are connected correctly and repeat.
Next, the HDD must be initialized within Windows
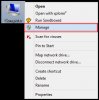
1. Right-Click on Computer, from the desktop (or got to Start and right-click on the entry Computer in the Start menu) and select Manage.
2. Under Storage, click on Disk Management
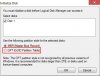
3. You will be prompted with a message to decide which partition style you want to use for the selected disk. As the drive is larger than 2TB use GUID/GPT (only readable by Windows XP 64-bit, Windows Vista, Windows 7, Windows 8/8.1, and newer)
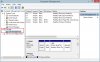
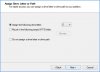
4. Next, you will see the list of hard drives. All drives with a blue bar have been allocated space and are primary partitions. Any hard drive with a black bar has not been allocated any space. In order to initialize a hard drive, you need to allocate the disk space.
Right-click on the hard drive with the black bar and select New Simple Volume.
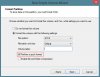
5. A wizard will guide the initialization process. By default, all available disk space will be allocated for the partition (you can change this if you want to create multiple partitions). Assign a drive letter to the drive, so it can be referenced by Windows, then click Next.
6. Enter a name for the New Volume. By default, the option Perform a quick format is selected, this is recommended.
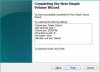
7. Finally, review the settings are correct and click on Finish.
If you have successfully initialized the hard drive, it will now show in the list and can be accessed from Computer.
Attachments
Last edited by a moderator:
Sorry on long delay. I have enable the drive in bios . I do not even see the ssd that is working in bios.. I am in wrong section?

If i swap out the purple drive for the one to the right. That drive shows up in computer.
]

If i swap out the purple drive for the one to the right. That drive shows up in computer.
]
lojix
Getting the hang of it
Sorry on long delay. I have enable the drive in bios . I do not even see the ssd that is working in bios.. I am in wrong section?
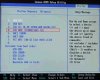
Without having access to your specific BIOS my direction may be a little sketchy, but...
You are in the section to enable the drives and the controller. I can see they are enabled. All good.
Now, you need to see what drives are actually being recognized in the BIOS. You may find them in the Startup menu.
CAUTION: Do not change settings you do not understand. Doing so may require aspirin. If in doubt, the fail-safe is to simply power-off the computer and settings will not be saved.
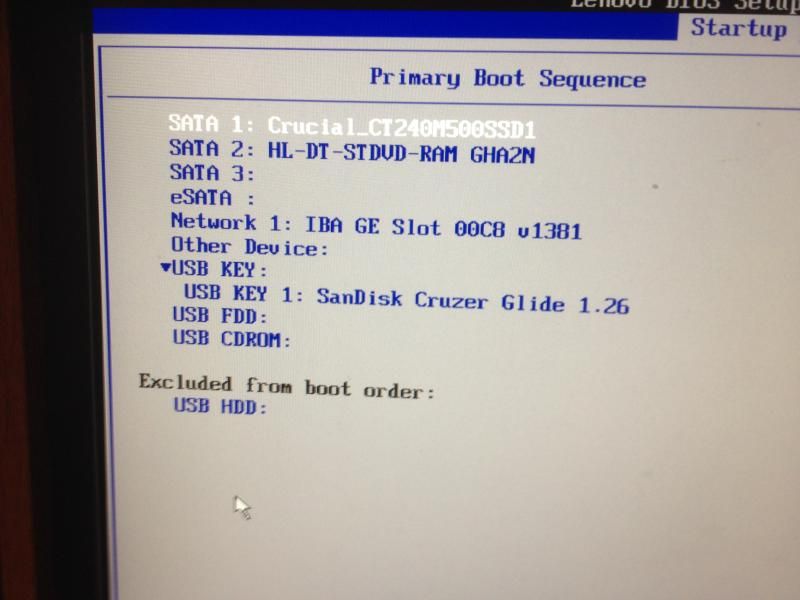
You can view or change the configured startup device sequence from this menu, our aim is just to view the available drives.
1. Start the Setup Utility program.
2. From the Setup Utility program main menu, select Startup (May also be in a submenu 'Boot device list').
3. Select the devices for the Primary Startup Sequence. You may need to toggle options to view unselected devices (Don't save any changed settings)
If the drives cannot be seen here, systematically navigate through the Utility menu until you find where the list is hiding.
Attachments
Thanks I found it ,with the 3TB drive connected bios does not see it,
with another test drive in place of 3TB
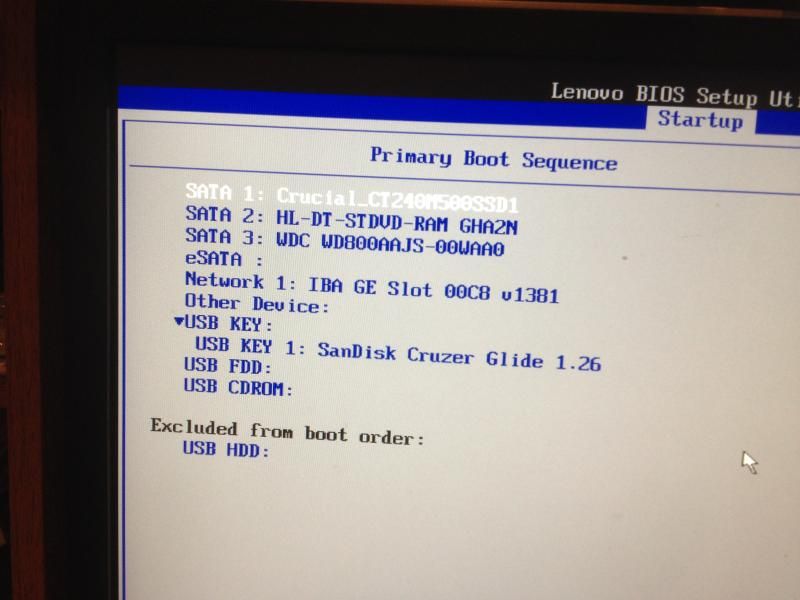
Possible dead drive or not able to see a 3TB?
with another test drive in place of 3TB
Possible dead drive or not able to see a 3TB?
lojix
Getting the hang of it
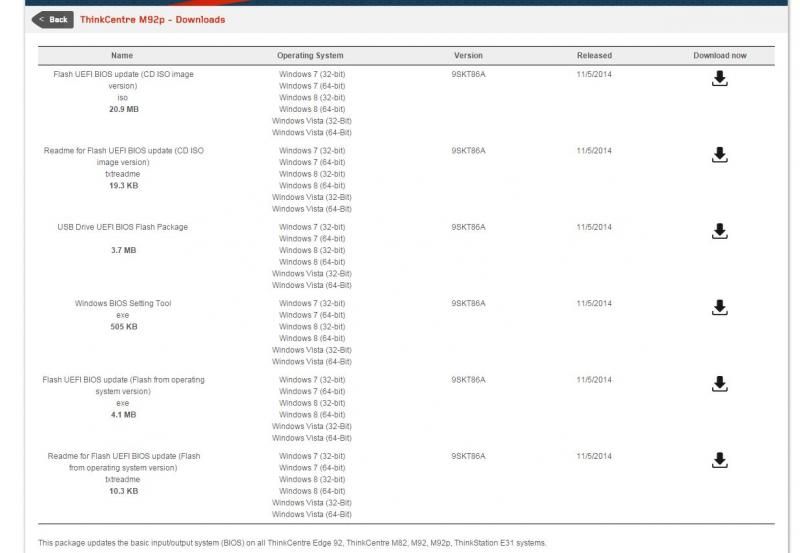
hmmm. Okay. The BIOS may not recognize anything above 2TB. In which case I would think there is a patch for. Check to see if there is a BIOS update for your motherboard. Hopefully that will be it. It would be very bad luck to have a dead drive, but not impossible. Can you hear the drive spool up when powering on?
This what came up on site for m92p . What do I need? I am gathering to find bios version I boot into it?
I tested drive in a portable unit no noise at all. thinking its dead
I tested drive in a portable unit no noise at all. thinking its dead
Last edited:
lojix
Getting the hang of it
lojix
Getting the hang of it
This what came up on site for m92p . What do I need? I am gathering to find bios version I boot into it?

...but If you are not running a UEFI BIOS, I would highly recommend doing the update. If this is a process you are not comfortable with, then I would advise to seek further assistance and not to make any changes. Caution must be taken during a BIOS update, if anything were to go wrong it could potentially render your motherboard useless.
With that said... some careful planning, reading the procedure from Lenovo, even looking for any videos on Youtube to make sure you have the process completed properly, I'm sure you can manage it. I would suggest doing the 'USB Flash' method', alternatively the 'Flash from within OS' method.
Edit: In the Image - The bottom 'USB method' should read 'From within OS' method' :stupid:
Attachments
Last edited by a moderator:
aaronwt
Getting the hang of it
How old is the PC to not be able to see a 3TB drive? Even an old PC I have from nine years ago will recognize a 3TB drive. it will even recognize 6TB drives.
if the drive is actually dead just exchange it where you purchased it. If it was purchased from a place like Newegg, Newegg will pay for return shipping. And ship out a replacement. Otherwise if you go through the manufacturer for a replacement then you will probably need to pay to ship it.
if the drive is actually dead just exchange it where you purchased it. If it was purchased from a place like Newegg, Newegg will pay for return shipping. And ship out a replacement. Otherwise if you go through the manufacturer for a replacement then you will probably need to pay to ship it.
I did a rma on drive . the new one should be here in a day or so. I will keep you posted ! In the mean time I will look into the bios!
Last edited: