Dahua has a new water proof junction box PFA130-E / PFA130E for Turrets ( PFA137, PFA139 )

iseeker

Getting the hang of it
Joined
Nov 16, 2018
Messages
229
Reaction score
90
Location
TEXAS
OK. Working on my first ip camera install. I've got the following equipment from Andy:

IPC-HDW2231R-ZS
PFA130-E

I need some help. I cannot figure out how these piece fit together. Will be mounting under eaves of my house. Are there not step by step instructions some where for how to use this mount? Basically three pieces: the junction box w/ "lid" and then the camera. Please help.
 

iseeker

Getting the hang of it
Joined
Nov 16, 2018
Messages
229
Reaction score
90
Location
TEXAS
Edited after install.

OK. Now I see that the camera comes apart in to three pieces as well which allows me to screw the bottom of the camera in to the lid of the junction box. So --

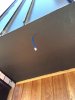
1 - apply the install sticker template and drill holes. I did mine under the eaves, so I didn't pay attention to the up/down markers. I drilled a hole smaller than the sticker template since I only had cat6 going through the middle. I also left a pull cord if I need to get cat6 to this location again.
2 - install the rj45 plug and test. Make sure you put the weather resistant cover through the cable first on the other side of the plug (and face it the correct way)!
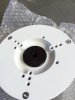
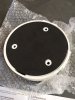
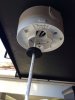
3 - install the bottom bracket of the box to the eaves with the ethernet cable going through the middle. Remove enough foam to fit cable through the bottom of the junction box. I just used a pocketknife and split the foam in the middle since only cat6 hanging through
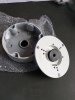
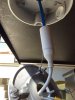
4 - Put the cords attached to the camera through the rubber gasket/grommet on the cover plate of the bottom bracket. I allowed this setup (including the camera) to hang from the cover plate; maybe there is a better way but I don't know what it is and this seemed secure enough. Leave 3 inches or so of cable outside of the grommet (i.e. - you don't want it fully snug to the grommet since it needs to move some when you rotate the camera).
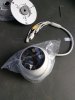
5 - install the weather resistant cover (came with camera; need to put on the cat6 line before installing the rj45 plug) and rj45 jack with a little dielectric grease (purchase separately; i used crc brand; HD was cheaper than Amazon)
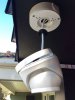
6 - screw on the lid of the junction box. You'll need to mess with the cables to get them all in there without crimping the cat6. be careful. they do fit.
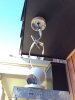
7 - screw bottom of camera to the lid of the junction box
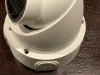
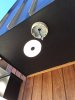
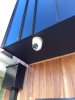
8 - put the "hood" of the camera on (has a little tab on one side that you just need to dip in place first) and tighten the set screw 60-80% (you still want to be able to adjust the viewing angle).
9 - position camera and view on your computer for the proper viewing angle. I had to take off the hood and adjust the cable to get the camera to adjust to where I wanted it.

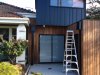
Edited - got my IPC-HDW2231R-ZS installed with the PFA130-E. First camera install and cable pull. Wow. That was a lot of work. 2nd one will be much quicker after the learning curve.
 
Last edited:

windguy

Getting comfortable
Joined
Sep 25, 2019
Messages
285
Reaction score
289
Location
Pacific Coast
Does anyone know if Dahua makes a junction box that fits the T5442TM-AS without having that extra 1/4" around the edge.
The 5231 circumference fits the PFA130-E junction box perfectly. Looking for something that has that cleaner look.
Thanks!
I was wondering the same thing. I'm in the pre-install phase and figuring out my next steps. The mounting base of the T5542 overlaps the hole pattern on the top cover of the PFA130-E junction box, as shown in tran383's picture and the one below. If you first mount the camera to the top cover, then the top cover's mounting screw heads won't make it past the edge of the camera base. I got around that by pushing the top cover screws down first before mounting the camera base. It's a workaround method but just seems odd. Maybe I'm missing something here, as usual.

turret jbox 02.jpg
 
Last edited:

windguy

Getting comfortable
Joined
Sep 25, 2019
Messages
285
Reaction score
289
Location
Pacific Coast
As mentioned above, I'm in the pre-install phase and sizing up the junction boxes that I have and how best to install them. This thread seems to offer the best help in junction box installs. Was wondering if any new tips and methods can be added to help?

PFA-130E J-Box for Turret - Is anyone using a grommet to feed the Cat 5e cable through the back or bottom port hole in the base? The bottom port hole is threaded like the two side ports. I would be mounting the junction box to a stucco wall feeding the data cable through the back without conduit in two locations that can get wet. The other two locations will have conduit feeding into the junction box.

PFA-121 J-Box for Bullet - I have one of these for a B5442 varifocal. Similar question, but this junction box does not have a threaded port hole in the base. Only one side threaded port.
Second question on this junction box. There are two studs in the box with machine type screws installed, I first figured they were for ground lugs until I got the PFA-130E box, which has the same stud used for the safety cable attached to the lid. The bullet junction box does not have a safety cable. See pics below for a comparison. Just curious about its purpose.

bullet jbox 01.jpgturret jbox 01.jpg

Stucco Mounting Screws - What are others using to mount junction boxes to stucco in a wall mount config? Someone on another thread about mounting conduit said they like to use Tapcons, which I've used before for heavier duty masonry applications. Also have used masonry anchors with limited success. Sometimes those can pull out if stressed. I'm more concerned about the bullet cam since it's a lot heavier than the turret. The bullet cam hardware packet has a set of decent looking anchors and screws. Was wondering if others have had success using them for stucco mounts? The turret cam also includes a set of anchors and screws, but not as beefy as the ones for the bullet. Was wondering if others have used them as well?

Thanks for the help!
 
Last edited:

windguy

Getting comfortable
Joined
Sep 25, 2019
Messages
285
Reaction score
289
Location
Pacific Coast
Bumping this thread to the top of the heap.
I had a few questions in the last two posts here. Thanks!
 

dudemaar

Known around here
Joined
Aug 18, 2018
Messages
1,181
Reaction score
2,521
Location
Canada
I’ve used 2-3 inch deck screws to mount onto stucco. You have to reach the plywood that’s behind the stucco. That’s if there is plywood behind the stucco? Just don’t torque the screws to crazy tight or you will cave in the stucco.
 

dudemaar

Known around here
Joined
Aug 18, 2018
Messages
1,181
Reaction score
2,521
Location
Canada
39CCCE90-415A-4300-BDEF-8907D881D10C.jpeg63B53ECC-7068-4998-95F3-5B736B69BEC2.jpegB34D000F-CA83-4AD3-BCC0-F26D40BDBF42.jpeg8A92D68A-FF6C-4069-8498-45F7C9950296.jpegA6D74F19-7597-4480-9A53-1B058107DF15.jpeg

Sub assemble everything first.
Try to hammer drill the hole into brick on a upward angle so no water gets in. Caulk a nice bead of clear outdoor caulking around the top half of box, after box is mounted. Use your finger to spread the bead out for a good seal. You can also drill a small drain hole into bottom of box.
 
Last edited:

windguy

Getting comfortable
Joined
Sep 25, 2019
Messages
285
Reaction score
289
Location
Pacific Coast
@dudemaar - thanks for the tips. We have an older house with no plywood backing. Stucco is around 1" thick.

Looks like you used those blue Tapcons for mounting your junction box to the masonry blocks.

For the bullet cam location, I might be able to tap into studs. Will have to inspect closer. I was planning on drilling the cable port hole in a narrow gap between two studs off the side of the garage door so attaching to the studs might be doable and provide a good grip. Good idea. The bullet camera is the one I'm most concerned about because of the weight.

Still would like to know if anyone has had success using the mounting screws and anchors supplied with the cameras. Thanks!
 

dudemaar

Known around here
Joined
Aug 18, 2018
Messages
1,181
Reaction score
2,521
Location
Canada
I use the supplied anchors and screws if I’m mounting to really old brick or mortar lines. In your case I would use the supplied anchors into stucco. Tap cons don’t usually work unless you shove a piece of zip tie into hole first.
 

mat-with-one-t

Getting the hang of it
Joined
Mar 7, 2020
Messages
85
Reaction score
27
Location
Melboure
Can I please also ask a silly question regarding the pfa130-e mount?
As you can see, my camera has a boatload of connectors, but I’ll only be using the cat6.
I will mount the camera under an eave, and as you can see, just my Cat6 is sticking out. I’ve terminated it with an rj45 plug and it tests fine. If I must (but would rather not) I can cut the connector off and start again. There’s plenty of cable slack in the eave to play with in need be..... BUT, help me through this....

- so I’ll use the template and mount the pfa130-e. I have at least one screw to go into solid timber, so the other 2 will just help stabilise

- as per others, I’ll make a little hole on in the backing foam of the mount plate to get the Cat6/RJ45 through? It looks like the waterproof rj45 male>female connector cover (that came with the camera) can go on after the fact, so I’ll add that as I go.

- now, there’s a big black rubber grommet at the base of the pfa130-e mount base plate (at interface between mount plate and camera base plate). (can pop out). There’s no slit in it. As you can see, there are a lot of cables out of the camera. Am I to assume I should simply cut a slit in the black grommet and have the initial single cable from the camera run through it? Thus, I will stash all the other unused cables inside the pfa130-e mount?

- there’s a braided steel cable holding the camera-side plate of the pfa130-e to its main body. Is this so I can mount the camera (following the camera mounting instructions) without it falling to its death, or is it for something else?

Thanks in advance guys!
 

Attachments

Last edited:

mat200

IPCT Contributor
Joined
Jan 17, 2017
Messages
13,655
Reaction score
22,749
..

- there’s a braided steel cable holding the camera-side plate of the pfa130-e to its main body. Is this so I can mount the camera (following the camera mounting instructions) without it falling to its death, or is it for something else?

Thanks in advance guys!
Hi @mat-with-one-t

hmmm I thought the steel cable was some sort of ground wire.... not really certain. Could be for what you are describing.

In terms of the other connectors from the camera that you do not plan to use, I used coax seal / silicone stretch tape and wrapped it around each end and then stuffed back into the junction box. ( do not cut them, you may want to use them in the future )
 

Mr_D

Getting comfortable
Joined
Nov 17, 2017
Messages
596
Reaction score
527
Location
Southern California
Can I please also ask a silly question regarding the pfa130-e mount?
As you can see, my camera has a boatload of connectors, but I’ll only be using the cat6.
I will mount the camera under an eave, and as you can see, just my Cat6 is sticking out. I’ve terminated it with an rj45 plug and it tests fine. If I must (but would rather not) I can cut the connector off and start again. There’s plenty of cable slack in the eave to play with in need be..... BUT, help me through this....

- so I’ll use the template and mount the pfa130-e. I have at least one screw to go into solid timber, so the other 2 will just help stabilise

- as per others, I’ll make a little hole on in the backing foam of the mount plate to get the Cat6/RJ45 through? It looks like the waterproof rj45 male>female connector cover (that came with the camera) can go on after the fact, so I’ll add that as I go.

- now, there’s a big black rubber grommet at the base of the pfa130-e mount base plate (at interface between mount plate and camera base plate). (can pop out). There’s no slit in it. As you can see, there are a lot of cables out of the camera. Am I to assume I should simply cut a slit in the black grommet and have the initial single cable from the camera run through it? Thus, I will stash all the other unused cables inside the pfa130-e mount?

- there’s a braided steel cable holding the camera-side plate of the pfa130-e to its main body. Is this so I can mount the camera (following the camera mounting instructions) without it falling to its death, or is it for something else?

Thanks in advance guys!
Yes, you can cut a slit in the big rubber grommet. Mine came already cut but I guess they missed that step on your's.

Yes, the steel cable is for keeping the lid and camera safely tethered to the box.
 

mat-with-one-t

Getting the hang of it
Joined
Mar 7, 2020
Messages
85
Reaction score
27
Location
Melboure
Did you cut a slice into the black rubber bung in the bottom of the mounting plate to get the cable through?
 

mat-with-one-t

Getting the hang of it
Joined
Mar 7, 2020
Messages
85
Reaction score
27
Location
Melboure
Ok 1st one (ever!) done....
A few observations that may be helpful....

- the waterproof connector that comes in the camera box CAN be installed AFTER you have terminated your cable with an RJ45 plug, so you can terminate the cable and test it with the camera before doing anything further

- the black rubber bung needed to be cut with a sharp knife to allow it to be placed over the camera’s main cable. I note that some guys in his thread found the bung pre-cut

- the excess cables really need a bit of stuffing into the mount base, but they’ll fit!

- the main camera assembly can come apart using the little whit plastic button on the side. This makes it easier

- not sure about the stainless cable’s function?

- pretty fiddly to attach camera, as there’s a real chance of dropping it! Be careful. I used my ladder as a platform, but take care!
 

Attachments

Joined
Jan 25, 2017
Messages
1
Reaction score
2
Looks good. The stainless cable is used to prevent the camera and cover from falling while being but on or during servicing. Weird that your rubber bung needed to be cut, every one I have used were all pre cut. That said the cut is not very obvious. Great job
 
Top