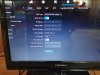
The NVR currently is set to DHCP, meaning the router assigns it an IP and it has assigned 192.168.100.4 to the NVR's LAN.
The router's DHCP pool is likely from 192.168.100.2 to 192.168.100.199, meaning you can probably use 192.168.100.200 to 192.168.100.254 for your use.
Ideally, you'd want to log into the router's LAN/gateway IP at 192.168.100.1 and reserve IP's for your use BUT you said your ISP has "locked down" your router. We'll gamble that you can use from 192.168.100.200 to 192.168.100.254.
Slide the "DHCP/IPv4" switch to the left, setting it to "Manual" or "Static".
For IP address (the NVR's LAN , the first entry), enter 192.168.100.200
For subnet mask, enter 255.255.255.0
For Gateway and Preferred DNS server, enter 192.168.100.1
Double-check all IP entries.
If correct, click on "Apply" button.
Go back to my previous instruction how to give your PC a static IP in the same subnet as the cam's default IP; set PC to 192.168.1.22, subnet mask of 255.255.255.0 and log into cam's webGUI at 192.168.1.108 (assuming it has been hard reset to defaults).
Go to cam's "network" / "TCP/IP" settings and change the static IP to 192.168.100.201, subnet mask to 255.255.255.0, gateway to 192.168.100.1, preferred DNS to 192.168.100.1; check all entries and if correct, click on "Save" or "Apply."
Now the cam and the NVR's LAN are in the same subnet as your router, 192.168.100.XXX; the router is 192.168.100.1, the NVR is at 192.168.100.200 and the cam is at 192.168.100.201.
Change your PC's NIC to either DHCP so it will receive an IP of 192.168.100.XXX from your router or better IMO, assign it a static IP of 192.168.100.222, subnet mask of 255.255.255.0, gateway and preferred DNS of 192.168.100.1.
Now the PC should be able to log into the cam using the cam's newly assigned static IP of 192.168.100.201.