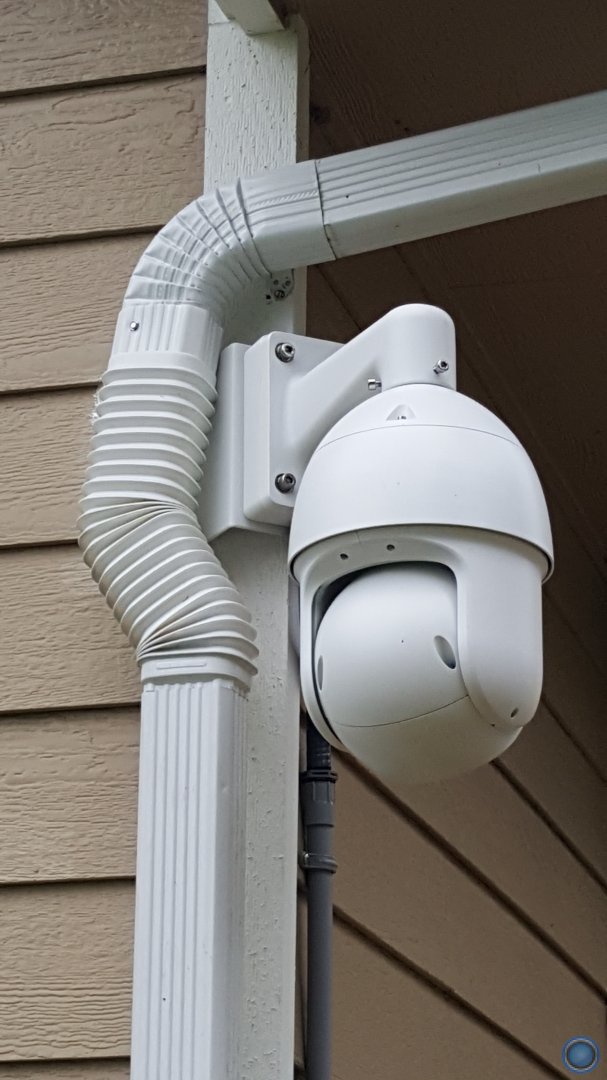
Review-I'll be the guinea pig for the new SD59225U-HNI PTZ.

Q™

IPCT Contributor
Joined
Feb 16, 2015
Messages
4,990
Reaction score
3,989
Location
Megatroplis, USA
Remember: this is my house, where the PFA151 corner bracket clears my downspout. I would recommend that you purchase a PFA151 corner bracket and hold it up to the corner of your house to determine if it will work for your particular downspout. thumbsup.gif
 

micoinde

Getting the hang of it
Joined
Mar 16, 2014
Messages
85
Reaction score
70
Here’s the solution for my PTZ. On the aluminum siding corner I used vinyl siding mounting plates / blocks from the local hardware store to level out the corner bracket. This provided enough clearance for the downspout. IMG_5710.jpg


Sent from my iPhone using Tapatalk
 

Wildcat_1

Known around here
Joined
Dec 9, 2018
Messages
2,046
Reaction score
5,861
Location
US
Thanks all for the replies very much appreciated. I have a number of options to try here.

A quick noob DIY question for this install. What is the depth usually of the wood siding vs void vs interior wall ? The reason I ask is, looking at some of the responses something like 3/8" lags seem to be the way to go. As most of those are 5" or longer, wanted to make sure that I didn't pierce into the interior wall :) Would not sit well if that happened.

@iptgmau is that a PFA151 corner mount or something else ? Assume the mount also clears (visually) the downspout for the PTZ ? Nice install

@CCTVCam thanks for all the detail, very helpful ! WRT to the 20', the side is on a slope so that would be 20' from pavement/sidewalk but about 10 - 12' from garden level if that helps explain it a little better. Due to the slope on the side of the house vs the grade of the front and back yard it makes it hard to pick a good height that is not too low in 1 place or too high in another.

@Q I think I might see if I can find a PFA151 locally or for quick delivery (maybe Amazon) to try this. Would prefer to by from Andy of course but in this case if the mount won't work can at least return it.

If all else fails then my plan is to punch out of the basement, run the POE up the wall in schedule 40 into a PFA120 then out through the PFB305 and into the cam. Mounting as close to the corner and as low as feasibly possible will also mean I should (hoping the arm extends out enough) get a blind spot in view as well. Was then thinking about augmenting this side further along at a lower level with something like a 5321E-Z12E so I can dial in the focal length and have that as a 2nd cam in this location. In time would be great to use that as a target for the PTZ but as I am still using a Lorex NR908x (where IVS has been stripped by Lorex) not sure I will have that option for a while.

Still also keeping an eye out for a good cam to use in a porch for entryway monitoring. Something with wide enough FOV that it can compare with a Ring Pro (the FOV was perfect for the area at 160 degrees) but of course in higher quality and without any cloud reliance. Still looking at something like a IPC-HDBW4231F-AS for that.

Thanks again all, please keep any additional tips coming and I will certainly report back once installed and up and running.
 
Last edited:

Q™

IPCT Contributor
Joined
Feb 16, 2015
Messages
4,990
Reaction score
3,989
Location
Megatroplis, USA
A quick noob DIY question for this install. What is the depth usually of the wood siding vs void vs interior wall ? The reason I ask is, looking at some of the responses something like 3/8" lags seem to be the way to go. As most of those are 5" or longer, wanted to make sure that I didn't pierce into the interior wall :) Would not sit well if that happened.
Common construction standards is usually nominal: 2x4 (actual 1.5x3.5...which is dated...and/or nominal 2x6 (actual 1.5x5.5)...plus the depth of exterior sheathing and interior wall board; don't hit any heating pipes. cursing.gif
 

Wildcat_1

Known around here
Joined
Dec 9, 2018
Messages
2,046
Reaction score
5,861
Location
US
@Q, thanks so the 3/8" x 5 should be good without going through the interior wall and taking out a TV, ceiling fan etc ? :)
 

iptgmau

n3wb
Joined
Apr 6, 2018
Messages
2
Reaction score
3
@iptgmau is that a PFA151 corner mount or something else ? Assume the mount also clears (visually) the downspout for the PTZ ? Nice install

It's a corner mount PFA151 purchased from B & H out of NYC. I cut out the GP siding and used 1" white PVC under the corner mount. Screwed the PVC to the under layment (OSB) so the camera is plumb. I hit the studs at least on one side. Pre drilled the PVC for a tight fit of SS lag bolts. Cauked everything.

Everything cleared nicely.

The horizontal down spout could be a little longer to look really nice.

Gordon
 

CCTVCam

Known around here
Joined
Sep 25, 2017
Messages
2,660
Reaction score
3,480
@Q, thanks so the 3/8" x 5 should be good without going through the interior wall and taking out a TV, ceiling fan etc ? :)
Your best option is a proper bracket. If that won't fit, then perhaps it's time to consider other DIY options, however, as you identified screwing deep into a wall is not without risk. If you can get the plans to your house, the wood should be specified. What you don't want to be doing aside from screwing all the way through, is just screwing a bracket that's got a heavy load on it just into the clapboard or trim board as the screws will likely pull out. You really need to be a good depth into the post without going through. With a bracket where the holes on each side are opposite each other, you want screws that stop just before 1/2 way to stop them meeting each other. Pipes and cables can be found with a detector, although beware they're not always 100% right, especially DIY priced ones. Also, a bit of common sense goes a long way here. Take a look at what's in the room behind the corner where you're going to screw for obvious signs of pipe work or cable routing. It's not fool proof but a visual inspection is a good place to start, followed by detecting etc. If you want to know the exact dimensions of the corner post, another option would be to lift the end of the trim board at the top or bottom of the wall and peak behind, then tack the trim board back.
 

Q™

IPCT Contributor
Joined
Feb 16, 2015
Messages
4,990
Reaction score
3,989
Location
Megatroplis, USA
@Q, thanks so the 3/8" x 5 should be good without going through the interior wall and taking out a TV, ceiling fan etc ? :)
That should be a perfect size to adequately piece a heating pipe and cause you to bear a $2,000.00 repair bill. :eek:
 

Wildcat_1

Known around here
Joined
Dec 9, 2018
Messages
2,046
Reaction score
5,861
Location
US
That should be a perfect size to adequately piece a heating pipe and cause you to bear a $2,000.00 repair bill. :eek:
Thanks @Q that is just what I need to take my DIY experience to the next level ;) shame that SPAX don’t do a 3/8” exterior powerlag in a shorter length though.
 

Wildcat_1

Known around here
Joined
Dec 9, 2018
Messages
2,046
Reaction score
5,861
Location
US
Your best option is a proper bracket. If that won't fit, then perhaps it's time to consider other DIY options, however, as you identified screwing deep into a wall is not without risk. If you can get the plans to your house, the wood should be specified. What you don't want to be doing aside from screwing all the way through, is just screwing a bracket that's got a heavy load on it just into the clapboard or trim board as the screws will likely pull out. You really need to be a good depth into the post without going through. With a bracket where the holes on each side are opposite each other, you want screws that stop just before 1/2 way to stop them meeting each other. Pipes and cables can be found with a detector, although beware they're not always 100% right, especially DIY priced ones. Also, a bit of common sense goes a long way here. Take a look at what's in the room behind the corner where you're going to screw for obvious signs of pipe work or cable routing. It's not fool proof but a visual inspection is a good place to start, followed by detecting etc. If you want to know the exact dimensions of the corner post, another option would be to lift the end of the trim board at the top or bottom of the wall and peak behind, then tack the trim board back.
Thanks @CCTVCam. Yes trust me I want to take this one very carefully, especially with the weight of the unit. I did order a PFA151 so I can at least see if I can make it work.

My other other option (only other one I think makes sense) is to pendant mount it into a 2nd story eave (lower floor would hang this cam too low) and run it off a branch switch up into the attic. That would give me a great 2 side view but of course would be a lot higher up and then really only serve as a overview cam. Then although 25x would still be enough it would beg the question that the 45 may have been better if placing that high.

Will wait for the mount to show up and do a dry run to see if that works. If not then I still planned on using the Dahua junction box but obviously although that is design to take the cam it won’t spread the load as wide as the mount would.
 

Wildcat_1

Known around here
Joined
Dec 9, 2018
Messages
2,046
Reaction score
5,861
Location
US
That is probably why I choose 5/16" bro.
Yeah just a shame no 3/8’s in that length ;) I’ll let you all know when I start the project in the next few days and take lots of pics before and after :)
 

Wildcat_1

Known around here
Joined
Dec 9, 2018
Messages
2,046
Reaction score
5,861
Location
US
Another question for those that have installed these larger cams. Any of you mounted foam behind the bracket or junction box to create a sandwiched layer of sound insulation for the rooms beyond the exterior wall ? Just wondered if a) sound travel was a thing with these cams (read some people have experienced but a lot have not and b) anyone tried the approach of the foam or equivalent idea. Obviously you would compress the foam as part of the finished install just wondering if that has helped or even been attempted by any here. Thanks again
 

looney2ns

IPCT Contributor
Joined
Sep 25, 2016
Messages
15,521
Reaction score
22,657
Location
Evansville, In. USA
Yes I've reset the 59225 back to defaults and reconfigured everything from scratch, it doesn't seem any different to just upgrading so far.

The limited information is still there under the lifetime stats compared to the older versions - not sure why they've hidden it unless they want to start making some of them warranty exclusions and they don't want end users having the ability to see this?
Do you still approve of this firmware? ;)
 

reverend

Pulling my weight
Joined
Jun 18, 2015
Messages
310
Reaction score
193
Location
UK
Do you still approve of this firmware? ;)
I've been away from home a couple of days and I have noticed something weird.

Before I went away I turned off the daily reboot, and the camera was offline for a short while yesterday morning which I noticed while checking Blue Iris. It came back online itself so I assumed nothing was wrong and it was just a glitch and had sorted itself out.

Just looking at my syslogs and see the switch has been reporting a port flapping and it was the 59225 and it's been randomly going offline & online for the last few days. The logs show the camera is still receiving power and it's just the data side going offline / coming online so the camera isn't actually rebooting.

I've just done a manual reboot to see if it stabilises again (the PTZ1A225U-IRA has been fine with the daily reboots).

As a whole stability wise this new firmware has been way better for me, I just need to figure out whether this one that has started happening is a new potential cable / connector fault (we had temps of about -6c the other morning) or whether it's just been unhappy after the camera has been up 4 or 5 days without a reboot. If it still flaps I'll cut the connector off the network cable and reterminate it :)

Autotracking is still bonkers but stability wise (in terms of the admin interface being available) this is definitely a step in the right direction - if you use microSD cards and you've had issues with the cameras hanging this is an essential upgrade :headbang:
 
Last edited:
Top