I was able to get BrickFixV2 applied but that always takes me back to Min_System.
I get success in installing a bunch of different versions of firmware, but it never will ping or show up in SADP afterwards. How long should I wait?
Yes, the brickfixV2 firmware is a modified min-system, without the downgrade block and with the ability to re-write the flash partition that holds values such as the language, and with the ability to do a direct update to the 5.4.5 firmware.
This is all handled by the in-built fixup script.
Yes, the brickfixV2 firmware is a modified min-system, without the downgrade block and with the ability to re-write the flash partition that holds values such as the language, and with the ability to do a direct update to the 5.4.5 firmware.
This is all handled by the in-built fixup script.
The min-system runtime environment should show up in SADP as firmware version 4.0.8
That only changes the language flag in the firmware header - it does not change the language of the camera.
When the brickfixV2 script applies the suitably-modified-for-language mtdblock6 - the camera language is changed.
Ok, so it seems my camera is all ready to be upgradeable. I followed all the steps. Changed the MTD_06 to fix the camera to a 26 98 changed the language block to an 01 and figured out the checksum value as 63 0D
that has been applied to the camera.
I've applied a multitude of versions of digicap.dav files thru both using the /dav/fixup.sh and also the lines:
# tftp -r digicap.dav -g 192.0.0.128
# upgrade
once I unplug & repower with reset button pressed for 30 seconds, the camera dissappears from both 192.0.0.64 and SADP to not be seen again until I reapply the BrickFix Min_System. Is my camera SOL?
One possibility is a partial flash failure that's stopping the device from running normally.
There have been a couple of posts about devices that have failed in that way after an update.
But either way, it seems like the hardware is misbehaving.
If you wanted to spend more time exploring that, or confirming the problem, you'd need to connect to the serial console of the device.
This would need these 2 items :
A wired 4-pin 1.5mm ZH JST connector, usually sold in 10-packs.
A serial TTL to USB convertor, such as a PL2303TA-based device or similar.
I'm also one of the unlucky ones. After the success with the initial TFTP of the brickfixv2 It will ping 1-3 times on boot and if tftp is running i will see the test line then nothing else and the ping dies.
I also have another indicator. Although the port shows UP on my HP Switch the mac-address isn't registering.
Unfortunately SADP shows nothing, I was never able to get into telnet after the initial breakfix tftp. I tried the 192.168.1.64 as well but nothing.
I've seen the replies regarding trying serial but I'm out of steam with this thing at least for now.
With my original message I just mainly wanted to pass on that it doesn't register a mac address with my switch, anytime I have seen that happen with other devices it's game over but who knows.
so guys i'm going to throw in the towel. It is too complex for me. I have been coming here repeatedly for years looking for solutions.
This is what ssh comes out of
then you tell me
Thank you.
Paul
There isn't enough info in dmesg to show why the normal bootup is not completing normally.
To get more detail, you'd need to connect to the device serial console.
To do this, 2 items are needed :
A 4-pin 1.5mm wired ZH JST connector, usually sold in 10-packs.
A USB to serial TTL adaptor, such as a PL2303TA-based device.
First off, big thanks to alastairstevenson.
Fixed six DS-2cd2232-IM with no problems with your debrick tool. Thanks to everyone who asked questions also, it helps alot. quick Something that helped me with long boot loop was another thread where someone had checked for water damage whlie fixing rj45 plug and they removed the lens ribbon to check for any damage inside.. I just happened to look for a reset button on a different brand DS-2cd2232-IM and removed the lens ribbon. i redid the ribbon, (found it easiest to put it on camera first then the lens) and it showed fw5.2.5. and now running 5.4.5. Worth checking if all else is failing, It worked for me
One question I have , has anyone use the fw IPC_R0_EN_STD_5.4.800_210813? It is on the hikvisioneurope portal but I search and found nothing on it here or anywhere else. Has anyone tried it? Is there any reason to or not to upgrade to it. I am happy with 5.4.5 but worry it might fix a another backdoor. I am a little shy of loading anything without asking with the update game they play LOL.
Thanks again to all and Stay healthy and safe. Merry Christmas!
has anyone use the fw IPC_R0_EN_STD_5.4.800_210813? It is on the hikvisioneurope portal but I search and found nothing on it here or anywhere else. Has anyone tried it?
I've seen that also, have not tried it, and wondered why it appeared as the @bashis PoC tool showed that an R0 with 5.4.0 160530 was not vulnerable to the CVE-2021-36260 exploit.
I keep that firmware version as it has the 'Hikvision backdoor' vulnerability so I can use the camera as a trojan horse to extract NVR admin passwords.
And initially, R0 models didn't appear on Hikvision's original affected table, since removed and put behind a page requiring a login. Which I didn't wish to do ...
But use-ip has it listed, though it's not clear if that is because it was in the original Hikvision table or has been added since.
Yesterday evening I received an email from Hivision detailing a critical vulnerability in a number of their products and a link to new firmware. The advisory is: Here It appears I have two camera models affected by this, as they match the document, but the link to new firmware produces no...
I went ahead and loaded the 5.4.8 fw on to a DS-2CD2232-IM with china serial #, (just one of six for now). So far no problems over 24hrs. I will let you know if there is any problems down the line.
I always wonder if the updates are protecting us from a backdoor or creating a backdoor? I am not too worried about it. I am just starting out with IPCams so I went with used ebay cameras where the price of 6 used was the same as 1 new, ran some cat 5e and only have 2 rules, don't point the cameras at anything you don't want others to see and protect the home network. Not sure how I'm going to do that yet but am still in the research phase. my internet is tops out at 1.5mb but have fiber box on the house and just waiting for final install of 1gig internet so that will open the cloud options or my own ftp.
Thanks again for everything you and everyone else do here.
The original 'brick-fix tool' and 'enhanced mtd hack' has proven pretty useful for those with R0 cameras that had been bricked by doing a firmware update.
It's been even more useful to deal with the fallout from the 'Hikvision backdoor' disclosure where so many people are finding their cameras are being messed with from the internet, mischievously or maliciously, and need to update to safer firmware.
However - the rather techy original method to make the changes, and probably my not-very-clear instructions have been a challenge for some people.
* And I only just noticed this - my original .txt attachments were in Linux format, not Windows format, making them hard to read without proper line breaks. And no-one let me know! Dohh! *
So here is 'Brick-fix tool V2' aimed at making the process less complex, a bit automated and easier to use, with the following changes:
After Brick-fix toolV2 has been installed using the Hikvision tftp updater, following the power cycle to activate and drop the payload, the camera will boot directly into 'min-system' mode with telnet and tftp access and a 'fixup' script ready and primed for use.
No web GUI access or Windows shares are needed to move files in and out of the camera.
The fixup script handles all the basics of extracting the original mtdblock6, importing and applying the user-modified mtdblock6 that has had the 'enhanced mtd hack', and initiating a firmware update.
The Brick-fix toolV2 automatically writes a valid template into mtdblock1 that stops cameras that originally had firmware 5.2.0 or 5.2.8 from otherwise going into a bricked state when newer firmware is applied.
Attached to this post are the resources required to convert your R0 / DS-2CD2x32 cameras into full English upgradeable devices.
The brick-fix tool V2 in both EN and CN header language versions (brick_fixv2.zip).
A required resource list and step-by-step guide to the fixup script.
A description of how to do the 'enhanced mtd hack' with screenshot with a list of devType codes for those cameras that have the masqueraded values.
A sample transcript of the fixup script going through all 3 stages - extract mtdblocks, import modded mtdblock6, apply firmware update.
edit 15Dec17 By popular request, a video worked example using a DS-2CD3332-I camera donated by a generous forum member.
Hikvision's really useful SADP tool. This will find your Hikvision device on the LAN whatever it's IP address, allow 'activation', and change of IP address. - SADP Tool
Step By Step Guide:
Here are the steps to take when using the brick-fixV2 tool to recover a bricked camera, and running the fixup script to change the camera to English / upgradeable. The camera doesn't have to be bricked to run the brick-fix tool if all that's required is a helping hand doing the 'enhanced mtd hack'.
Create a folder on the local drive of your Windows PC to hold the Hikvision tftp updater, the chosen tftp server program (e.g. jouinin.net version), the unzipped 'brick-fixV2' files, and the Hikvision firmware to use for updating. The HxD hex editor should be installed on the PC.
With the PC and the camera each on a wired connection (not WiFi) set the PC IP address to 192.0.0.128, subnet mask to 255.255.255.0 The default gateway does not matter.
Make a copy of brickfixV2EN and name it as digicap.dav If the EN version does not work, e.g. "System update completed" is not displayed in step 5 or you don't get the login prompt when trying to telnet in step 8, try the CN version.
Start the Hikvision tftp updater tftpserve.exe and if a Windows firewall popup appears, click OK to accept what the program needs.
Power on the camera and observe the status messages in the tftp updater. Hopefully you will see 'System update completed' after 2 or 3 minutes.
Close the Hikvision tftp updater, delete the digicap.dev file from step 3 and make a copy of the Hikvision firmware to use for updating and name it digicap.dav.
Power down the camera. At this point the brickfixV2 tool has been installed but not yet activated. Power on the camera to activate the tool, it will then drop the payload, fix up mtdblock1 and reboot into min-system mode for telnet access.
Using PuTTY, start a telnet session to 192.0.0.64 and make sure the telnet radio button is selected. At the login prompt username=root password=12345. You should see a # prompt. The message "can't chdir to home directory '/root/'" isn't an error and can be ignored.
Start the normal tftp server (not the Hikvision tftp updater). If it's the jouinin.net version, the program is tftpd32.exe
At this point, Stage 1 of 3 is ready to be executed.
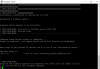
At the telnet command prompt, type:
/dav/fixup.sh
and watch the on-screen messages.
On success with Stage 1, check the PC folder that the tftp server is running in for the presence of the file 'mtd6ro_orig'. You may have to hit F5 to refresh. Make a copy of mtd6ro_orig rename to mtd6ro_mod. Do the 'enhanced mtd hack' on it, using the instructions in the spoiler below.
These are the steps that are used to do the 'enhanced mtd hack' to mtdblock6 in an R0 IP camera.
Extract a copy of mtdblock6 from the camera. The 'Brick-fixV2 tool / fixup script' will conveniently do this for you, or it could be done manually by other methods.
Make a copy of the mtdblock6 file and name it mtd6ro_mod
Check / change as needed the language byte at location 0x10 to ensure it is 01
Check the devType value in locations 0x64 and 0x65
[*]
If the value shown is FF98 - then the FF value needs to be replaced with the true numeric value. Ideally the true value is determined from the 'devType' line from the prtHardInfo shell command, but as that is going to be unavailable on a bricked camera use this (partial) cross-reference list, paying careful attention to the exact model number.
There is some slight uncertainty here - it would be good if any forum members could confirm / supplement the content.
Replace the FF in location 0x64 with the first 2 digits of the numeric devType value.
If location 0x64 already has a 2-digit numeric value, no change is needed.
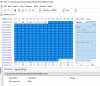
Starting at location 0x09, drag to select and highlight a length of F4 bytes, as shown he the HxD bottom status bar.
[*]
Using the Analysis / Checksum menu, double-click Checksum-16 to calculate the new checksum. This will show as a 2 byte value in the Checksums tab at the bottom of the screen. These need to be applied using the correct 'endian-ness', which is the reverse of how the values are presented on the screen.
The left hand byte (0x0C in the screenshot) is the most significant byte and should be used in location 0x05
The right hand byte (0x5F in the screenshot) is the least significant byte and should be used in location 0x04
Use your own just-calculated values - not those from the screenshot.
Click File | Save and the mtd6ro_mod file has had the 'enhanced mtd hack' and is ready to be applied to the camera.
This is done during Stage 2 of the fixup script in the brick-fixV2 tool.
Good luck!
At this point, Stage 2 of 3 is ready to be executed.
At the telnet command prompt, type:
/dav/fixup.sh
and watch the on-screen messages.
This will bring in the modified mtd6ro_mod and apply it to the camera to convert it to English / upgradeable.
At this point, Stage 3 of 3 is ready to be executed.
At the telnet command prompt, type:
/dav/fixup.sh
and watch the on-screen messages.
This will attempt a firmware update using the Hikvision firmware file digicap.dav that you placed in the same folder as the tftp server.
Assuming a successful result, shut down the tftp server and power cycle the camera. Interestingly, on testing I did find that a straight jump to the 5.4.5 firmware version worked OK. YMMV. But worth trying.
Start SADP and check for the camera presence running the firmware version used for the update.
If you used the 5.4.5 firmware, the camera will require 'activation' with your choice of strong password.
If already active, if earlier firmware was used for the upgrade, log in with the admin password=12345
Change the IP address to what you want the camera to use.
How To Upgrade
Rename the firmware to digicap.dav
Put the firmware under the same folder of this TFTP
Set the IP of computer as 192.0.0.128
Camera's IP can be anyone.
Run the tftpserv.exe
Power off and power on the DVR/DVS/IPC. The device will search the new firmware and upgrade it automatically.
Please wait until TFTP shows "Device [192.0.0.64] system update completed!" It takes about 5 minutes.
Close the TFTP before the camera reboots.
DVR/DVS/IPC will restart automatically after upgrading.
I have a bunch of DS-2CD6412FWD-20 that got unresponsive after upgrading from a 5.1.x firmware to 5.4.x version. Saw the warning in the firmware description to late... So they've been lying around since.
So now all are saved and working perfect again.
I've seen that also, have not tried it, and wondered why it appeared as the @bashis PoC tool showed that an R0 with 5.4.0 160530 was not vulnerable to the CVE-2021-36260 exploit


")